현재 홈 오토메이션 시장에서 사용할 수 있는 스마트 존재 센서로 인해 스마트 홈에 적합한 감지 센서를 실제로 선택해야 하는 불가피한 과제가 있습니다. 선택할 수 있는 모델과 변형이 너무 많으며, 그 중 다수는 매력적인 가격표에도 불구하고 완전히 쓰레기입니다. 지금까지 검토한 이 장치 게시물의 맨 아래에 전체 목록을 남겨 두겠습니다.
최근에 저는 CO2 모니터링 및 기타 여러 가지 흥미로운 기능/센서가 포함된 Apollo MSR-1 Prescence Multi-Sensor를 테스트했습니다. MSR-1은 뛰어난 기능과 사용자 정의가 가능하며 진정한 홈 오토메이션 애호가의 꿈으로 판명되었습니다. 내 리뷰에서 MSR-1이 제공하는 것을 확인하는 것이 좋습니다.
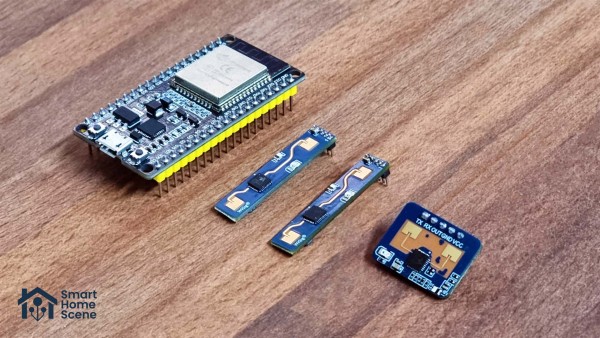
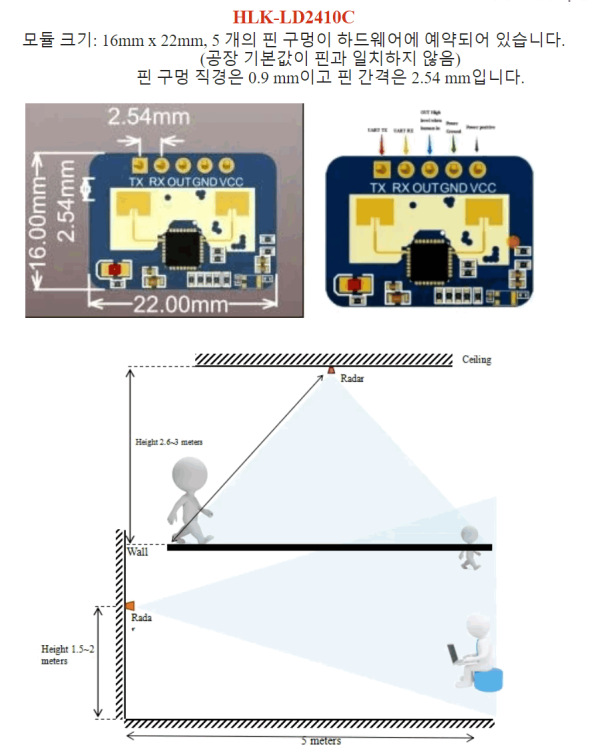
Apollo MSR-1은 24GHz Hi-Link HLK-LD2410b mmWave 레이더 센서를 기반으로 하며, 이는 동일한 유형의 다른 많은 장치(예: Moes ZSS-LP-HP02)에도 사용됩니다. 올바르게 코딩하면 오탐 또는 부정 트리거 없이 신뢰할 수 있는 존재 감지 장치로 전환할 수 있습니다.

이 기사에서는 HLK-LD2410 센서와 ESP32 보드를 기반으로 하는 간단한 존재 센서를 만들기 위한 DIY 가이드를 공유하며, 모두 ESPHome 및 Home Assistant를 통해 코딩됩니다.
https://smarthomescene.com/diy/diy-presence-sensor-with-hi-link-ld2410-and-esp32-for-home-assistant/
===============
적용소스>>> 적용 실패
https://github.com/rainchi/ESPHome-LD2410/blob/main/ld2410.yaml
esphome:
name: ld2410
includes:
- ld2410_uart.h
on_boot:
priority: 600
# ...
then:
- lambda: |-
auto uart_component = static_cast<LD2410 *>(ld2410);
uart_component->setNumbers(maxMovingDistanceRange, maxStillDistanceRange, noneDuration);
esp8266:
board: d1_mini
logger:
baud_rate: 0
api:
ota:
wifi:
ssid: !secret wifi_ssid
password: !secret wifi_password
ap:
ssid: "LD2410 Fallback Hotspot"
captive_portal:
uart:
id: uart123
tx_pin: TX
rx_pin: RX
baud_rate: 256000 # Change this according to your setting
parity: NONE
stop_bits: 1
debug:
direction: BOTH
dummy_receiver: false
after:
delimiter: [0xF8,0xF7,0xF6,0xF5]
custom_component:
- lambda: |-
return {new LD2410(id(uart123))};
components:
- id: ld2410
binary_sensor:
- platform: custom
lambda: |-
auto uart_component = static_cast<LD2410 *>(ld2410);
return {uart_component->hasTarget,uart_component->hasMovingTarget,uart_component->hasStillTarget,uart_component->lastCommandSuccess};
binary_sensors:
- name: "Has Target"
- name: "Has Moving Target"
- name: "Has Still Target"
- name: "Last Command Success"
sensor:
- platform: custom
lambda: |-
auto uart_component = static_cast<LD2410 *>(ld2410);
return {uart_component->movingTargetDistance,uart_component->movingTargetEnergy,uart_component->stillTargetDistance,uart_component->stillTargetEnergy,uart_component->detectDistance};
sensors:
- name: "Moving Target Distance"
unit_of_measurement: "cm"
accuracy_decimals: 0
- name: "Moving Target Energy"
unit_of_measurement: "%"
accuracy_decimals: 0
- name: "Still Target Distance"
unit_of_measurement: "cm"
accuracy_decimals: 0
- name: "Still Target Energy"
unit_of_measurement: "%"
accuracy_decimals: 0
- name: "Detect Distance"
unit_of_measurement: "cm"
accuracy_decimals: 0
number:
- platform: template
name: "Max Moving Distance Range"
id: maxMovingDistanceRange
min_value: 1
max_value: 8
step: 1
update_interval: never
optimistic: true
set_action:
- lambda: |-
auto uart_component = static_cast<LD2410 *>(ld2410);
uart_component->setMaxDistancesAndNoneDuration(x,id(maxStillDistanceRange).state,id(noneDuration).state);
- platform: template
name: "Max Still Distance Range"
id: maxStillDistanceRange
min_value: 1
max_value: 8
step: 1
update_interval: never
optimistic: true
set_action:
- lambda: |-
auto uart_component = static_cast<LD2410 *>(ld2410);
uart_component->setMaxDistancesAndNoneDuration(id(maxMovingDistanceRange).state,x,id(noneDuration).state);
- platform: template
name: "None Duration"
id: noneDuration
min_value: 0
max_value: 32767
step: 1
mode: box
update_interval: never
optimistic: true
set_action:
- lambda: |-
auto uart_component = static_cast<LD2410 *>(ld2410);
uart_component->setMaxDistancesAndNoneDuration(id(maxMovingDistanceRange).state,id(maxStillDistanceRange).state,x);
button:
- platform: template
name: "Reboot LD2410"
on_press:
lambda: 'static_cast<LD2410 *>(ld2410)->reboot();'
- platform: template
name: "Turn on config mode"
on_press:
- lambda: 'static_cast<LD2410 *>(ld2410)->setConfigMode(true);'
- platform: template
name: "Turn off config mode"
on_press:
- lambda: 'static_cast<LD2410 *>(ld2410)->setConfigMode(false);'
- platform: template
name: "Get config"
on_press:
- lambda: 'static_cast<LD2410 *>(ld2410)->queryParameters();'
- platform: template
name: "Set baud rate to 256000"
on_press:
- lambda: 'static_cast<LD2410 *>(ld2410)->setBaudrate(7);'
- platform: template
name: "Set baud rate to 115200"
on_press:
- lambda: 'static_cast<LD2410 *>(ld2410)->setBaudrate(5);'
- platform: template
name: "Set baud rate to 9600"
on_press:
- lambda: 'static_cast<LD2410 *>(ld2410)->setBaudrate(1);'
===============>
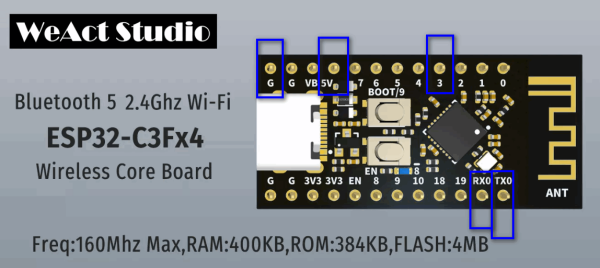
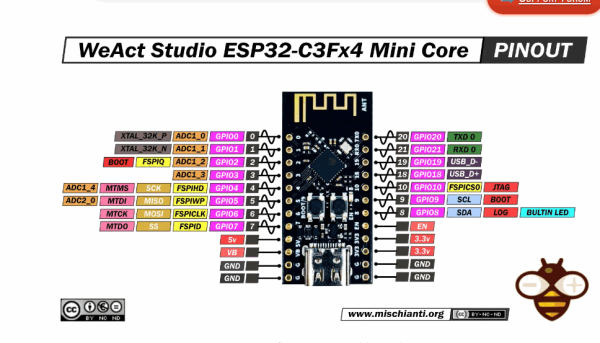
WeActStudio.ESP32C3CoreBoard 제품의 Rx Tx 의 출력 실패
다른 esp32로 진행 준비 합니다,
https://11q.kr 에 등록된 자료 입니다. ♠ 정보찾아 공유 드리며 출처는 링크 참조 바랍니다♠


