Loading...
팝업레이어 알림
HomePC.11q.kr
홈페이지
https://www.11q.kr
여러분의
11q.kr
방문을 환영 합니다
<★★★ 주의 ★★★>
모든 자료는
개인 보관 테스트 자료이며
본인 테스트외에 타사이트 공유 배포 사용 할수 없습니다.
수정공지 > 2025_1120_0050_34
인기검색어
haos
esphome
2410
인체감지
아미나
나리야
플러그인
zigbee
스킨
그누보드
부트스트랩
테마
스킨
위젯
애드온
메뉴
검색
HomePC.11q.kr
메인 메뉴
새글
커뮤니티
코딩게시판
자유게시판
갤러리
공지사항
QA
사이트연결
자료실_o
홈스테이션 카페
Previous
Next
cording
등록일
07.24
[올인원] Torque pro 어플 & OBD2 스캐너를 이용해 올인원 화면에 차량 정보 띄우기
등록일
07.22
haos의 core 업데이트 이버전 업데이트 하지 않음후 표시되지 않는 경우 다시 업데이트 하기 수정 방법
등록일
07.21
TubeMusicPlayer 유튜브 URL을 이용하여 HAOS 환경에서 음악을 구성하며, PC, 안드로이드, 차량 등 어느 장소
댓글
1
등록일
07.19
esp32-c6 직비로 LD2412 인체감 mmwave-out 단자이용 인체감지 센서 동작은 바이너리센서만 동작
등록일
07.17
Everything QuickLook DeepL 프로그램
등록일
07.17
비쥬얼 스투디오 터미널에서 chatgpt 연결하기
등록일
07.16
DisableSearchBoxSuggestions 을 윈도우 레지스터 편집기 웹검색을 제거하는 regedit 구성
free
등록일
07.23
1
일체형 변경 비데 조립 분해 방법
등록일
07.10
2
배경사진
등록일
06.28
3
Samsung 스마트 리모컨 (RMCRMM1AP1) 초기설정 메뉴얼 및 음성인식
등록일
06.02
4
🔥딱 한가지 기준으로 다 칠 수 있습니다🔥 | 1대2 삼각형 기준 | BEST모음집
등록일
05.30
5
아리사카 arisaka 2021 영화
등록일
05.29
6
충격적인↗45도 대칭 플러스투 설계법! 이런게 가능하다고?
등록일
05.25
7
혹시나.........
link
등록일
04.11
https://windowsforum.kr/
등록일
04.11
와우 라디오 - 한국 FM 라디오 어플 특징과 장점
등록일
04.08
2026년 최고의 토렌트 사이트 12곳 (100% 안전하고 작동 보장)
등록일
03.12
티맵다운로드 tmap download
등록일
01.27
오늘의집 우리아파트도면 만들기
등록일
01.16
esp32보드 정보 확인 메뉴얼 연결 platform-espressif32/tree/develop/boards 의 보드 정보 확인 하기
등록일
12.18
OpenBK7231T/OpenBeken은 최신 Tuya 기반 모듈을 위한 Tasmota/ESPHome 대체 애플리케이션
Gallery
W:\g5\theme\BS4-Basic\index\index-basic.php
구글 보이스 리모컨 G9N9N 블루투스 IR 스마트 구글 크롬캐스트 TV 셋톱박스용 구글 TV 호환
등록자
최고관리자
쪽지보내기
자기소개
전체게시물
쪽지보내기
자기소개
전체게시물
등록일
04.29
삼성에어컨 모델 정보
등록자
최고관리자
쪽지보내기
자기소개
전체게시물
쪽지보내기
자기소개
전체게시물
등록일
04.25
삼성.LG 에어컨 전용 통합 리코컨 다이소 5천원 제품 설정 사용방법
등록자
최고관리자
쪽지보내기
자기소개
전체게시물
쪽지보내기
자기소개
전체게시물
등록일
04.24
지져분한 사워장 면도 거울 2천원으로 간단수리 교체하기 및 김서림 방지 방법
등록자
최고관리자
쪽지보내기
자기소개
전체게시물
쪽지보내기
자기소개
전체게시물
등록일
04.04
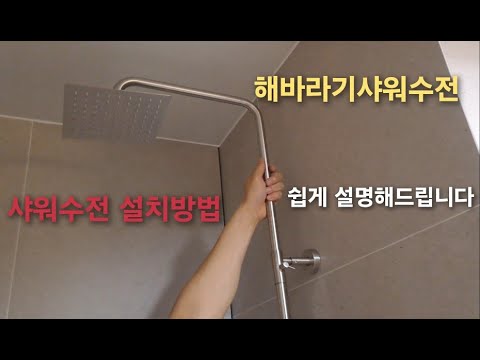
셀프리빙 고급형 해바라기 샤워기 스테인레스 수전 본체 무타공 [셀프영상 설치가능] 광교레이크스위첸아파트
등록자
최고관리자
쪽지보내기
자기소개
전체게시물
쪽지보내기
자기소개
전체게시물
등록일
04.02
오디오 믹서 구성) KDES KP4 오디오 믹서 4채널 99 DSP 이펙트 레코드 PC 48V 팬텀 파워 USB 사운드 믹서 블루투스 DJ 콘솔 카라오케 믹싱용
등록자
최고관리자
쪽지보내기
자기소개
전체게시물
쪽지보내기
자기소개
전체게시물
등록일
02.06
AK55 디지털 앰프 Bluetooth 사운드 앰프 가정용 자동차 가라오케 용 2 채널 HIFi FM USB 오디오 앰프
등록자
최고관리자
쪽지보내기
자기소개
전체게시물
쪽지보내기
자기소개
전체게시물
등록일
02.13
원피스 일체형 양변기 절수기 부속품 설치작업 성공 > WSG 40-60
댓글
1
등록자
최고관리자
쪽지보내기
자기소개
전체게시물
쪽지보내기
자기소개
전체게시물
등록일
01.24
cording2
등록일
03.09
웹사이트 로딩 속도 분석 및 PHP 실행 속도 개선
등록일
02.21
wavve 실시간 채널 앱
댓글
3
등록일
02.12
Claude Code 왕초보 입문 튜토리얼 23가지 팁 | 클로드코드 설치 사용법 50분 강의 완전정복 2026 가이드
등록일
02.02
시놀로지 NAS 시스템 모니터링 mqtt 구축 센서 구성하기
등록일
12.28
ESP32-S3 AI 스마트 스피커 개발 보드, 온보드 듀얼 디지털 마이크 어레이, 소음 감소 및 에코 제거 지원
등록일
11.28
티맵 자동실행후 지도화면으로이동및 부팅앱을 macrodroid 매크로 동작 자동실행
등록일
11.09
이모지 😀 😃 😄 😁 시놀로지 MariaDB + 그누보드 이모지(utf8mb4) 적용 전체 정리
댓글
1
sw
등록일
07.15
7/20) 뮤직자동on/off 개선 carnavi-11-4-2-3880_cargps_260720.apk
댓글
28
등록일
06.23
musictoggle_ver_011.apk
댓글
1
등록일
06.23
정보■ AB Launcher v1.0.5 업데이트 요약 (2026-06-22)
댓글
4
등록일
06.19
7/2🚗CarNavi_260702🛻/cargps6/id/광고/10분/안전운전/GPSui/0k/icon/uptime/gps감도표시 off 가능
댓글
41
등록일
05.23
크로미움 사용자 마스터 1.1
등록일
05.15
5/26일 9차) 고속도로 위성감도 표시 차량아이콘과 겹침 위치 이동
댓글
36
등록일
05.14
ab카런처 사용기 및 정보 v0.1.16 업데이트 안내 및 musictoggle.apk 앱 개발 공유 a.b카런처 활용
댓글
5
menber1
등록일
11.11
4구 장타의 깨달음을 주는 모아치기 내비게이션 모음.ZIP -아빌534회
주요 사이트 이동
아이디
필수
비밀번호
필수
로그인
자동로그인
회원가입
정보찾기
공지글
등록일
01.17
인증메일 오지 않으면 네이버카페 홈스테이션 방문 채팅 해주세요
등록일
12.12
광고 도배 주의 경고 합니다>>광고 차단 리스트 공유
등록일
11.08
에디터 기본 summernote 0.90 그누보드 웨지익 에디터 사용중입니다
등록일
11.06
php 8.2 로 dsm 지원으로 변경 되어 홈피 수정 작업
등록일
09.24
홈피 가입시 이메일 인증 합니다
최근글
등록일
07.24
[올인원] Torque pro 어플 & OBD2 스캐너를 이용해 올인원 화면에 차량 정보 띄우기
등록일
07.23
일체형 변경 비데 조립 분해 방법
등록일
07.22
haos의 core 업데이트 이버전 업데이트 하지 않음후 표시되지 않는 경우 다시 업데이트 하기 수정 방법
등록일
07.21
TubeMusicPlayer 유튜브 URL을 이용하여 HAOS 환경에서 음악을 구성하며, PC, 안드로이드, 차량 등 어느 장소
댓글
1
등록일
07.19
esp32-c6 직비로 LD2412 인체감 mmwave-out 단자이용 인체감지 센서 동작은 바이너리센서만 동작
등록일
07.17
Everything QuickLook DeepL 프로그램
등록일
07.17
비쥬얼 스투디오 터미널에서 chatgpt 연결하기
새댓글
W:\g5\theme\BS4-Basic\side\side-index.php
등록자
지성준
등록일
07.24
현재 제가 사용하고 있는 티맵 버전은 7월 2일자 버전입니다
등록자
최고관리자
등록일
07.24
버전은 무엇인가요
등록자
지성준
등록일
07.23
비밀댓글입니다.
등록자
김태용
등록일
07.23
감사합니다
등록자
문용승
등록일
07.23
비밀댓글입니다.
등록자
김성훈
등록일
07.22
감사합니다
등록자
남상집
등록일
07.21
감사합니다