★ HA작업) DIY 가정용 에너지 모니터를 HAOS 에 연결 구동 준비: ESP32 + Clamp SCT-013-000 센서
♨ 카랜더 일정 :
2023년08월09일
본문
● HA작업) DIY 가정용 에너지 모니터를 HAOS 에 연결 구동 준비 회로구성: ESP32 + Clamp SCT-013-000 센서 로


streo jack pcb용과 아답터 겸용으로 제작


https://11q.kr/www/bbs/board.php?bo_table=co3&wr_id=1213
구성 하였습니다


전력 전류 투닝은 전류로 설정기준으로 한다
기본적으로 계측기가 있어야 합니다

상기 측정값 기준으로 전류만 동일하게 맞추면 됩니다
esp32 수정 인스톨 3.7일때 알마 인가 확인 합니다
주) 전원공급 아답터 변경시 전압차이로 전류 측정값이 상이해 집니다

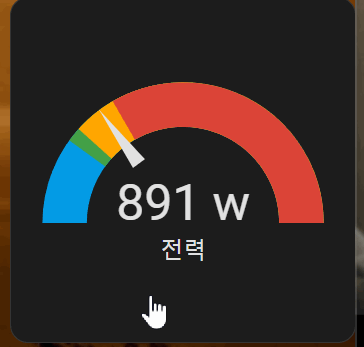
하나더 esp32 로 사용전력 표시 모니터링1

esp32 로 사용전력 표시 모니터링2

box 케이스 구입정보

HAOS 설정 사례
모든에너지미터는 상대비교 측정치에 맞게 비례 구성해야 합니다
예측 에너지미터 입니다
기본 회로에 저항값을 어느곳에서 측정하는 곳에 따라 변경 되어야하고
esp32-haos에서 비례값을 구성을 위하여 에너지 측정기계가 있어 계측 해야 합니다


정보는 >>>> 설정 > 대시보드 > 에너지 >> 시작하는 방법 알아보기

간단 전력 에너지미터 자작 diy 구성 구입정보
1) esp32 - 30pin 의 구입 pin 정보

https://makerspace.steamedu123.com/entry/ESP32-ESP32-%EC%95%84%EB%91%90%EC%9D%B4%EB%85%B8-IDE-%EC%97%90%EC%84%9C-%EC%82%AC%EC%9A%A9%ED%95%98%EA%B8%B0

새 버전!
Win10 시스템 자동 설치 드라이브
높은 baud 속도를 지원합니다. 더 나은 안정성.
ESP32 개발 보드 CH9102X WiFi + 블루투스 초저전력 소비 듀얼 코어 ESP-32 ESP-32S 유사
ESP32 는 이미 안테나와 RF balun, 전력 증폭기, 저소음 증폭기, 필터,
및 전원 관리 모듈. 전체 솔루션은 인쇄 회로 기판 영역의 최소 금액을 차지합니다.
이 보드는 TSMC 40nm 저전력 기술에 의해 2.4 GHz 듀얼 모드 Wi-Fi 및 블루투스 칩과 함께 사용되며,
전력 및 RF 속성으로, 안전하고 신뢰할 수 있으며 다양한 애플리케이션에 확장 가능합니다.
특징:
고성능-가격 비율
작은 볼륨, 다른 제품에 쉽게 내장
LWIP 프로토콜을 지원하는 강력한 기능, Freertos
AP, STA 및 AP + STA의 세 가지 모드 지원
쉽게 개발할 수있는 Lua 프로그램 지원
Win10 시스템 자동 설치 드라이브
높은 baud 속도를 지원합니다. 더 나은 안정성.
ESP32 개발 보드 CH9102X WiFi + 블루투스 초저전력 소비 듀얼 코어 ESP-32 ESP-32S 유사
ESP32 는 이미 안테나와 RF balun, 전력 증폭기, 저소음 증폭기, 필터,
및 전원 관리 모듈. 전체 솔루션은 인쇄 회로 기판 영역의 최소 금액을 차지합니다.
이 보드는 TSMC 40nm 저전력 기술에 의해 2.4 GHz 듀얼 모드 Wi-Fi 및 블루투스 칩과 함께 사용되며,
전력 및 RF 속성으로, 안전하고 신뢰할 수 있으며 다양한 애플리케이션에 확장 가능합니다.
2. ct-cramp 전류 센서 구입 정보
SCT-013-000 10A 20A 30A 50A 60A 100A 비 침습성 분할 코어 전류 변압기 AC 전류 센서

Model : SCT013
Frequency : 50HZ-150KHZ
Retractable transformer SCT-013 Rated Input Current : 100A Model : SCT-013 Rated Input Current : 60A / 100A
Features :
Opening size:
13mm × 13mm, is fully compatible with similar foreign products ; non-linearity of ± 3% (10% ~ 120% of rated input current ) ; lead length 1.5 m , the standard three-pin plug Φ3.5 output ; current, voltage, two output forms ( built- shaped output voltage sampling resistor ) .
Uses:
Current measurement for AC motors, lighting equipment , air compressor , monitoring and protection. Core material : ferrite mechanical strength : opening and closing times of not less than 1000 times (20 °c test )
Safety indicators : Dielectric strength ( between housing and output ) 6000V AC / 1min retardant characteristics meet UL94-V0
Operating temperature : -25 ° C~ + 70 °C


3. 부품 회로 구성정보

1.가정의 배전반 입력단에 최적 로드저항은 33옴 ~100옴 >> 50옴 결정 (또는 100옴 2개 병렬)
2.저항 R1 및 R2에 적합한 값 선택>> 10k 2개
3.전해콘덴서 : 10uF
배선 > 5V ,gnd, gpio34 와 L단자( audio jack 의 GND에 L 연결 , 맨끝단자 k 연결 )
부품 구입은
https://ko.aliexpress.com/item/1005003245581546.html

사용사례 정보
CT 센서 - Arduino와의 인터페이스 정보
CT 센서를 Arduino에 연결하려면 CT 센서의 출력 신호가 Arduino 아날로그 입력의 입력 요구 사항(예: 0V와 ADC 기준 전압 사이의 양의 전압)을 충족하도록 조절해야 합니다.
메모: 이 페이지에서는 예를 제공합니다.amp5V에서 작동하는 Arduino 기판과 3.3V에서 작동하는 EmonTx의 e. 설정에 해당하는 계산에서 올바른 공급 전압 및 바이어스 전압을 사용해야 합니다.
이것은 두 가지 주요 부분으로 구성된 다음 회로로 달성할 수 있습니다.
CT 센서 및 부담 저항기
바이어싱 전압 분배기(R1 & R2)
적절한 부담 저항 크기 계산> 어디에 연결할 목적인가 ( 배전반 ,가전제품)
1.가정의 배전반 입력단에 최적 로드저항은 33옴 ~100옴 >>50옴
을 아래 링크에서 계산하세요
1) 선풍기 에너지미터 측정하고 >> 배전반의 가정전체의 에너지측정은 상이한 값이 나옴니다
2) 적절한 저항을 구성하여 연결해야 합니다.==> 배전반의 전력 측정을 현재 current 값
https://tyler.anairo.com/projects/open-energy-monitor-calculator
CT 전선 중 하나를 접지에 연결하고 접지를 기준으로 두 번째 전선의 전압을 측정하면 전압은 접지에 대해 양극에서 음수로 변합니다. 그러나 Arduino 아날로그 입력에는 양의 전압이 필요합니다. 접지에 연결한 CT 리드를 공급 전압의 절반에 있는 소스에 연결하면 CT 출력 전압이 이제 2.5V 위아래로 스윙하여 양수로 유지됩니다.
위의 회로도에서 저항 R1 및 R2는 2.5V 소스(emonTx의 경우 1.65V)를 제공하는 전압 분배기입니다. 커패시터 C1은 리액턴스(수백 옴)가 낮고 교류가 저항을 우회할 수 있는 경로를 제공합니다. 10μF의 값이 적합합니다.
2.저항 R1 및 R2에 적합한 값 선택>> 10k
저항이 높을수록 대기 에너지 소비가 줄어듭니다.
우리는 주 전원 모니터에 10kΩ 저항을 사용합니다.
로드저항은 아레 문서 링크에서 확인 사용처에 맞게 사용하세요
3.전해콘덴서 : 10uF
추가 github 정보
https://github.com/danpeig/ESP32EnergyMonitor

관련정보
https://tyler.anairo.com/projects/open-energy-monitor-calculator
https://docs.openenergymonitor.org/electricity-monitoring/ct-sensors/interface-with-arduino.html
https://www.speaktothegeek.co.uk/2022/08/esphome-ct-clamp-power-and-energy-monitor/
https://community.home-assistant.io/t/ct-clamp-sensor-interference-on-esp32-adc/450366
으 정보에서 아래 내용을 확인하세요
내 특정 문제에 대한 해결책이 있으므로 업데이트합니다.
문제는 일반적인 YHDC 클램프 센서의 다른 버전 간의 차이점에 있습니다.
모델 번호가 SCT-013-xxx인 대부분의 저전류 센서에는 부담 저항기가 내장되어 있습니다(SCT-013-030, SCT-013-050).
그러나 이 센서의 100A 버전인 SCT-013-000에는 부담 저항기가 포함되어 있지 않습니다!
뷰PDF 1,2
office view
관련자료
-
링크
-
이전
-
다음
댓글목록

11qkr님의 댓글
11qkr님의 댓글
- 0.0344 -> 0.000
- 1.6420 -> 4.800
1k 로드저항
10uF + 10K +10K + 3.2v
11qkr님의 댓글
# 온도보정 추가 20230725_1337_47
esphome:
name: bme680
friendly_name: BME680
esp32:
board: esp32dev
framework:
type: arduino
# Enable logging
logger:
# Enable Home Assistant API
api:
encryption:
key: "WXaMoHvvUtRmsLoA2g/ZMWWrWdd??????"
ota:
password: "eb5841dd5390de633d4e8????????1f5"
wifi:
ssid: !secret wifi_ssid
password: !secret wifi_password
# Enable fallback hotspot (captive portal) in case wifi connection fails
ap:
ssid: "Bme680 Fallback Hotspot"
password: "3SOGNSBVbqxK"
captive_portal:
# ==========================================
binary_sensor:
- platform: gpio
pin: GPIO2
name: "PIR_Sensor"
device_class: motion
id: pin_d2
i2c:
scl: GPIO22
sda: GPIO21
time:
- platform: homeassistant
id: homeassistant_time
timezone: Asia/Seoul
sensor:
- platform: bme680
temperature:
name: "BME680 Temperature"
oversampling: 16x
filters:
- calibrate_linear:
- 0 -> 0
- 32.0 -> 31.3
pressure:
name: "BME680 Pressure"
humidity:
name: "BME680 Humidity"
filters:
- calibrate_linear:
- 0 -> 0
- 0.72 -> 0.66
gas_resistance:
name: "BME680 Gas Resistance"
address: 0x77
update_interval: 60s
- platform: homeassistant
id: temperature
entity_id: sensor.bme680_bme680_temperature
internal: true
- platform: homeassistant
id: humidity
entity_id: sensor.bme680_bme680_humidity
internal: true
# ======================
# ct_clamp connection at esp32
# ======================
- platform: adc
pin: GPIO34
id: adc_sensor
accuracy_decimals: 5
attenuation: 11db
update_interval: 10s
# update_interval: 3s
- platform: ct_clamp
sensor: adc_sensor
name: "raw"
update_interval: 10s
accuracy_decimals: 3
- platform: ct_clamp
sensor: adc_sensor
sample_duration: 300ms
name: "Electricity usage_current(A)"
update_interval: 10s
accuracy_decimals: 5
# value as per power plug
filters:
- calibrate_linear:
- 0.0230 -> 0.000
- 1.6000 -> 4.000
- platform: ct_clamp
sensor: adc_sensor
sample_duration: 300ms
name: "Electricity usage_Power(W)"
id: esp_watts
update_interval: 10s
accuracy_decimals: 5
filters:
- calibrate_linear:
- 0.0230 -> 0.000
- 1.6000 -> 4.000
- lambda: return x * 220.0 / 1;
unit_of_measurement: "W"
# value as per power plug current와 동일하게 여까지 구성
# - 0.0344 -> 0.000
# - 1.6420 -> 4.800
# 1k 로드저항
# 10uF + 10K +10K + 3.2v
# 선풍기 25w 30w 37w 테스트
- platform: total_daily_energy # This sensor will give you a Daily kW reading
name: "Total Daily Energy"
unit_of_measurement: 'kWh'
power_id: esp_watts
accuracy_decimals: 5
filters:
device_class: energy
# Homeassistant 통합구성요소에서 680검색
- platform: homeassistant
id: raw
entity_id: sensor.bme680_raw
internal: true
- platform: homeassistant
id: current
entity_id: sensor.bme680_electricity_usage_currenta
internal: true
- platform: homeassistant
id: power
entity_id: sensor.bme680_electricity_usage_powerw
internal: true
- platform: homeassistant
id: daily_energy
entity_id: sensor.bme680_total_daily_energy
internal: true
# I’m surprised and impressed just how accurate this is.
# As of writing this, its been running for almost 24 hours now and
# ==============================
# ========================
display:
- platform: lcd_pcf8574
dimensions: 20x4
address: 0x27
id: mydisplay
user_characters:
- position: 1
data:
- 0b00000
- 0b00010
- 0b00101
- 0b00010
- 0b00000
- 0b00000
- 0b00000
- 0b00000
- position: 2
data:
- 0b01000
- 0b10101
- 0b01011
- 0b00110
- 0b01100
- 0b11010
- 0b10101
- 0b00110
lambda: |-
it.print(0, 0, "680 P>");
it.printf(7, 0, "%.1fW", id(power).state);
it.printf(14, 0, "%.1fKWH", id(daily_energy).state);
it.printf(0, 1, "raw > %.5f A", id(raw).state);
it.printf(0, 2, "current > %.5f A", id(current).state);
it.printf(0, 3, "Temp > %.1f C", id(temperature).state);
it.printf(11, 3, "\x01");
it.printf(14, 3, "%.1f ", id(humidity).state);
it.printf(18, 3, "\x02");
# it.strftime(0, 1, "Date > %Y-%b-%d", id(homeassistant_time).now());
# it.strftime(0, 2, "Time > %H:%M %a", id(homeassistant_time).now());
# https://esphome.io/components/display/lcd_display.html
# https://esphome.io/components/sensor/bme680.html?highlight=bme680
# 20230722_2101_38
11qkr님의 댓글
# https://esphome.io/components/display/lcd_display.html
# https://esphome.io/components/sensor/bme680.html?highlight=bme680
# https://docs.openenergymonitor.org/electricity-monitoring/ct-sensors/interface-with-arduino.html
# https://www.speaktothegeek.co.uk/2022/08/esphome-ct-clamp-power-and-energy-monitor/
# https://community.home-assistant.io/t/energy-tracking-with-esp32-ct-clamp-sensor-from-an-efergy-elite-1-0r/344002
# 20230810_1322_51
11qkr님의 댓글
11qkr님의 댓글
captive_portal:
# ==========================================
# esp32 초기설치후 추가영역
# ==========================================
binary_sensor:
- platform: gpio
pin: GPIO2
name: "PIR_Sensor"
device_class: motion
id: pin_d2
i2c:
scl: GPIO22
sda: GPIO21
time:
- platform: homeassistant
id: homeassistant_time
timezone: Asia/Seoul
sensor:
- platform: bme680
temperature:
name: "BME680 Temperature"
oversampling: 16x
filters:
- calibrate_linear:
- 0 -> 0
- 32.0 -> 31.3
pressure:
name: "BME680 Pressure"
humidity:
name: "BME680 Humidity"
filters:
- calibrate_linear:
- 0 -> 0
- 0.72 -> 0.66
gas_resistance:
name: "BME680 Gas Resistance"
address: 0x77
update_interval: 60s
- platform: homeassistant
id: temperature
entity_id: sensor.bme680_bme680_temperature
internal: true
- platform: homeassistant
id: humidity
entity_id: sensor.bme680_bme680_humidity
internal: true
# ======================
# ct_clamp connection at esp32
# ======================
- platform: adc
pin: GPIO34
id: adc_sensor
accuracy_decimals: 5
attenuation: 11db
update_interval: 10s
# update_interval: 3s
- platform: ct_clamp
sensor: adc_sensor
name: "raw"
update_interval: 10s
accuracy_decimals: 3
- platform: ct_clamp
sensor: adc_sensor
sample_duration: 300ms
name: "Electricity usage_current(A)"
update_interval: 10s
accuracy_decimals: 5
# value as per power plug
filters:
- calibrate_linear:
- 0.0230 -> 0.000
- 1.6000 -> 4.000
- platform: ct_clamp
sensor: adc_sensor
sample_duration: 300ms
name: "Electricity usage_Power(W)"
id: esp_watts
update_interval: 10s
accuracy_decimals: 5
filters:
- calibrate_linear:
- 0.0230 -> 0.000
- 1.6000 -> 4.000
- lambda: return x * 220.0 / 1;
unit_of_measurement: "W"
# value as per power plug current와 동일하게 여까지 구성
# - 0.0344 -> 0.000
# - 1.6420 -> 4.800
# 1k 로드저항
# 10uF + 10K +10K + 3.2v
# 선풍기 25w 30w 37w 테스트
- platform: total_daily_energy # This sensor will give you a Daily kW reading
name: "Total Daily Energy"
unit_of_measurement: 'kWh'
power_id: esp_watts
accuracy_decimals: 5
filters:
device_class: energy
# Homeassistant 통합구성요소에서 680검색
- platform: homeassistant
id: raw
entity_id: sensor.bme680_raw
internal: true
- platform: homeassistant
id: current
entity_id: sensor.bme680_electricity_usage_currenta
internal: true
- platform: homeassistant
id: power
entity_id: sensor.bme680_electricity_usage_powerw
internal: true
- platform: homeassistant
id: daily_energy
entity_id: sensor.bme680_total_daily_energy
internal: true
# I’m surprised and impressed just how accurate this is.
# As of writing this, its been running for almost 24 hours now and
# ==============================
# ========================
display:
- platform: lcd_pcf8574
dimensions: 20x4
address: 0x27
id: mydisplay
user_characters:
- position: 1
data:
- 0b00000
- 0b00010
- 0b00101
- 0b00010
- 0b00000
- 0b00000
- 0b00000
- 0b00000
- position: 2
data:
- 0b01000
- 0b10101
- 0b01011
- 0b00110
- 0b01100
- 0b11010
- 0b10101
- 0b00110
lambda: |-
it.print(0, 0, "680 P>");
it.printf(7, 0, "%.1fW", id(power).state);
it.printf(14, 0, "%.1fKWH", id(daily_energy).state);
it.printf(0, 1, "raw > %.5f A", id(raw).state);
it.printf(0, 2, "current > %.5f A", id(current).state);
it.printf(0, 3, "Temp > %.1f C", id(temperature).state);
it.printf(11, 3, "\x01");
it.printf(14, 3, "%.1f ", id(humidity).state);
it.printf(18, 3, "\x02");
# it.strftime(0, 1, "Date > %Y-%b-%d", id(homeassistant_time).now());
# it.strftime(0, 2, "Time > %H:%M %a", id(homeassistant_time).now());
# https://esphome.io/components/display/lcd_display.html
# https://esphome.io/components/sensor/bme680.html?highlight=bme680
# https://docs.openenergymonitor.org/electricity-monitoring/ct-sensors/interface-with-arduino.html
# https://www.speaktothegeek.co.uk/2022/08/esphome-ct-clamp-power-and-energy-monitor/
# https://community.home-assistant.io/t/energy-tracking-with-esp32-ct-clamp-sensor-from-an-efergy-elite-1-0r/344002
# 20230810_1322_51
11qkr님의 댓글
11qkr님의 댓글
11qkr님의 댓글
Happy Box 해피박스 휴대용 플라스틱 케이스 #55 다용도 정리 보관 박스 #55
https://www.coupang.com/vp/products/6908630800?vendorItemId=83825798104&sourceType=MyCoupang_my_orders_list_product_title&isAddedCart=
11qkr님의 댓글
# 온도보정 추가 20230813_0012_18
esphome:
name: energymeterip67
friendly_name: energymeterip67
esp32:
board: esp32dev
framework:
type: arduino
# Enable logging
logger:
# Enable Home Assistant API
api:
encryption:
key: "WXaMoHvvUtRmsLoA2g/ZMWWrW2p7????ABtc="
ota:
password: "eb5841dd5390de633???????a5e1f5"
wifi:
ssid: !secret wifi_ssid
password: !secret wifi_password
# Optional manual IP
manual_ip:
static_ip: 192.168.0.67
gateway: 192.168.0.1
subnet: 255.255.255.0
dns1: 8.8.8.8
dns2: 8.8.4.4
# Enable fallback hotspot (captive portal) in case wifi connection fails
ap:
ssid: "Bme680 Fallback Hotspot"
password: "3SO???bqxK"
captive_portal:
# ==========================================
time:
- platform: homeassistant
id: homeassistant_time
timezone: Asia/Seoul
sensor:
# ================================
# ct_clamp connection at esp32
# ================================
- platform: adc
pin: GPIO34
id: adc_sensor
accuracy_decimals: 4
attenuation: 11db
update_interval: 10s
- platform: ct_clamp
sensor: adc_sensor
name: "raw"
update_interval: 10s
accuracy_decimals: 4
- platform: ct_clamp
sensor: adc_sensor
sample_duration: 300ms
name: "Electricity usage_current(A)"
update_interval: 10s
accuracy_decimals: 1
filters:
- calibrate_linear:
- 0.0 -> 0.0
- 0.1146 -> 4.8
- platform: ct_clamp
sensor: adc_sensor
sample_duration: 300ms
name: "Electricity usage_Power(W)"
id: esp_watts
update_interval: 10s
accuracy_decimals: 0
filters:
- calibrate_linear:
- 0.0 -> 0.0
- 0.1146 -> 4.8
- lambda: return x * 220.0 / 1;
unit_of_measurement: "W"
- platform: total_daily_energy
name: "Total Daily Electricity"
unit_of_measurement: 'Wh'
power_id: esp_watts
accuracy_decimals: 0
filters:
device_class: energy
# Homeassistant 통합구성요소에서 680검색
- platform: homeassistant
id: raw
entity_id: sensor.energymeterip67_raw
internal: true
- platform: homeassistant
id: current
entity_id: sensor.energymeterip67_electricity_usage_currenta
internal: true
- platform: homeassistant
id: power
entity_id: sensor.energymeterip67_electricity_usage_powerw_2
internal: true
- platform: homeassistant
id: daily_energy
entity_id: sensor.energymeterip67_total_daily_electricity
internal: true
# https://esphome.io/components/display/lcd_display.html
# https://esphome.io/components/sensor/bme680.html?highlight=bme680
# https://docs.openenergymonitor.org/electricity-monitoring/ct-sensors/interface-with-arduino.html
# https://www.speaktothegeek.co.uk/2022/08/esphome-ct-clamp-power-and-energy-monitor/
# https://community.home-assistant.io/t/energy-tracking-with-esp32-ct-clamp-sensor-from-an-efergy-elite-1-0r/344002
# https://community.home-assistant.io/t/ct-clamp-sensor-interference-on-esp32-adc/450366/2
# 20230810_1322_51
11qkr님의 댓글
11qkr님의 댓글
# 전류 least_squares 적용 20230908_1528_51
esphome:
name: energymeterip67
friendly_name: energymeterip67
esp32:
board: esp32dev
framework:
type: arduino
# Enable logging
logger:
# Enable Home Assistant API
api:
encryption:
key: "WXaMoHvvUtRmsLoA2g/ZMWWrW2p7CT???????"
ota:
password: "eb5841dd539?????????????"
wifi:
ssid: !secret wifi_ssid
password: !secret wifi_password
# Optional manual IP
manual_ip:
static_ip: 192.168.0.67
gateway: 192.168.0.1
subnet: 255.255.255.0
dns1: 8.8.8.8
dns2: 8.8.4.4
# Enable fallback hotspot (captive portal) in case wifi connection fails
ap:
ssid: "Bme680 Fallback Hotspot"
password: "3SOGNSBVbqxK"
captive_portal:
# ==========================================
time:
- platform: homeassistant
id: homeassistant_time
timezone: Asia/Seoul
# --------------------------------
# binary_sensor:
# - platform: gpio
# pin: GPIO2
# name: "PIR_Sensor"
# device_class: motion
# id: pin_d2
# i2c:
# scl: GPIO22
# sda: GPIO21
sensor:
# - platform: bme680
# temperature:
# name: "BME680 Temperature"
# oversampling: 16x
# filters:
# - calibrate_linear:
# - 0 -> 0
# - 32.0 -> 30.0
# pressure:
# name: "BME680 Pressure"
# humidity:
# name: "BME680 Humidity"
# filters:
# - calibrate_linear:
# - 0 -> 0
# - 0.530 -> 0.520
# gas_resistance:
# name: "BME680 Gas Resistance"
# address: 0x77
# update_interval: 60s
# ================================
# ct_clamp connection at esp32
# ================================
- platform: adc
pin: GPIO34
id: adc_sensor
accuracy_decimals: 3
attenuation: 11db
update_interval: 10s
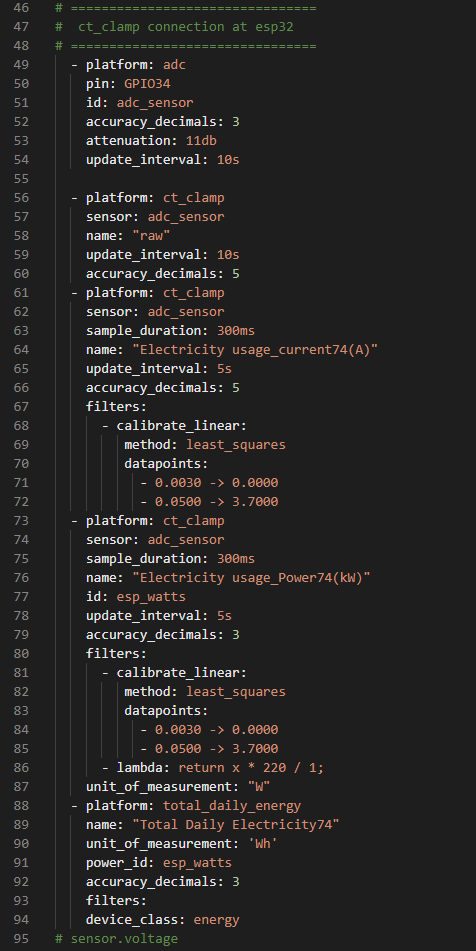
- platform: ct_clamp
sensor: adc_sensor
name: "raw"
update_interval: 10s
accuracy_decimals: 3
- platform: ct_clamp
sensor: adc_sensor
sample_duration: 300ms
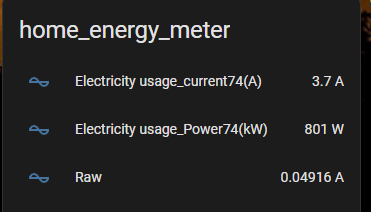
name: "Electricity usage_current67(A)"
update_interval: 5s
accuracy_decimals: 3
filters:
- calibrate_linear:
method: least_squares
datapoints:
- 0.0030 -> 0.0000
- 0.1146 -> 4.8000
- platform: ct_clamp
sensor: adc_sensor
sample_duration: 300ms
name: "Electricity usage_Power67(kW)"
id: esp_watts
update_interval: 5s
accuracy_decimals: 3
filters:
- calibrate_linear:
method: least_squares
datapoints:
- 0.0030 -> 0.0000
- 0.1146 -> 4.8000
- lambda: return x * 220 / 1;
unit_of_measurement: "W"
- platform: total_daily_energy
name: "Total Daily Electricity67"
power_id: esp_watts
accuracy_decimals: 3
filters:
- lambda: return x / 1;
device_class: energy
unit_of_measurement: 'Wh'
# sensor.voltage
# Homeassistant 통합구성요소에서 검색
- platform: homeassistant
id: raw
entity_id: sensor.energymeterip67_raw
internal: true
- platform: homeassistant
id: current
entity_id: sensor.energymeterip67_electricity_usage_current67a
internal: true
- platform: homeassistant
id: power
entity_id: sensor.energymeterip67_electricity_usage_power67kw
internal: true
- platform: homeassistant
id: daily_energy
entity_id: sensor.energymeterip67_total_daily_electricity67
internal: true
# display:
# - platform: lcd_pcf8574
# dimensions: 20x4
# address: 0x27
# id: mydisplay
# user_characters:
# - position: 1
# data:
# - 0b00000
# - 0b00010
# - 0b00101
# - 0b00010
# - 0b00000
# - 0b00000
# - 0b00000
# - 0b00000
# - position: 2
# data:
# - 0b01000
# - 0b10101
# - 0b01011
# - 0b00110
# - 0b01100
# - 0b11010
# - 0b10101
# - 0b00110
# lambda: |-
# it.strftime(0, 0, "Time > %H:%M-%S %a", id(homeassistant_time).now());
# it.strftime(0, 1, "Date > %Y-%b-%d", id(homeassistant_time).now());
# it.printf(0, 2, "Power> %.3f kW", id(power).state);
# it.printf(15, 2, ">%.1f", id(current).state);
# it.printf(0, 3, "Temp1> %.1f C", id(temperature).state);
# it.printf(11, 3, "\x01");
# it.printf(14, 3, "%.1f ", id(humidity).state);
# it.printf(18, 3, "\x02");
# https://esphome.io/components/display/lcd_display.html
# https://esphome.io/components/sensor/bme680.html?highlight=bme680
# https://docs.openenergymonitor.org/electricity-monitoring/ct-sensors/interface-with-arduino.html
# https://www.speaktothegeek.co.uk/2022/08/esphome-ct-clamp-power-and-energy-monitor/
# https://community.home-assistant.io/t/energy-tracking-with-esp32-ct-clamp-sensor-from-an-efergy-elite-1-0r/344002
# https://community.home-assistant.io/t/ct-clamp-sensor-interference-on-esp32-adc/450366/2
# https://11q.kr/www/bbs/board.php?bo_table=co3&wr_id=1201
# 20230908_1529_40
♥간단_메모글♥
-
등록일 04.15가입 인사드립니다.댓글 2
-
등록일 04.09가입인사.댓글 2
-
등록일 03.03안녕하세여댓글 1
-
등록일 02.13
최근글
새댓글
-
등록자 권오삼 등록일 02:19
-
등록자 민준아빠 등록일 05.04
-
등록자 민준아빠 등록일 05.04
-
등록자 11qkr 등록일 05.04
-
등록자 11qkr 등록일 05.03
오늘의 홈 현황
QR코드
☞ QR코드 스캔은 kakao앱 자체 QR코드