데비안 10 rc.local 추가 파일 생성 실행파일 만들기
♨ 카랜더 일정 :
본문
데비안 10 rc.local 추가 파일 생성 실행파일 만들기
최신 데비안 버전에서는 /etc/rc.local 파일이 더 이상 사용되지 않지만
여전히 의존하는 스크립트 나 응용 프로그램에 systemd를 사용하여 다시 추가 할 수 있습니다.
이것은 올바른 방법이 아니며 스크립트 또는 응용 프로그램에 대한 서비스를 만들어야 할 수도 있지만
아직 모든 것을 마이그레이션하는 데 시간을 보내고 싶지 않으면 rc.local을 추가하면됩니다.
데비안 10으로 파일을 다시 보냅니다.
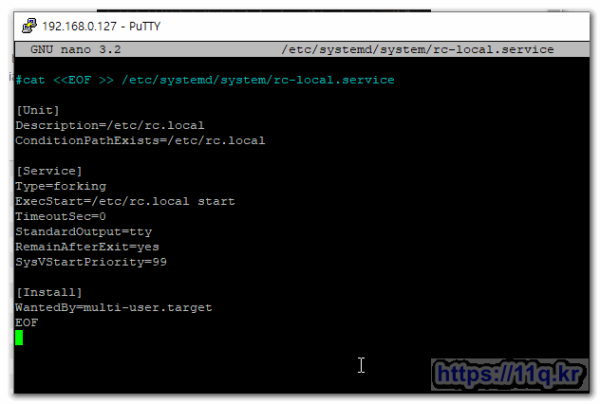
먼저 서비스 파일을 만들어야합니다 :
cat <<EOF >> /etc/systemd/system/rc-local.service
[Unit]
Description=/etc/rc.local
ConditionPathExists=/etc/rc.local
[Service]
Type=forking
ExecStart=/etc/rc.local start
TimeoutSec=0
StandardOutput=tty
RemainAfterExit=yes
SysVStartPriority=99
[Install]
WantedBy=multi-user.target
EOF
------------
파일 내용 추가
root@localhost:~# nano /etc/systemd/system/rc-local.service
권한 변경
root@localhost:~# chmod a+x /etc/systemd/system/rc-local.service
root@localhost:~# chmod 755 /etc/systemd/system/rc-local.service
그런 다음 rc.local 파일을 다시 만듭니다.
cat <<EOF >> /etc/rc.local
#!/bin/sh -e
#
# rc.local
#
# This script is executed at the end of each multiuser runlevel.
# Make sure that the script will "exit 0" on success or any other
# value on error.
#
# In order to enable or disable this script just change the execution
# bits.
#
# By default this script does nothing.
exit 0
권한을 설정하십시오.
chmod + x / etc / rc.local
부팅 중에 서비스가 시작되도록 설정
systemctl enable rc-local
그리고 마지막으로 서비스를 시작하십시오
systemctl start rc-local
다음을
사용하여 서비스 상태를 볼 수 있습니다. 부팅 중에 서비스가 시작되도록 설정
systemctl status rc-local
이제 원하는 것을 rc.local 파일에 다시 추가 할 수 있습니다.
물론 이것은 올바른 방법이 아닙니다.
가능한 경우 시스템에서 스크립트 / 프로그램에 대한 서비스를 추가하는 것이 가장 좋습니다.
============== 사례 및 적용 작업================
<droppy 시작파일 만들기>
1)/etc/init.d/droppy 를 생성합니다.
root@AOL-Debi/droppy
2) # 실행 권한 줍니다.
root@AOL-Debian:~# chmod a+x /etc/init.d/droppy
3) # 부팅시 자동실행 설정합니다.
root@AOL-Debian:~# update-rc.d droppy defaults
4) 정상적으로 작동하는지 봅니다.
root@AOL-Debian:~# ps -ef | grep droppy
root 14485 1 0 02:33 ? 00:00:00 /bin/bash /etc/droppy/run.sh
root 14486 14485 37 02:33 ? 00:00:02 droppy
root 14529 2635 0 02:33 pts/0 00:00:00 grep droppy
root@AOL-Debian:~#
--------------------
----------------------
cd /etc/init.d
cd ~
pwd
/root
cp tvh_start /etc/init.d
nano /etc/init.d/tvh_start
cd /etc/init.d
update-rc.d tvh_start defaults
/etc/init.d/tvh_start
ps -ef | grep tvh_start
root@localhost:~# service tvheadend restart
[....] Restarting Tvheadend: tvheadend/etc/init.d/tvheadend: 59: /etc/init.d/tvheadend: udevadm: not found
. ok
root@localhost:~# nano /etc/init.d/tvh_start
root@localhost:~# ps -ef | grep tvheadend
10075 30293 1 5 14:29 ? 00:00:01 /usr/bin/tvheadend -f -u hts -g video
10075 30359 30192 0 14:29 pts/1 00:00:00 grep tvheadend
root@localhost:~# ./3
[ ok ] Stopping Tvheadend: tvheadend.
root@localhost:~# ps -ef | grep tvheadend
10075 30392 30192 0 14:29 pts/1 00:00:00 grep tvheadend
root@localhost:~#
============================================
systemctl enable plexdrive - 부팅 시 자동 실행되도록 설정
systemctl disable plexdrive - 부팅 시 자동 실행 해제
systemctl [start|restart|stop|status] plexdrive - 실행|재실행|중지|상태보기
===========================================
systemd로 rc.local 서비스를 실행하는 대신 systemd로 plexdrive를 실행하는 것을 생각하지 않으시다니요!
아래를 참조하여 경로를 적절히 수정하여 /etc/systemd/system/plexdrive.service 파일을 만듭니다.
-----------------------
[Unit]
Description=Plexdrive
AssertPathIsDirectory=/mnt/plexdrive
After=syslog.target network.target
PropagatesReloadTo=plexunion.service plexmediaserver.service
[Service]
Type=simple
ExecStart=/usr/bin/plexdrive mount -c /root/.plexdrive \
--fuse-options=default_permissions,allow_other \
--uid=1000 --gid=44 --umask=0775 \
--chunk-check-threads=4 \
--chunk-load-ahead=2 \
--chunk-load-threads=4 \
--chunk-size=1M \
--max-chunks=256 \
--refresh-interval=10m \
-v 0 /mnt/plexdrive
ExecStop=/bin/fusermount -uz /mnt/plexdrive
Restart=on-failure
RestartSec=5
StartLimitInterval=60s
StartLimitBurst=3
[Install]
WantedBy=default.target
----------------
After= 구문은 다음에 있는 서비스가 실행된 후에 이 서비스가 실행되도록 지정합니다.
PropagatesReloadTo= 구문은 이 서비스가 다시 실행된 후에 나열된 서비스도 다시 실행되도록 지정합니다.
----------------
systemctl enable plexdrive - 부팅 시 자동 실행되도록 설정
systemctl disable plexdrive - 부팅 시 자동 실행 해제
systemctl [start|restart|stop|status] plexdrive - 실행|재실행|중지|상태보기
rc.local보다 구문도 간단하고 안정성도 좋습니다~
================
부팅시 스크립트를 자동으로 수행하기 위해서, EC2 Launch시 UserData를 사용할 수 있다.
리눅스 내부에서는 /etc/rc.d/rc.local/ 에 넣어주면 된다.
root 권한으로 실행을 하려면
su root -c “/opt/bin/myscript.sh &” 을 적어주어야 하며,
가장 상단의 #!/bin/sh 의 경우, #!/bin/bash와 다르게
export PATH=$PATH:/opt/bin 으로 주면 환경 변수 설정에 실패한다. 대신
PATH=$PATH:/opt/bin
export PATH 으로 설정해야 한다.
주의하자. (sh 실행 권한 도 주의 필요. chmod 1 3 7 중 하나)
■ ▶ ☞ ♠ 정보찾아 공유 드리며 출처는 링크 참조 바랍니다. https://11q.kr ♠
뷰PDF 1,2
office view
관련자료
-
링크
댓글목록

shimss@11q.kr님의 댓글
데비안 10 rc.local 추가 파일 생성 실행파일 만들기
================
cp tvh_start /etc/init.d
nano /etc/init.d/tvh_start
chmod a+x /etc/init.d/tvh_start
cd /etc/init.d
update-rc.d tvh_start defaults
/etc/init.d/tvh_start
ps -ef | grep tvh_start
===============
11.sh
을 rc.local 추가
♥간단_메모글♥
-
등록일 04.15가입 인사드립니다.댓글 6
-
등록일 04.09가입인사.댓글 4
-
등록일 03.03안녕하세여댓글 1
-
등록일 02.13
최근글
-
등록일 11.19
새댓글
-
등록자 삽질황제 등록일 11.21
-
등록자 changgeol 등록일 11.21
-
등록자 스노우캣 등록일 11.21
-
등록자 사다드 등록일 11.21
-
등록자 애완용 등록일 11.20
오늘의 홈 현황
QR코드
☞ QR코드 스캔은 kakao앱 자체 QR코드

