iperf 설치 다른 IP 서버와 통신 측정 하기 /u5pvr/ synology/vmware
♨ 카랜더 일정 :
본문
iperf 설치 다른 IP 서버와 통신 측정 하기 /u5pvr/ synology/vmware
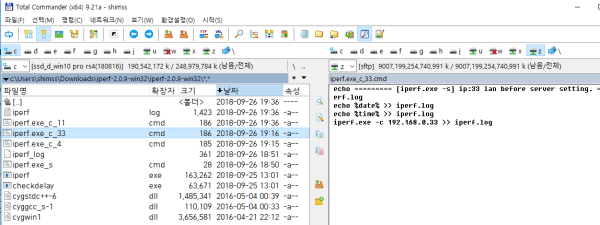
윈도우용 파일 cmd 명령어를 만들어 저장 합니다.
iperf-2.0.9-win32_11q.kr.7z
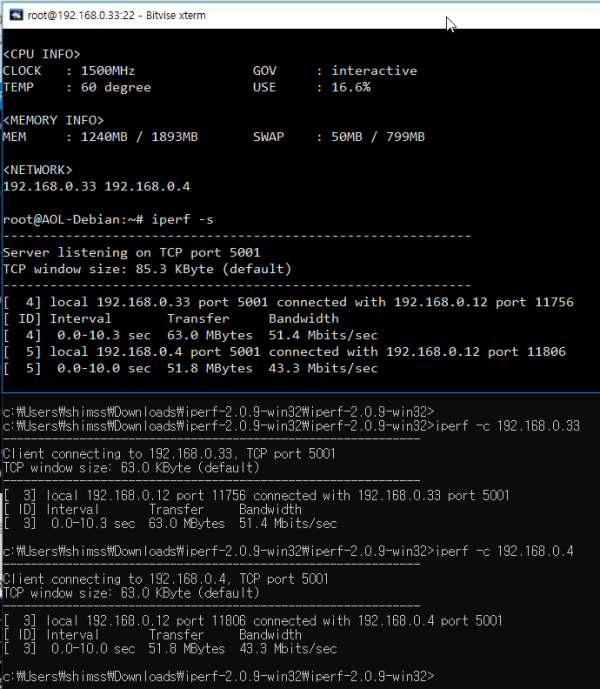
< 테스트 결과 내용 >

cmd 명령으로 log 파일 생성을 위와 같이 저장 됩니다.
< iperf_c_ip33.cmd 파일 형식으로 log파일 저장 하기>
echo == [iperf.exe -s] ip:33 u5pvr lan before server setting. ============ >> iperf.log
echo %date% >> iperf.log
echo %time% >> iperf.log
iperf.exe -c 192.168.0.33 >> iperf.log
서버명령
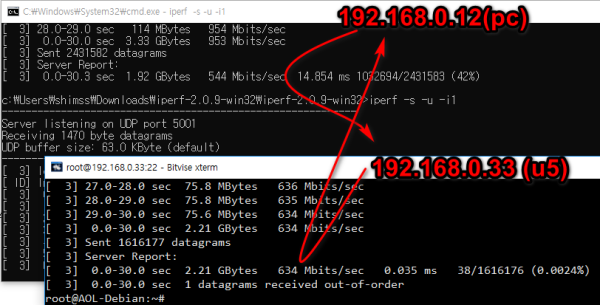
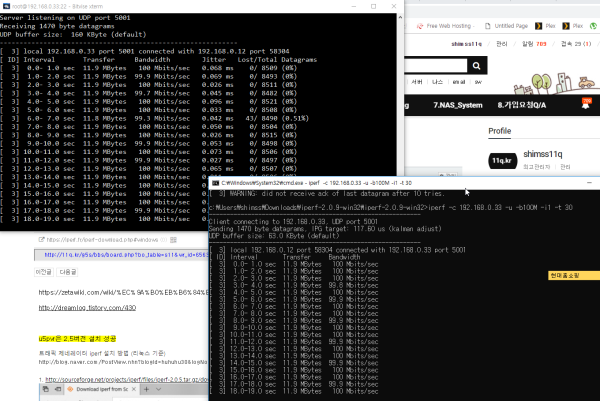
iperf -s -u -i1
호스트 명령
iperf -c 192.168.0.33 -u -b1000M -i1 -t 30
iperf -c 192.168.0.10 -u -b1000M -i1 -t 30
iperf -c 192.168.0.12 -u -b1000M -i1 -t 30
============
참조 사이트
https://zetawiki.com/wiki/%EC%9A%B0%EB%B6%84%ED%88%AC_iperf_%EC%84%A4%EC%B9%98
http://dreamlog.tistory.com/430
https://cafe.naver.com/mk802/28114
u5pvr은 2.5버전 설치 성공
트래픽 제네레이터 iperf 설치 방법 (리눅스 기준)
http://blog.naver.com/PostView.nhn?blogId=huhuhu30&logNo=130163057494
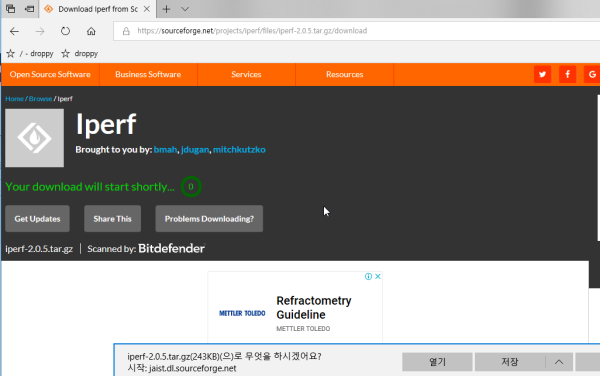
1. http://sourceforge.net/projects/iperf/files/iperf-2.0.5.tar.gz/download 에서 iperf 다운로드
파일 윈도우에서 다운로드 파일명 확인 아래 mv download iperf-2.0.5.tar.gz 확인 하세요
<u5pvr 설치 putty 터미널 실행 설치>
cd\
wget https://sourceforge.net/projects/iperf/files/iperf-2.0.5.tar.gz/download
mv download iperf-2.0.5.tar.gz
tar -xzvf iperf-2.0.5.tar.gz
cd iperf-2.0.5.tar.gz
./configure
make
make install
iperf -v
ls
apt-get install iperf
iperf -s -u -i1
==============
http://software.es.net/iperf/news.html
접속 최신 버전링크를 확인 합니다
최종 버전 확인후
putty 로 터미널 접합니다
wget https://downloads.es.net/pub/iperf/iperf-3.6.tar.gz
다운 로드
후 압축 해제
tar -xzvf iperf-3.6.tar.gz
ls
cd iperf-3.6
./configure
# <-- 점 슬래쉬임
make
make install
=================== 아래 명령 복사 putty에 붙여넣기하세요 =============
cd\
wget https://downloads.es.net/pub/iperf/iperf-3.6.tar.gz
tar -xzvf iperf-3.6.tar.gz
cd iperf-3.6
./configure
make
make install
iperf -v
ls
=================
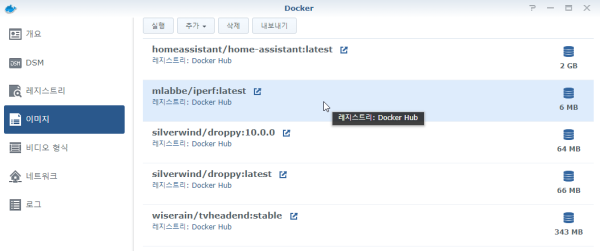
<시놀로지 iperf 설치>
도커에서 설치 실행해놓으면 됩니다
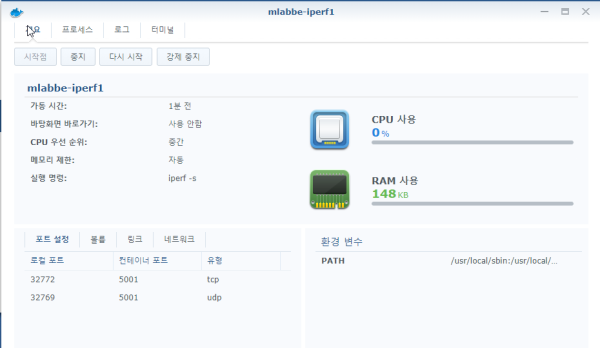
설치 버전 mlabbe-iperf1 입니다( 설정 없음 설치만 하시고 실행)
자동으로 iperf -s 됩니다
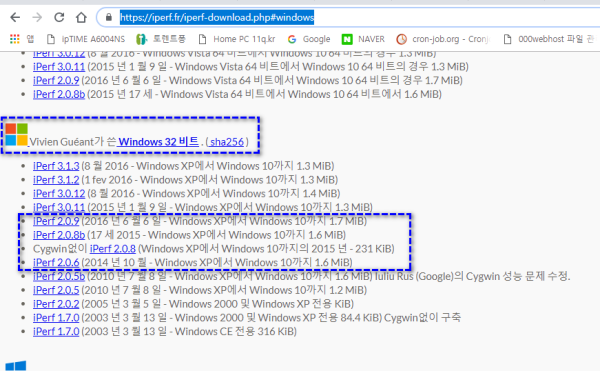
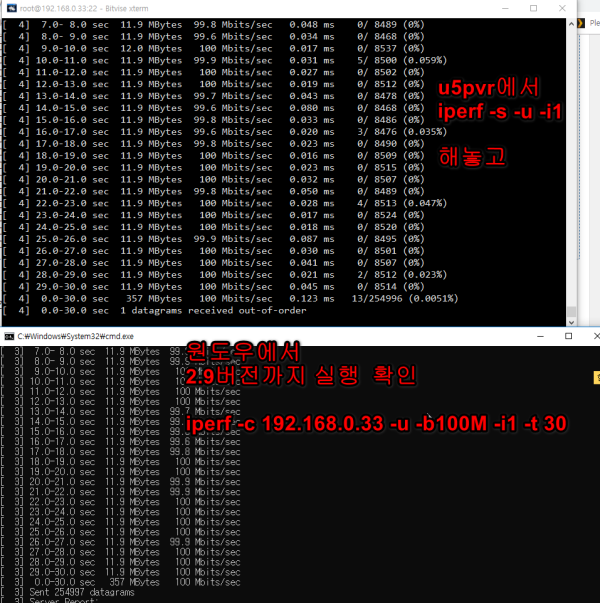
<원도우 버전설치는 2.6버전 2.9 까지 실행 확인>
https://iperf.fr/iperf-download.php#windows
u5pvr 은 대기 상태
iperf -s -u -i1
에서
해놓고
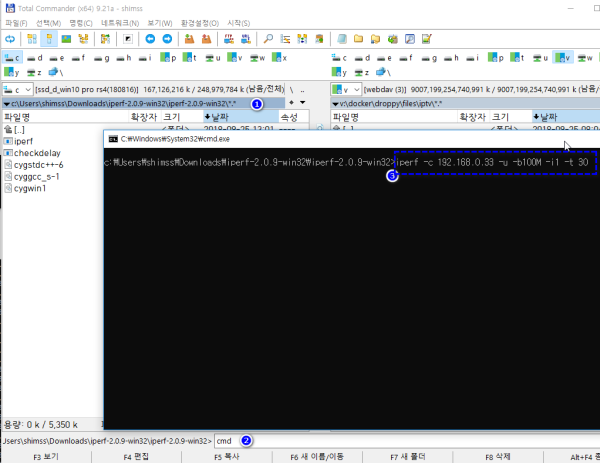
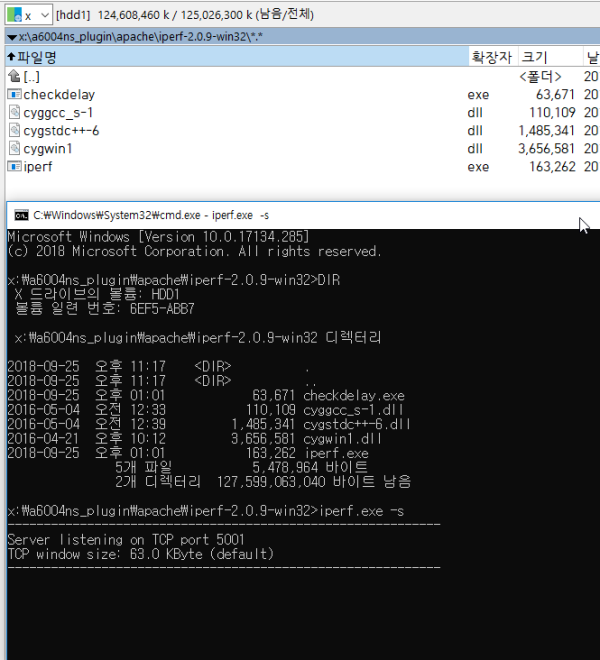
원도우 압축 해제 경로에서
totalcmd로 이동후
cmd
iperf -c 192.168.0.33 -u -b1000M -i1 -t 30
iperf -s -u -i1
iperf -c 192.168.0.1 -u -b1000M -i1 -t 30
c:\Users\shimss\Downloads\iperf-2.0.9-win32\iperf-2.0.9-win32>iperf -c 192.168.0.33 -u -b100M -i1 -t 30
------------------------------------------------------------
Client connecting to 192.168.0.33, UDP port 5001
Sending 1470 byte datagrams, IPG target: 117.60 us (kalman adjust)
UDP buffer size: 63.0 KByte (default)
------------------------------------------------------------
[ 3] local 192.168.0.12 port 54913 connected with 192.168.0.33 port 5001
[ ID] Interval Transfer Bandwidth
[ 3] 0.0- 1.0 sec 11.9 MBytes 100 Mbits/sec
[ 3] 1.0- 2.0 sec 11.9 MBytes 99.9 Mbits/sec
[ 3] 2.0- 3.0 sec 11.9 MBytes 100 Mbits/sec
[ 3] 3.0- 4.0 sec 11.9 MBytes 100 Mbits/sec
[ 3] 4.0- 5.0 sec 11.9 MBytes 99.9 Mbits/sec
[ 3] 5.0- 6.0 sec 11.9 MBytes 100 Mbits/sec
[ 3] 6.0- 7.0 sec 11.9 MBytes 100 Mbits/sec
[ 3] 7.0- 8.0 sec 11.9 MBytes 99.9 Mbits/sec
[ 3] 8.0- 9.0 sec 11.9 MBytes 100 Mbits/sec
[ 3] 9.0-10.0 sec 11.9 MBytes 100 Mbits/sec
[ 3] 10.0-11.0 sec 11.9 MBytes 99.9 Mbits/sec
[ 3] 11.0-12.0 sec 11.9 MBytes 100 Mbits/sec
[ 3] 12.0-13.0 sec 11.9 MBytes 100 Mbits/sec
[ 3] 13.0-14.0 sec 11.9 MBytes 99.9 Mbits/sec
[ 3] 14.0-15.0 sec 11.9 MBytes 100 Mbits/sec
[ 3] 15.0-16.0 sec 11.9 MBytes 100 Mbits/sec
[ 3] 16.0-17.0 sec 11.9 MBytes 99.9 Mbits/sec
[ 3] 17.0-18.0 sec 11.9 MBytes 100 Mbits/sec
[ 3] 18.0-19.0 sec 11.9 MBytes 100 Mbits/sec
[ 3] 19.0-20.0 sec 11.9 MBytes 100 Mbits/sec
[ 3] 20.0-21.0 sec 11.9 MBytes 100 Mbits/sec
[ 3] 21.0-22.0 sec 11.9 MBytes 100 Mbits/sec
[ 3] 22.0-23.0 sec 11.9 MBytes 99.9 Mbits/sec
[ 3] 23.0-24.0 sec 11.9 MBytes 100 Mbits/sec
[ 3] 24.0-25.0 sec 11.9 MBytes 100 Mbits/sec
[ 3] 25.0-26.0 sec 11.9 MBytes 100 Mbits/sec
[ 3] 26.0-27.0 sec 11.9 MBytes 100 Mbits/sec
[ 3] 27.0-28.0 sec 11.9 MBytes 100 Mbits/sec
[ 3] 28.0-29.0 sec 11.9 MBytes 100 Mbits/sec
[ 3] 29.0-30.0 sec 11.9 MBytes 100 Mbits/sec
[ 3] 0.0-30.0 sec 358 MBytes 100 Mbits/sec
[ 3] Sent 255102 datagrams
[ 3] Server Report:
[ 3] 0.0-30.0 sec 358 MBytes 100 Mbits/sec 0.024 ms 0/255102 (0%)
c:\Users\shimss\Downloads\iperf-2.0.9-win32\iperf-2.0.9-win32>
=================
이하 참조
==================
===============================
root@AOL-Debian:~/iperf-3.6# iperf --help
Usage: iperf [-s|-c host] [options]
iperf [-h|--help] [-v|--version]
Client/Server:
-f, --format [kmKM] format to report: Kbits, Mbits, KBytes, MBytes
-i, --interval # seconds between periodic bandwidth reports
-l, --len #[KM] length of buffer to read or write (default 8 KB)
-m, --print_mss print TCP maximum segment size (MTU - TCP/IP header)
-o, --output <filename> output the report or error message to this specified file
-p, --port # server port to listen on/connect to
-u, --udp use UDP rather than TCP
-w, --window #[KM] TCP window size (socket buffer size)
-B, --bind <host> bind to <host>, an interface or multicast address
-C, --compatibility for use with older versions does not sent extra msgs
-M, --mss # set TCP maximum segment size (MTU - 40 bytes)
-N, --nodelay set TCP no delay, disabling Nagle's Algorithm
-V, --IPv6Version Set the domain to IPv6
Server specific:
-s, --server run in server mode
-U, --single_udp run in single threaded UDP mode
-D, --daemon run the server as a daemon
Client specific:
-b, --bandwidth #[KM] for UDP, bandwidth to send at in bits/sec
(default 1 Mbit/sec, implies -u)
-c, --client <host> run in client mode, connecting to <host>
-d, --dualtest Do a bidirectional test simultaneously
-n, --num #[KM] number of bytes to transmit (instead of -t)
-r, --tradeoff Do a bidirectional test individually
-t, --time # time in seconds to transmit for (default 10 secs)
-F, --fileinput <name> input the data to be transmitted from a file
-I, --stdin input the data to be transmitted from stdin
-L, --listenport # port to receive bidirectional tests back on
-P, --parallel # number of parallel client threads to run
-T, --ttl # time-to-live, for multicast (default 1)
-Z, --linux-congestion <algo> set TCP congestion control algorithm (Linux only)
Miscellaneous:
-x, --reportexclude [CDMSV] exclude C(connection) D(data) M(multicast) S(settings) V(server) reports
-y, --reportstyle C report as a Comma-Separated Values
-h, --help print this message and quit
-v, --version print version information and quit
[KM] Indicates options that support a K or M suffix for kilo- or mega-
The TCP window size option can be set by the environment variable
TCP_WINDOW_SIZE. Most other options can be set by an environment variable
IPERF_<long option name>, such as IPERF_BANDWIDTH.
Report bugs to <iperf-users@lists.sourceforge.net>
root@AOL-Debian:~/iperf-3.6#
대기 서버 준비
뷰PDF 1,2
office view
관련자료
-
링크
-
첨부
댓글목록

shimss11q님의 댓글
windows 에서 다중 네트워크 사용하기, route 설정, 테더링 등 외부망 내부망 사용하기
출처: http://cofs.tistory.com/292 [CofS]
http://cofs.tistory.com/292

shimss11q님의 댓글
iptime a6004ns 제품 설명서
http://iptime.com/iptime/?page_id=11&pf=3&page=3&pt=271&pd=1
♥간단_메모글♥
-
등록일 04.15가입 인사드립니다.댓글 2
-
등록일 04.09가입인사.댓글 2
-
등록일 03.03안녕하세여댓글 1
-
등록일 02.13
최근글
새댓글
-
등록자 11qkr 등록일 02:33
-
등록자 11qkr 등록일 06.25
-
등록자 박카스D 등록일 06.25
-
등록자 마음친구 등록일 06.25
-
등록자 11qkr 등록일 06.25
오늘의 홈 현황
QR코드
☞ QR코드 스캔은 kakao앱 자체 QR코드




 ● 시놀로지 dsm 7.2에서 nano 에디터 및 mc 파일관리자 설치 방법 _조회수_댓글수(
2034
 ● ha작업) esxi서버 HDD 용량 키우기 작업 _조회수_댓글수(
12477
 ● 영상분석)시놀로지NAS에 네임서버 한방에 쉽게 셋팅하는 영상입니다 _조회수_댓글수(
9203
 ● 영상분석)도메인이란? 웹사이트에 나만의 도메인 등록하는 방법 (ft. HTTPS 평생 무료) _조회수_댓글수(
6724
 ● 시놀로지 dsm 7.2에서 nano 에디터 및 mc 파일관리자 설치 방법 _조회수_댓글수(
2034