This contains my notes on how to customize existing Android apps such as changing app name, app icon, hiding app from the app drawer, and others. These steps were done on a Windows PC.
- Preparation
- Customize App Name
- Customize App Icon
- Hide App from App Drawer
- Exclude App from Recent Screen
The first step to customize an Android app is of course to download the .apk file:
-
Search your desired app to customize in Google Play.
-
Copy the link of the app from Google Play to this apk downloader site. For this demonstration, I will customize AnyDesk Remote Desktop. Below shows the downloaded
.apkfile.

-
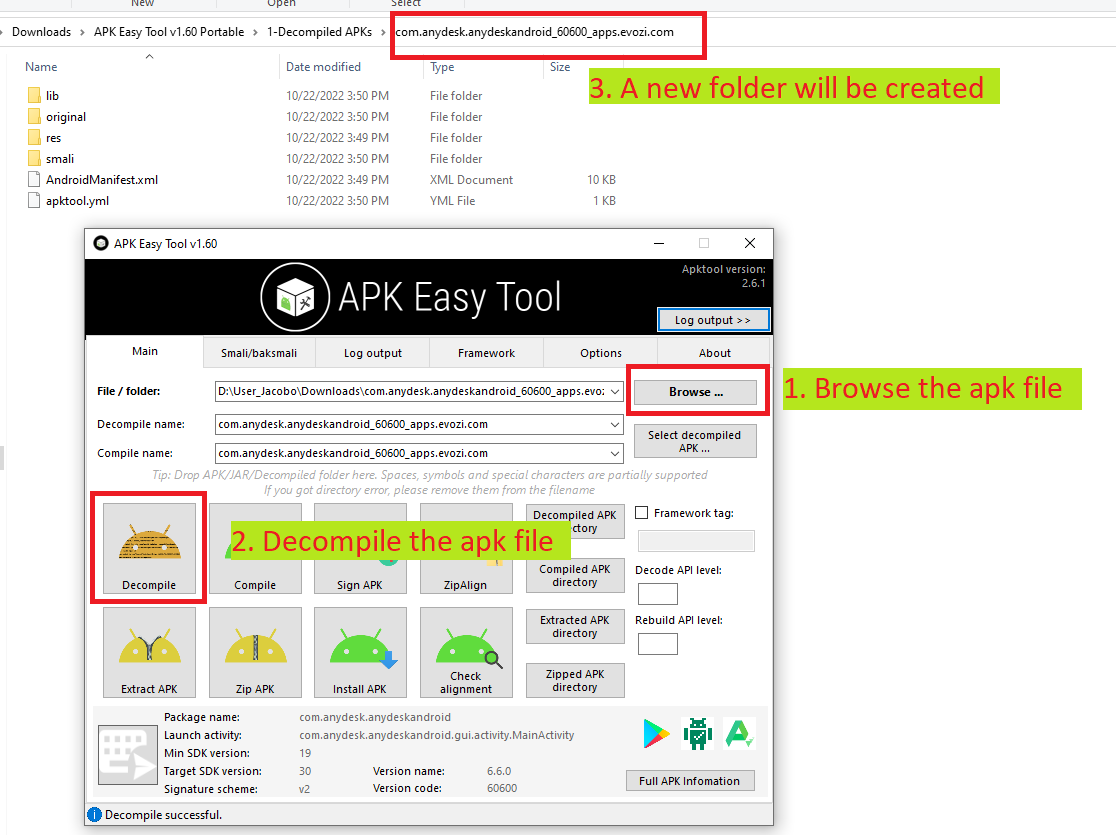
Next, we will need to decompile this
.apkfile (then recompile later after customizing it) to extract the codes. We will use Easy Apk Tool for that. Download the tool, extract, then runapkeasytool.exe. -
Browse the apk file then click on Decompile button. A new folder will be created under
/1-Decompiled APKs/.
First thing you might want to do is to change the name that appears on the app drawer:
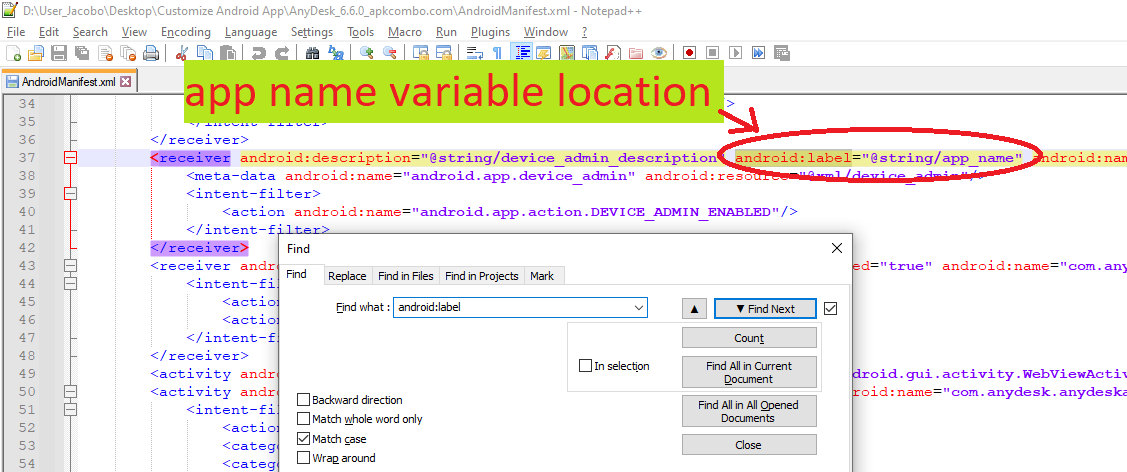
- Go inside the decompiled folder and open the manifest file
AndroidManifest.xml. Search for the keywordandroid:label. - The value of the
android:labelpertains to the app name. As seen below, the value is"@string/app_name". This means the value is inside thestring.xmlfile and is stored specifically on theapp_namevariable.
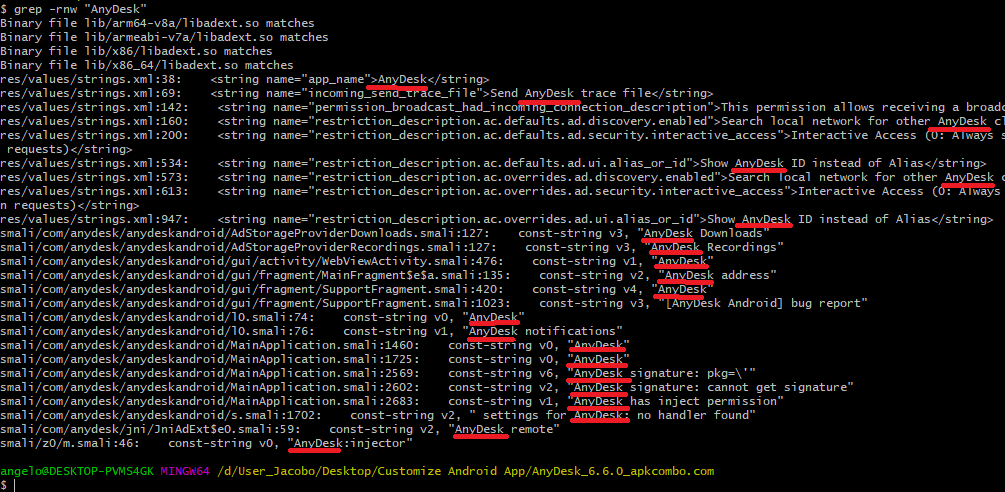
- The
string.xmlcan be located underres/values/. Search for the keywordapp_namethen take note of the string value. On this demonstration, the app name isAnyDesk.
- We will now change this string value for all instances. First, search for all instances of the name by running
grep -rnw <app_name>on the top directory of the decompiled folder. The result will include the filenames and the linenumber where the app name is hardcoded. On this demonstration, I rungrep -rnw "AnyDesk".
- We can manually change the name for each files listed above which is very tedious. Instead, we can just use the bash terminal and some commands:
find . -type f -name "*.xml" -exec sed -i'' -e 's/<previous_name>/<customized_name>/g' {} +
This will search for all .xml files recursively then replace all instances of <previous_name> to <customized_name>. On this demonstration, I run:
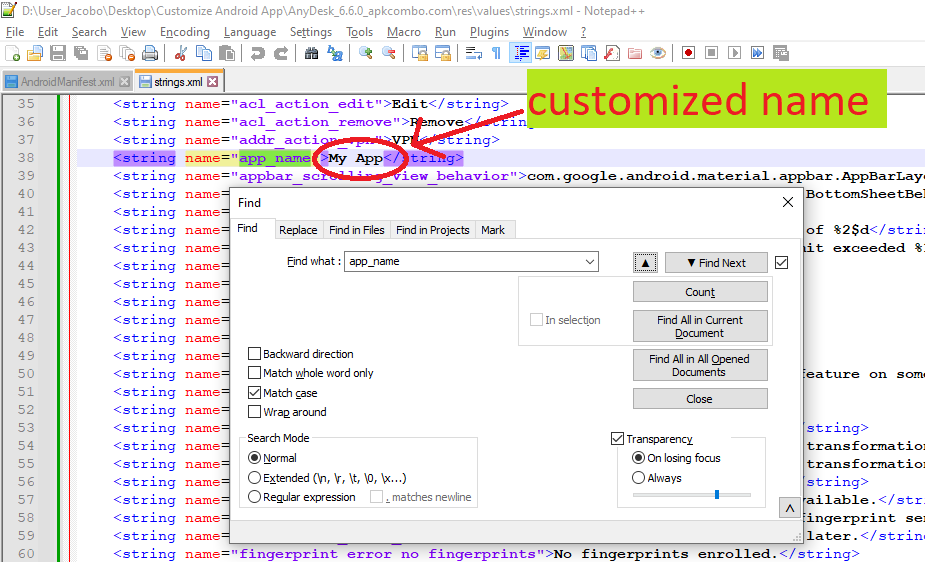
find . -type f -name "*.xml" -exec sed -i'' -e 's/AnyDesk/My App/g' {} +
This will change the name from AnyDesk to My App. For sanity check if the app name is changed, look for the app_name under strings.xml again. The string value must now match your desired new app name.
-
We can now convert the decompiled codes back to
.apkfile. Go back toEasy APK tool, change the compile name, then click on Compile to compile it back to apk file. The generated.apkfile will be created under/2-Recompiled APKs/.

-
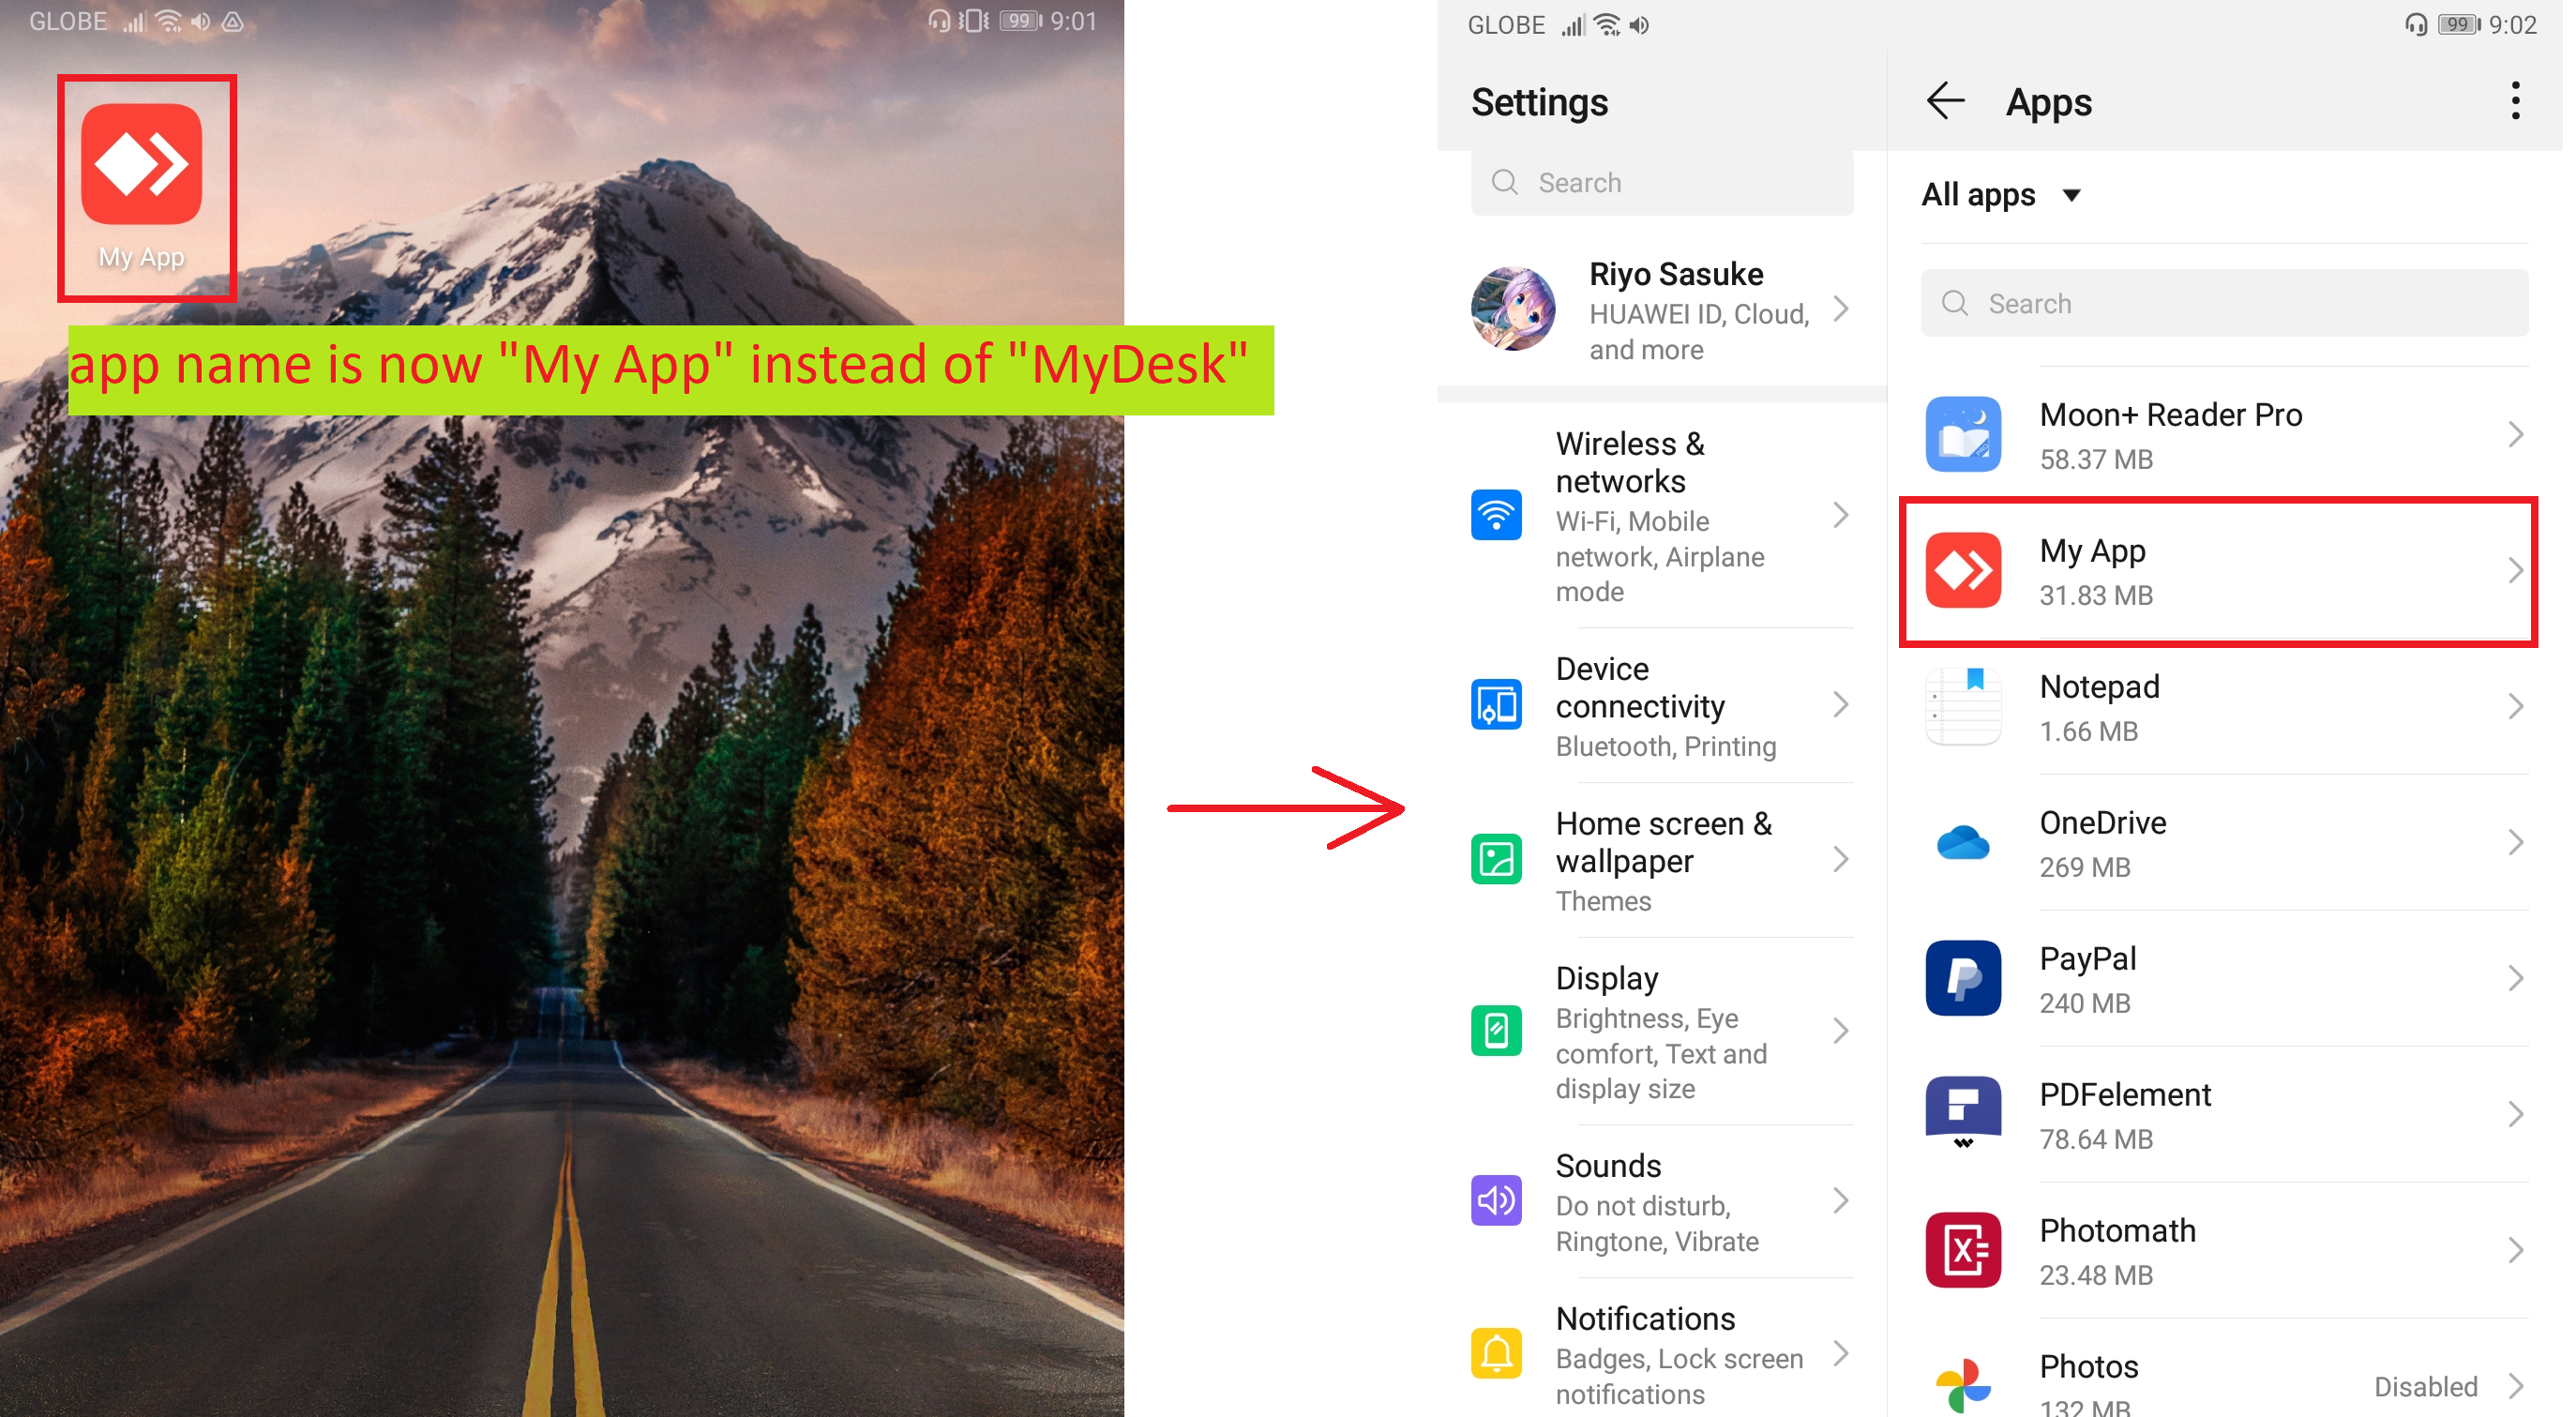
Install the
.apkto your phone. Done! As shown below, the app name is changed fromAnyDesktoMy App.
After changing the app name, you might also want to customize the app icon:
- Go inside the decompiled folder and open the manifest file
AndroidManifest.xml. Search the keywordandroid:icon.
- The value of the
android:iconpertains to the file location of the app icon. As seen above, the value is"@mipmap/ic_launcher. Go to/res/directory then notice folders starting withmipmap. Each folder contains various icons used by the app.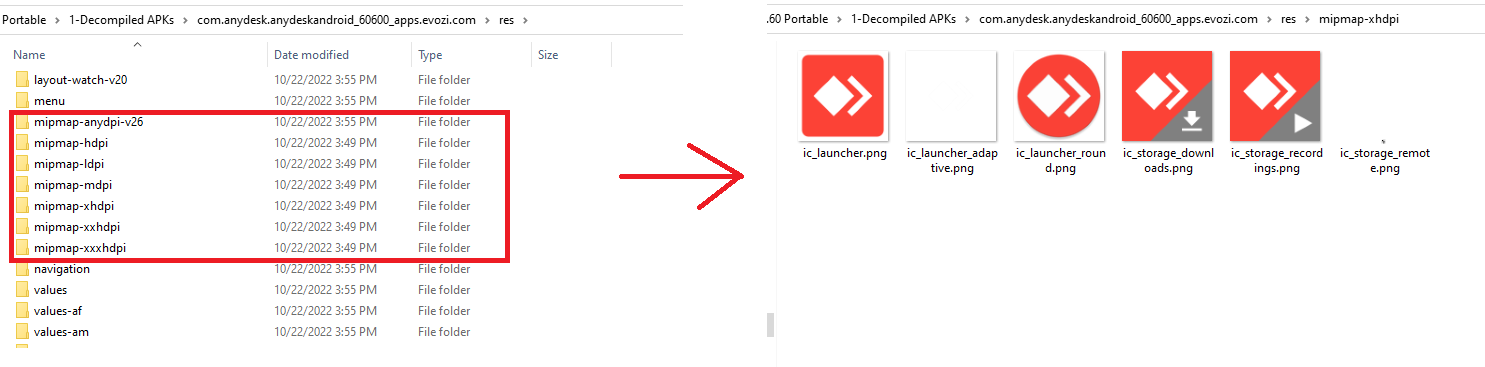
- We will now change every icons for all
mipmapfolders. Make sure all icon names will remain, just replace the image. To make it less tedious, you can just replace all icons with the same images.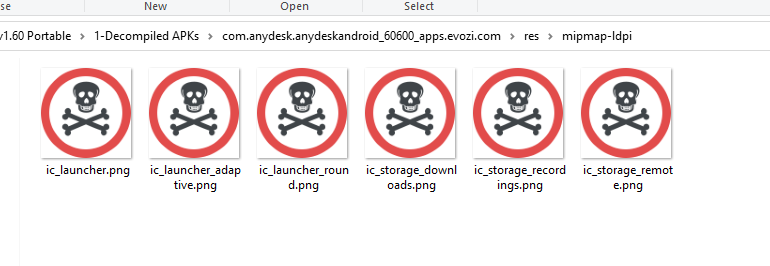
- We can now convert the decompiled codes back to
.apkfile. Go back toEasy APK tool, change the compile name, then click on Compile to compile it back to apk file. The generated.apkfile will be created under/2-Recompiled APKs/.
- Install the apk to your phone. Done! As shown below, the app icon of
MyDeskis now different.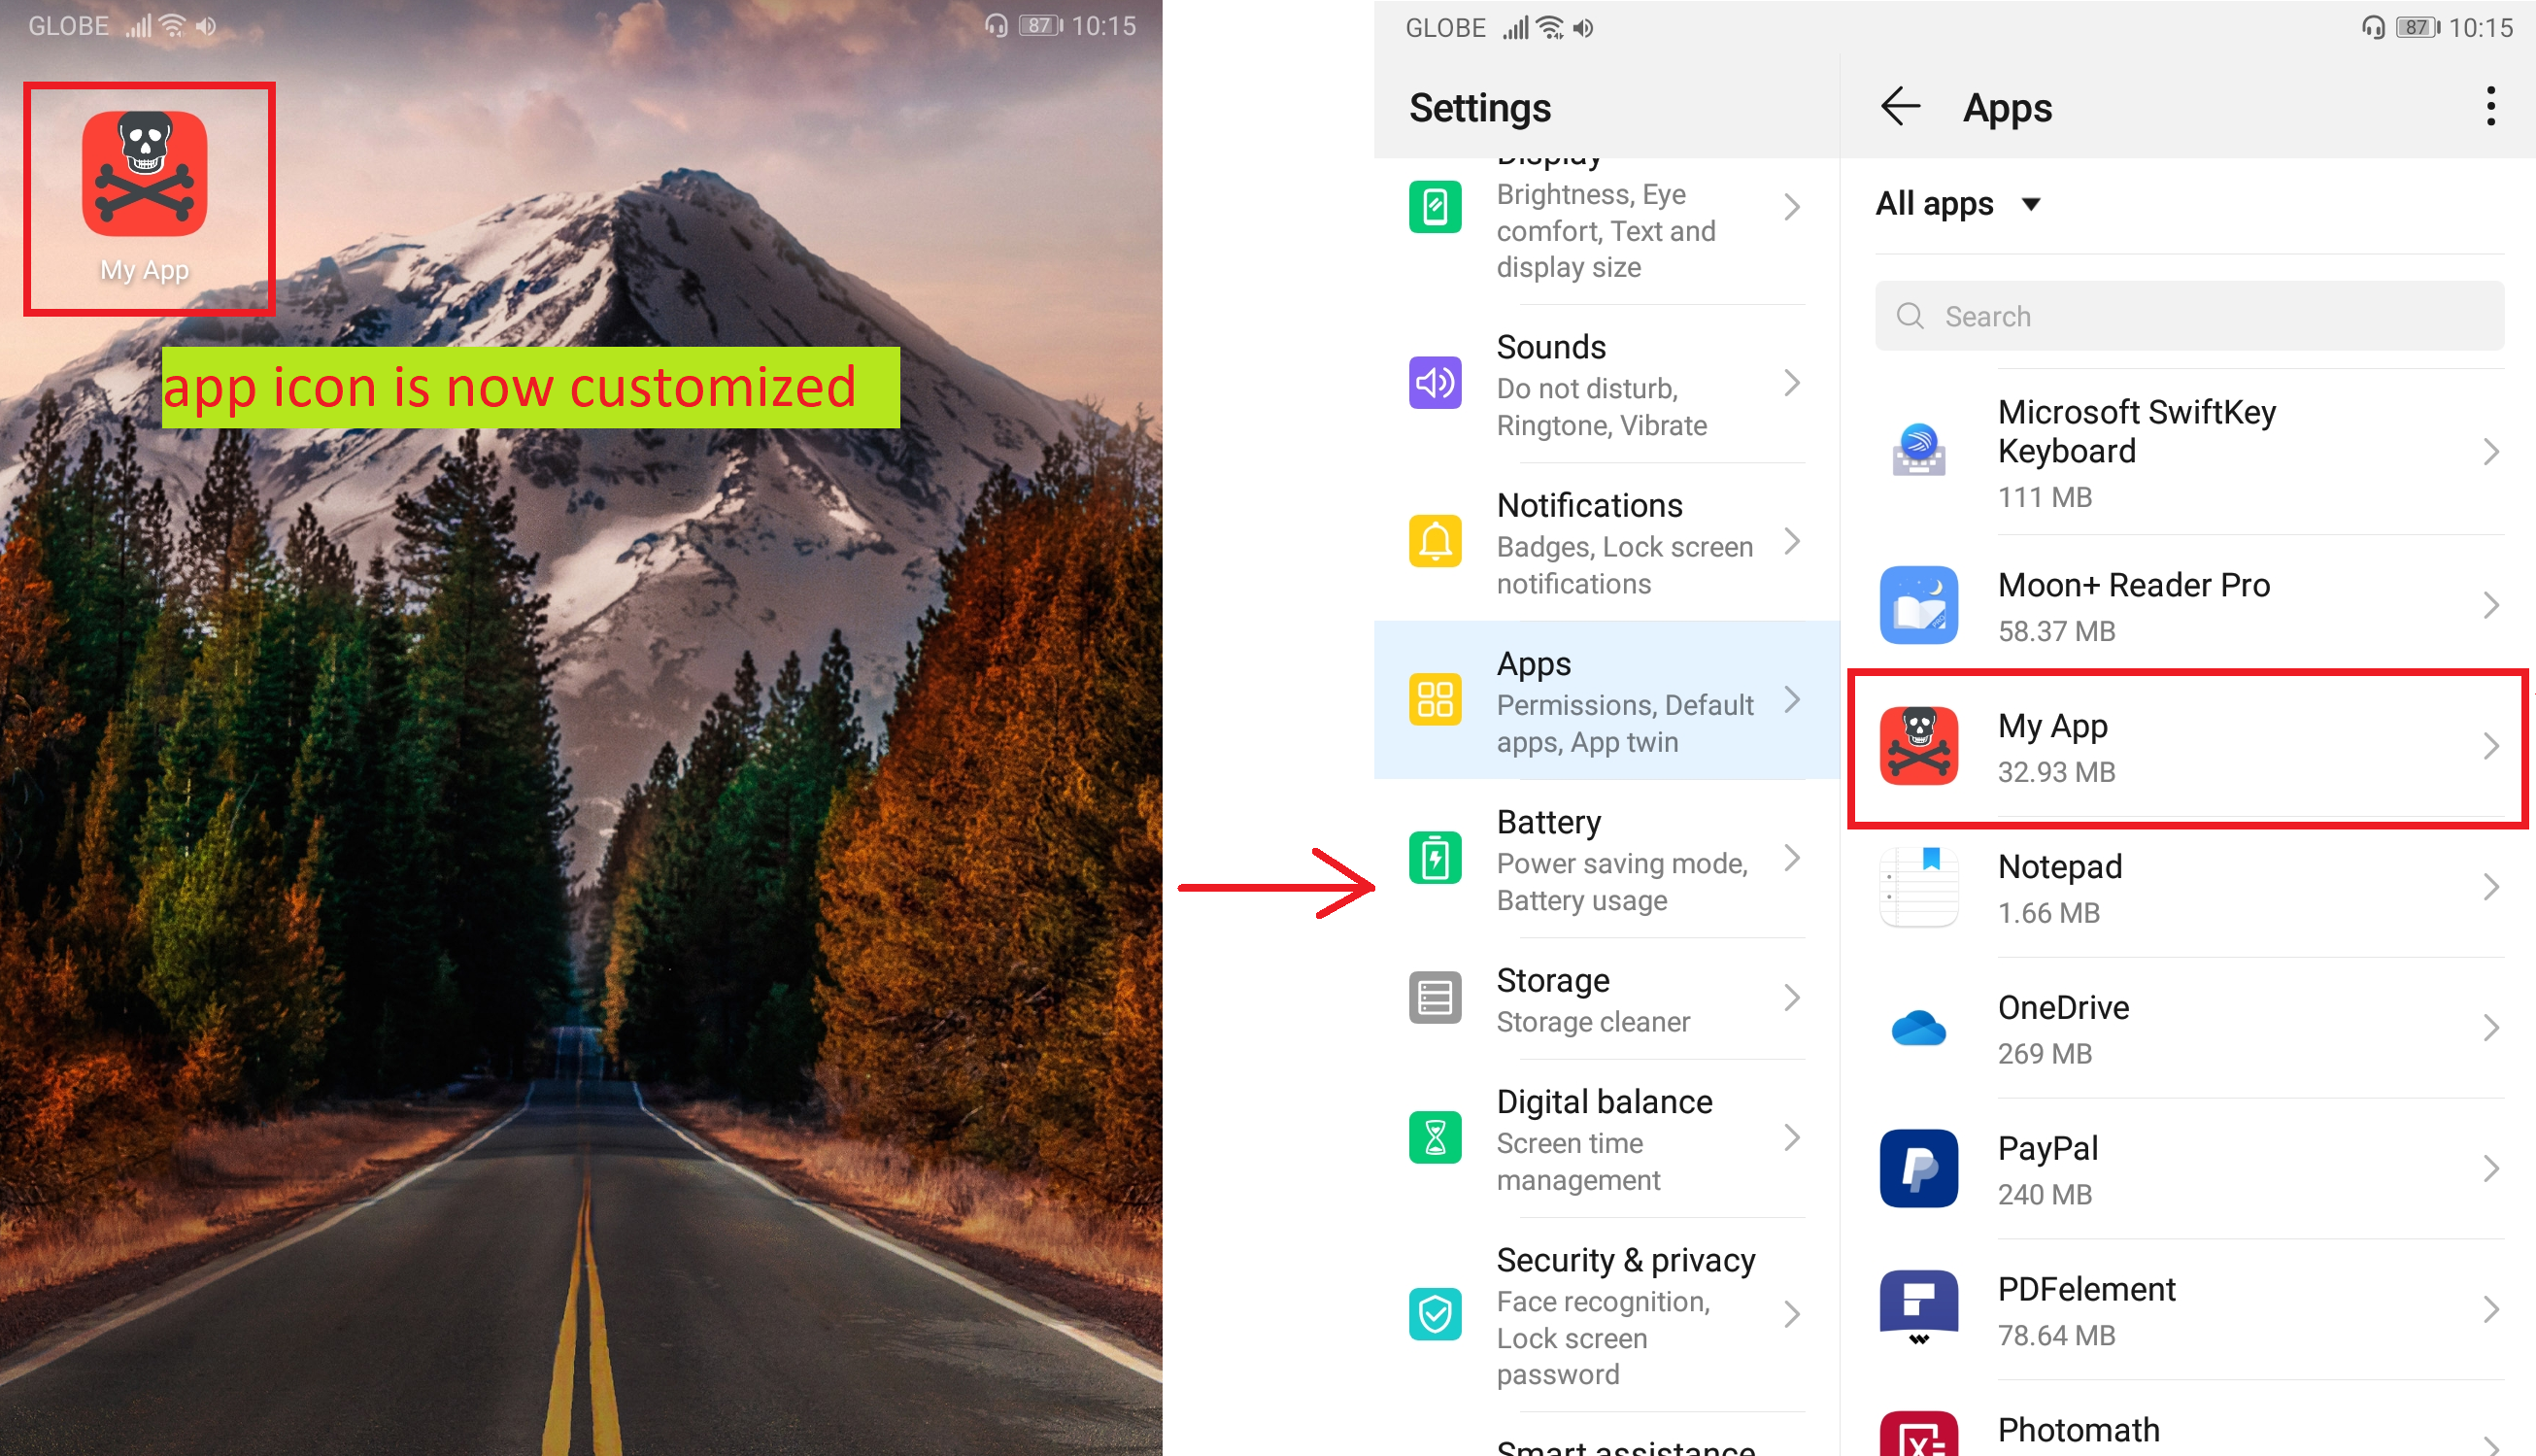
There might be situations where you might want your app to not appear on the app drawer. You can use app launcher to hide apps (like this HideU: Calculator Lock) but this will implicitly give someone an idea that you have an app that you don't want others to see. If you want to hide your app without app launchers, follow the steps below:
- Go inside the decompiled folder and open the manifest file
AndroidManifest.xml. Search for the keywordandroid.intent.category.LAUNCHER. - This category means that the app should appear in the launcher (your app drawer) as a top-level application. To hide your app, just comment the line containing the keyword
android.intent.category.LAUNCHER. XML comment has the following syntax
<!--Your comment-->

- We can now convert the decompiled codes back to
.apkfile. Go back toEasy APK tool, change the compile name, then click on Compile to compile it back to apk file. The generated.apkfile will be created under/2-Recompiled APKs/.
- Install the apk to your phone. Done! The app will not appear on your app drawer but you can of course still see it installed in Settings>Apps>App_Name.
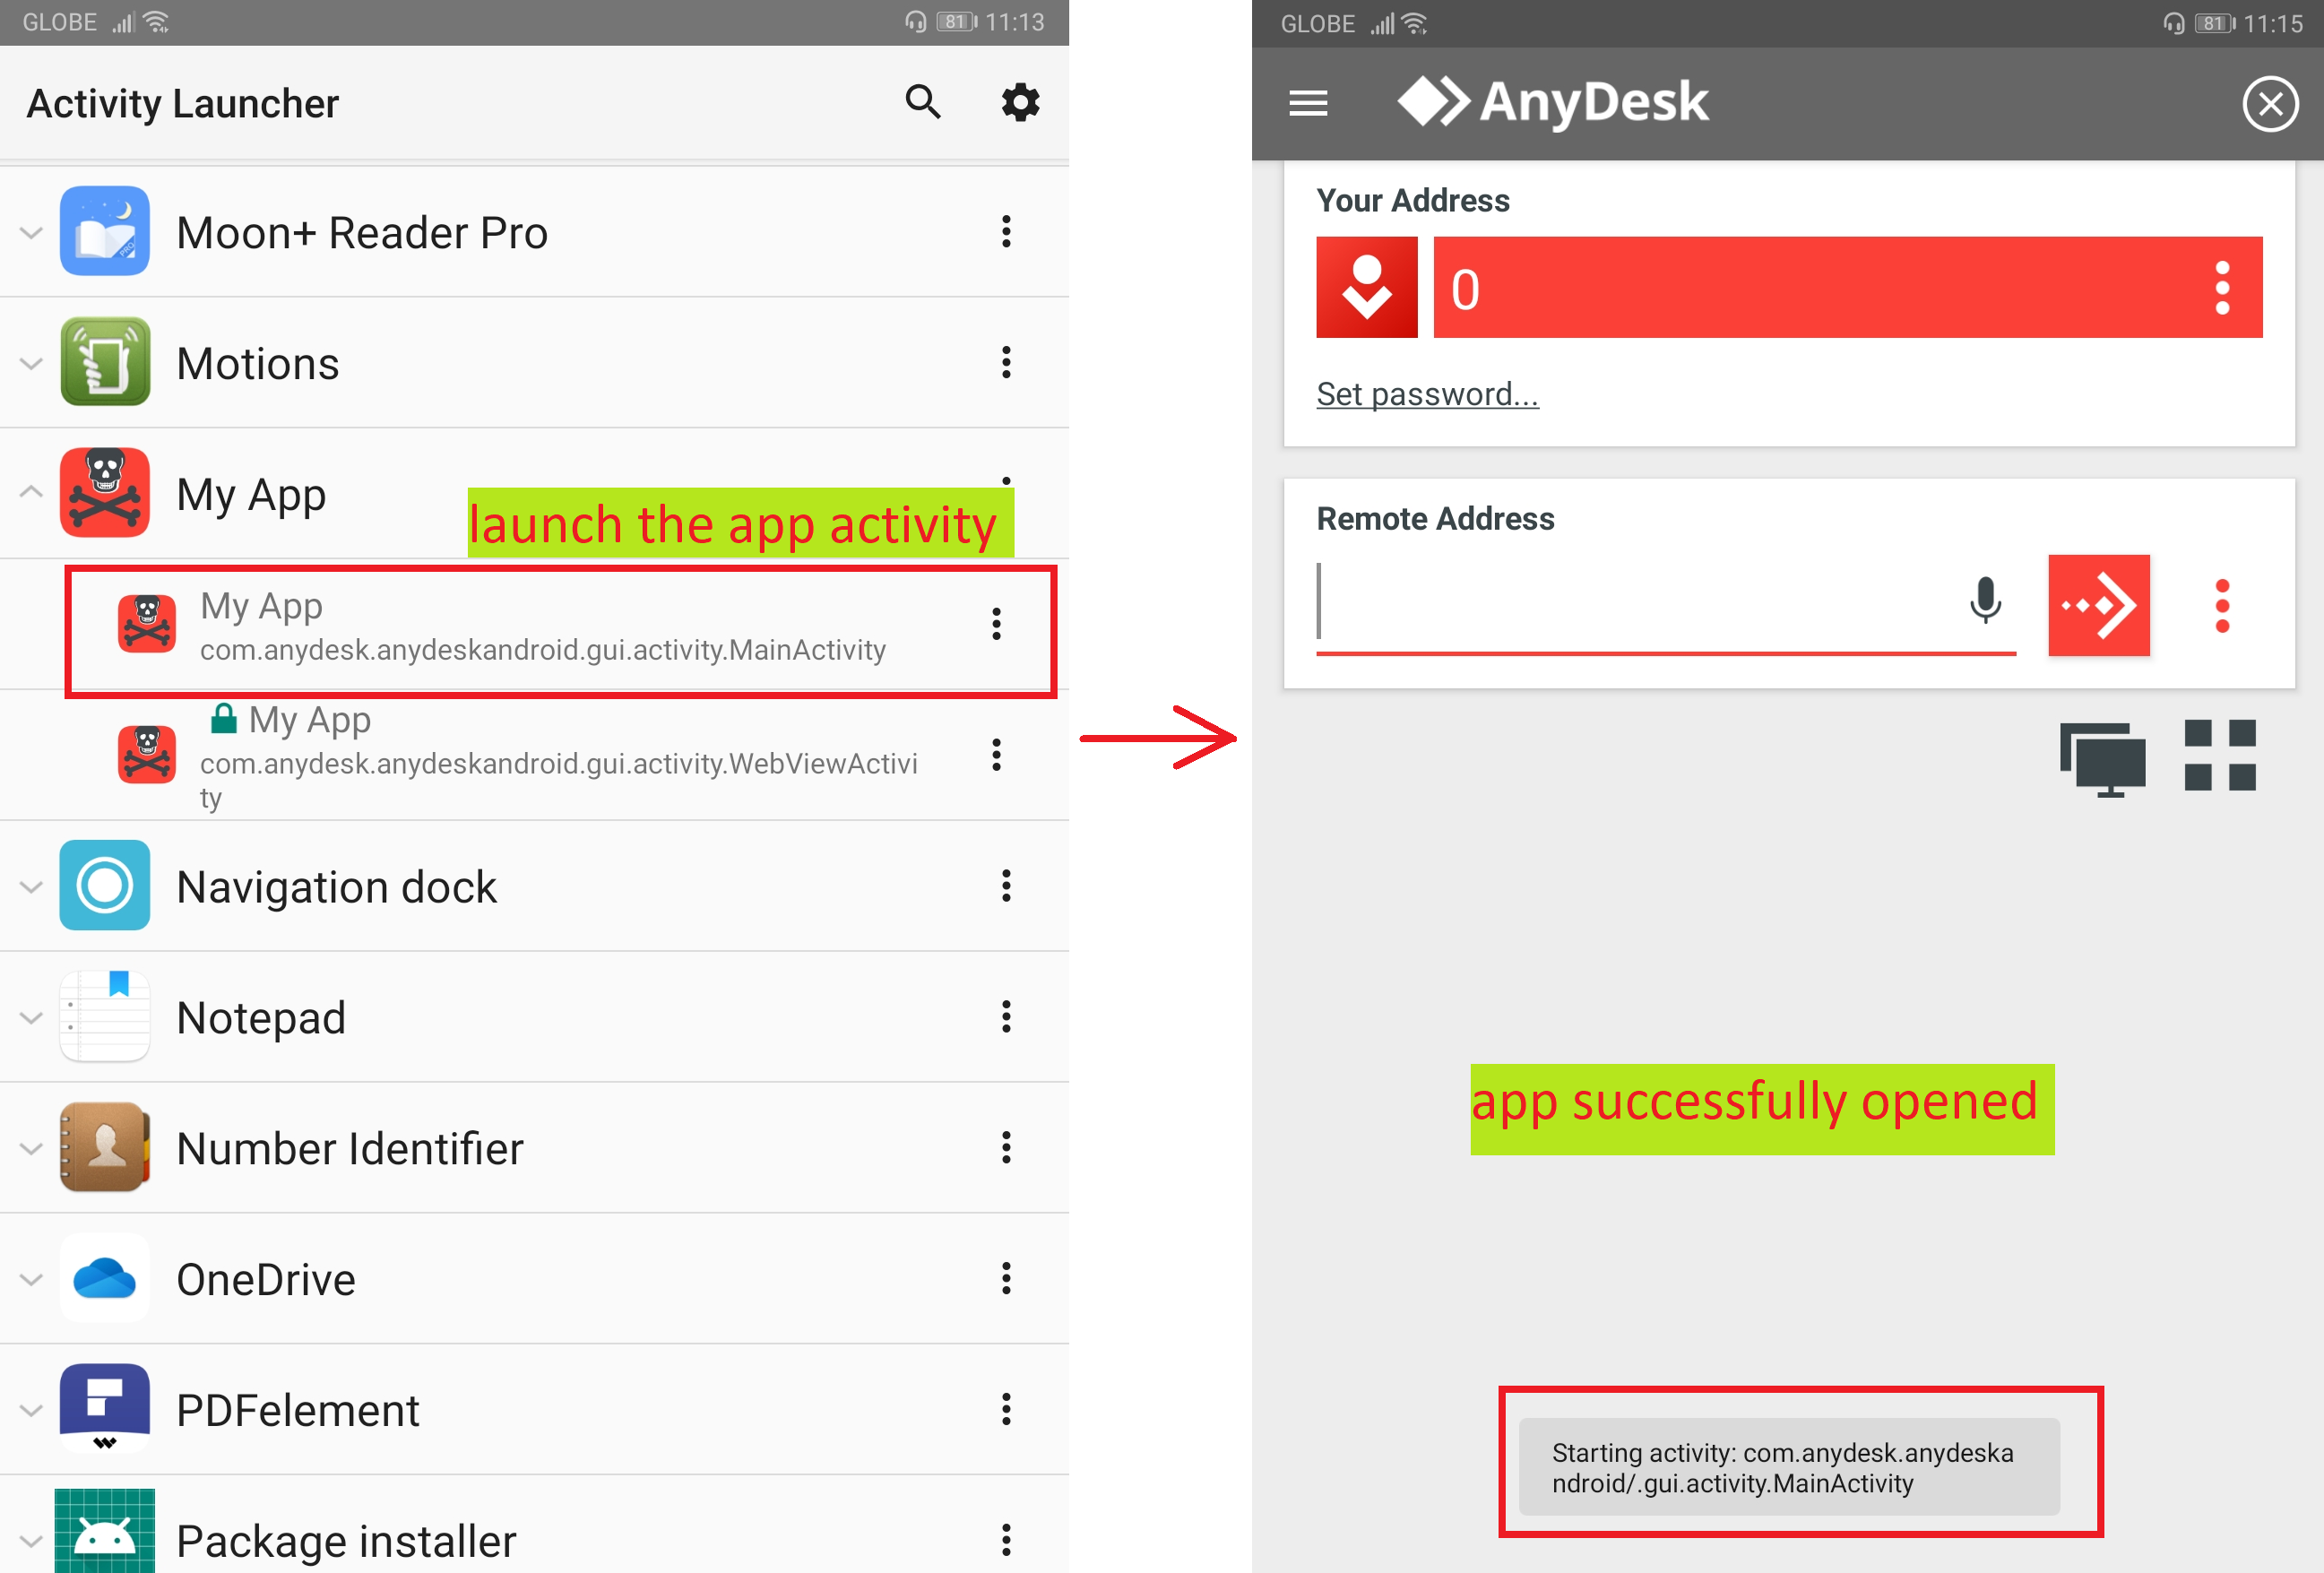
- Now that we made it impossible for the app to not appear on the app drawer. How can then we open it? You can use Android Debug Bridge (ADB) to launch the activity of the app. But a simpler way is to install Activity Launcher. As shown below
My Appappears on theActivity Launcher, just click any activities under it to open the app. Some activities might throw errors but just try each activities until the app is launched.
If you launched an app, the app will appear on the overview screen/recent apps after you close it. Follow the steps below if you do not want your app to appear on this recent app screen:
- Go inside the decompiled folder and open the manifest file
AndroidManifest.xml. Notice lines starting with<activity. We will addandroid:excludeFromRecents="true"after the every<activity. Ifandroid:excludeFromRecents="true"is already added on the line then there will be no need to add it again.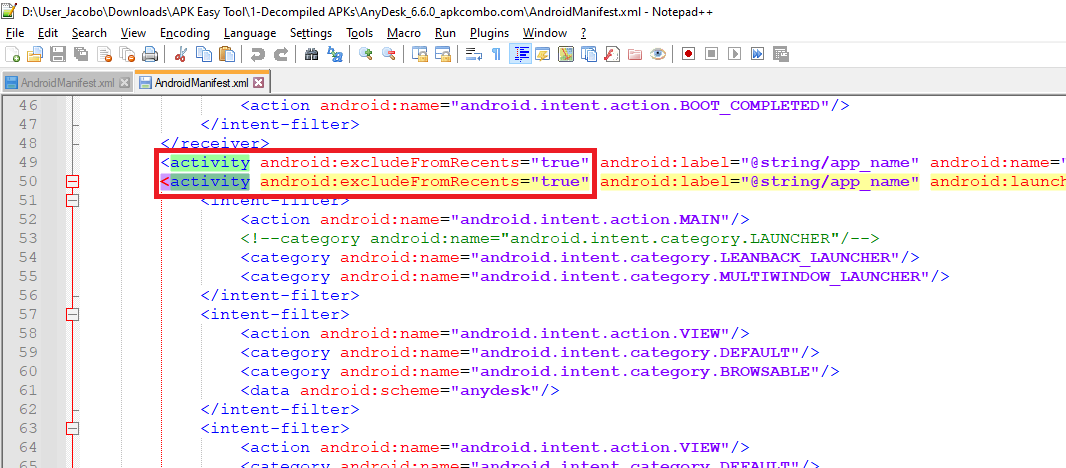
- We can now convert the decompiled codes back to
.apkfile. Go back toEasy APK tool, change the compile name, then click on Compile to compile it back to apk file. The generated.apkfile will be created under/2-Recompiled APKs/.
- Install the apk to your phone. Done! Every time you close the app, it will now never appear on the recent app screen.
You can support me by donating:

Connect with me at my linkedin: https://www.linkedin.com/in/angelo-jacobo/