●HA작업) lcd_pcf8574 Component LCD 모듈 HAOS에 연결 및 PIR_Sensor 구성및 감도 감지후 해체 시간 조정 하기
♨ 카랜더 일정 :
2023년06월22일
본문
●HA작업) lcd_pcf8574 Component LCD 모듈 HAOS에 연결 및 PIR_Sensor 구성및 감도 감지후 해체 시간 조정 하기
추가정보)
ESPHome을 갖춘 밝기 조절 가능 PCF8574 LCD 디스플레이
https://community.home-assistant.io/t/dimmable-pcf8574-lcd-display-with-esphome/272308
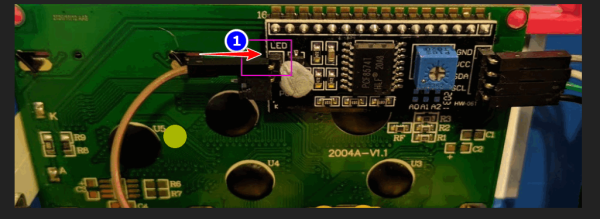
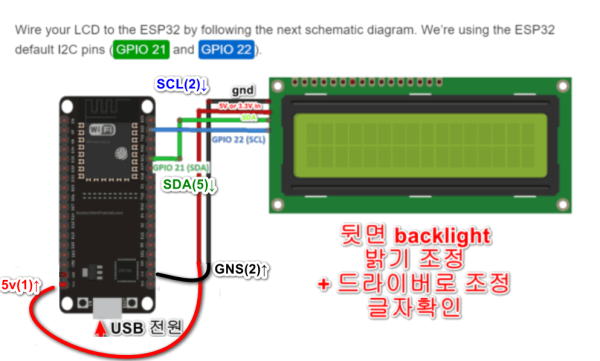
상단 1번pin에 연결 >> 댓글 소스 적용 >>
# backlight 20240110_1154_28
# ========================
output:
- platform: ledc
pin: GPIO12
id: backlight
inverted: true
# backlight_GPIO12
# ==========
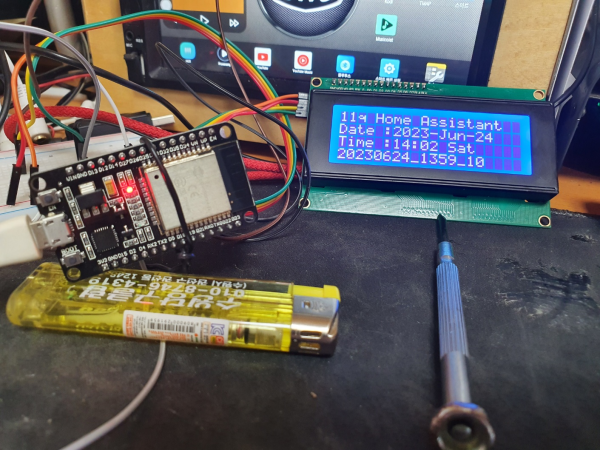
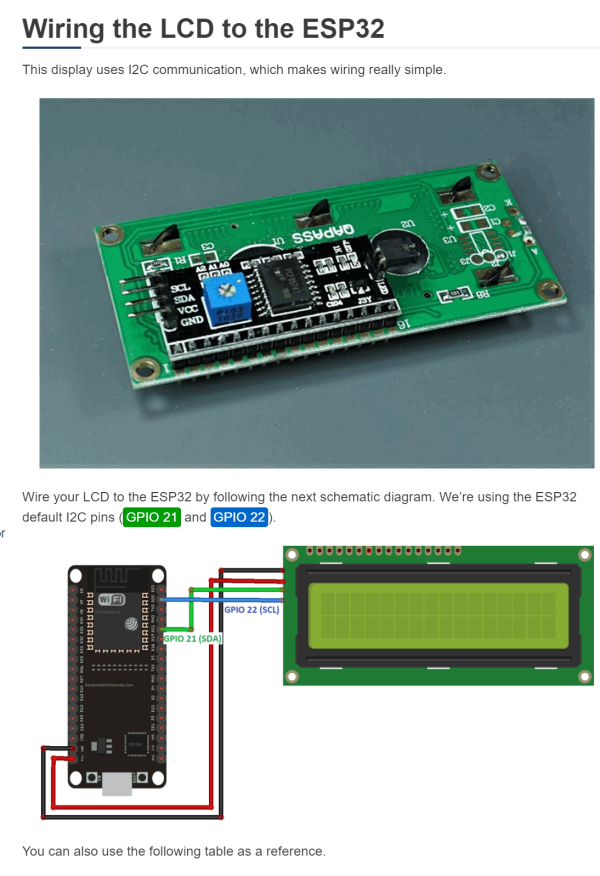
haos에 esp32 연결하여 lcd_pcf8574 Component lcd display 적용 간단 합니다.
초기 초보자는 아래 lcd_pcf8574 Component 정보를 확인 하여 연결 주의
아래 소스 적용 lcd_pcf8574 Component install 내용입니다
단독 esp32 install 후
중간에서 부터 display 제품 연결 lcd_pcf8574 Component 소스 입니다.
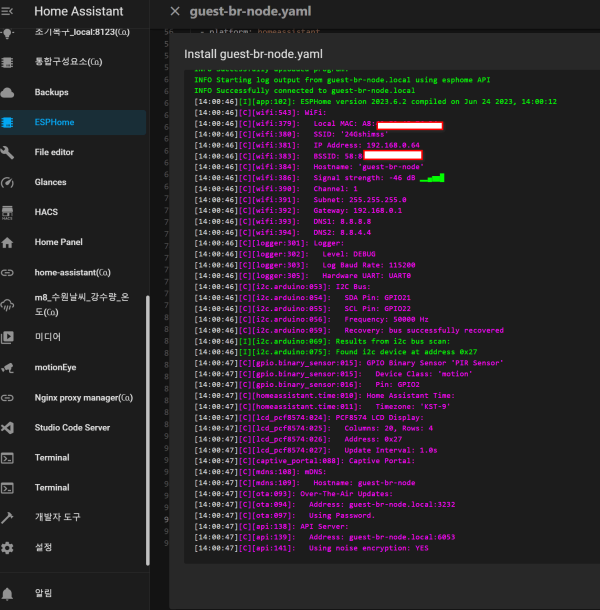
install 내용
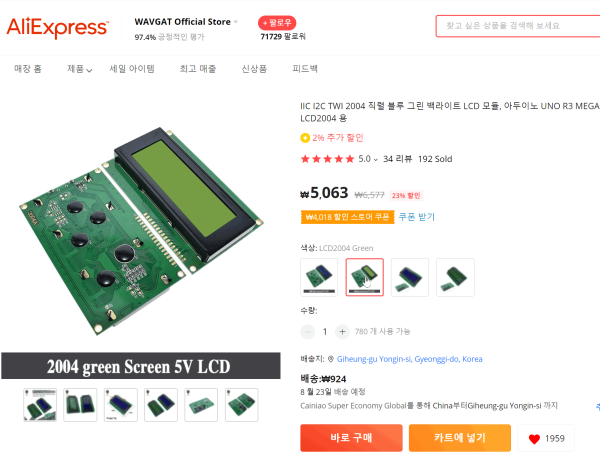
구입 정보 lcd_pcf8574 Component
기본적인 연결만 잘하고 소스 적용만 하면
모든것이 home assistant에 esphone 자동으로 연결 업데이트 설정 됩니다.
<정보 찾아보기> lcd_pcf8574 Component
기본 Home assistant 에 연결 테스트 합니다
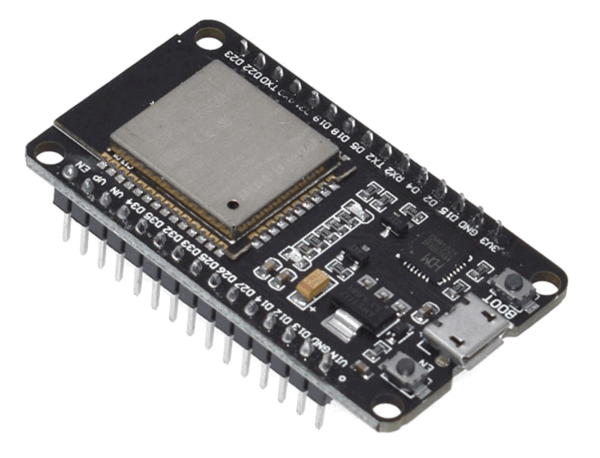
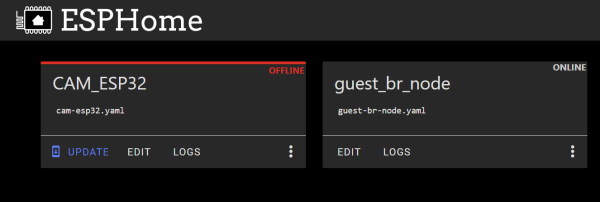
★★★ HA작업) ESP32 동작테스트 성공) wifi로 homeassistant의 esphone 애드온 연결 성공 _무선 와이파이 및 블루투스 호환 듀얼 코어, RF ESP32 개발 보드, 3.3V 2023, CP2104, 2.4GHz, 1PC
Character-Based LCD Display > 제품 정보 lcd_pcf8574 Component
https://github.com/esphome/esphome-docs/blob/current/components/display/lcd_display.rst
How to Use I2C LCD with ESP32 on Arduino IDE (ESP8266 compatible)
https://randomnerdtutorials.com/esp32-esp8266-i2c-lcd-arduino-ide/
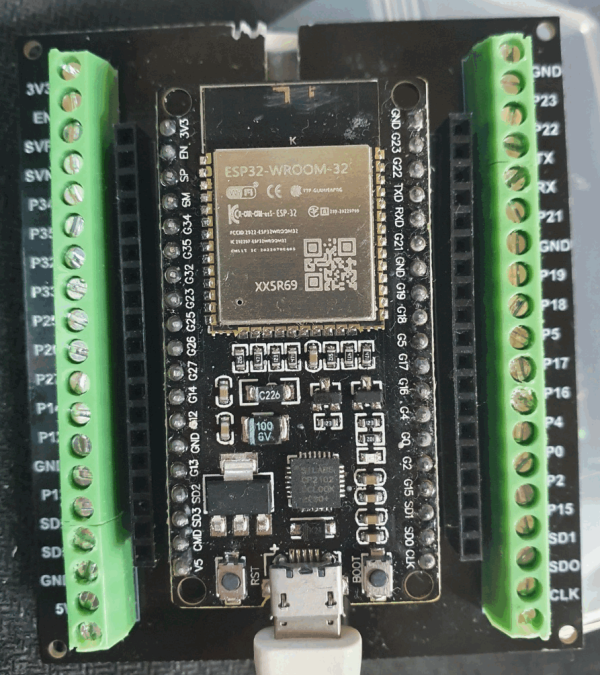
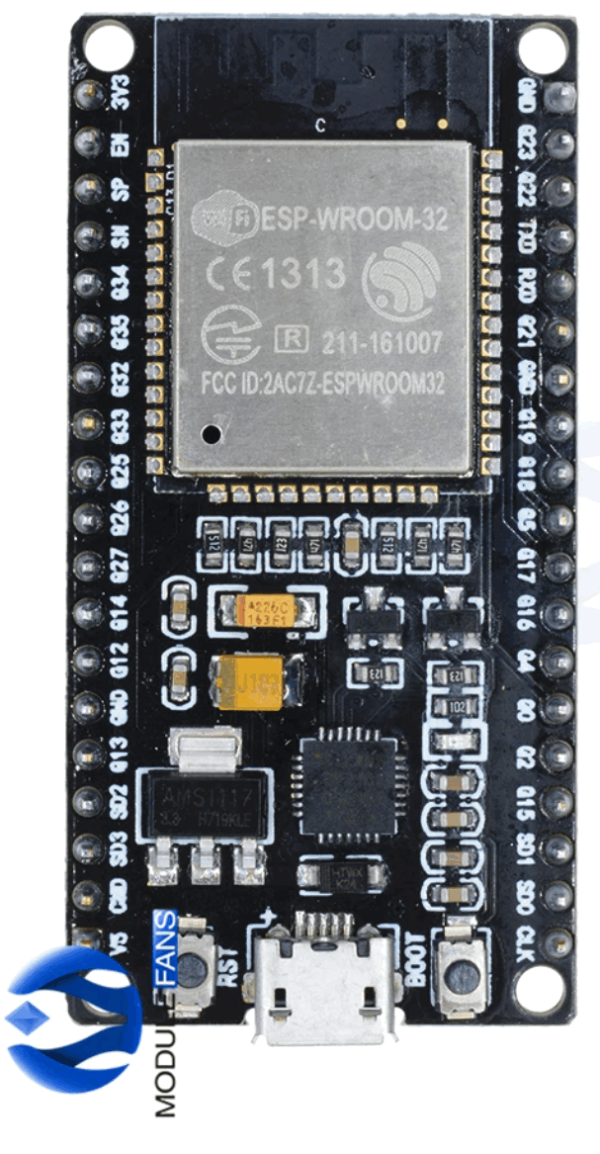
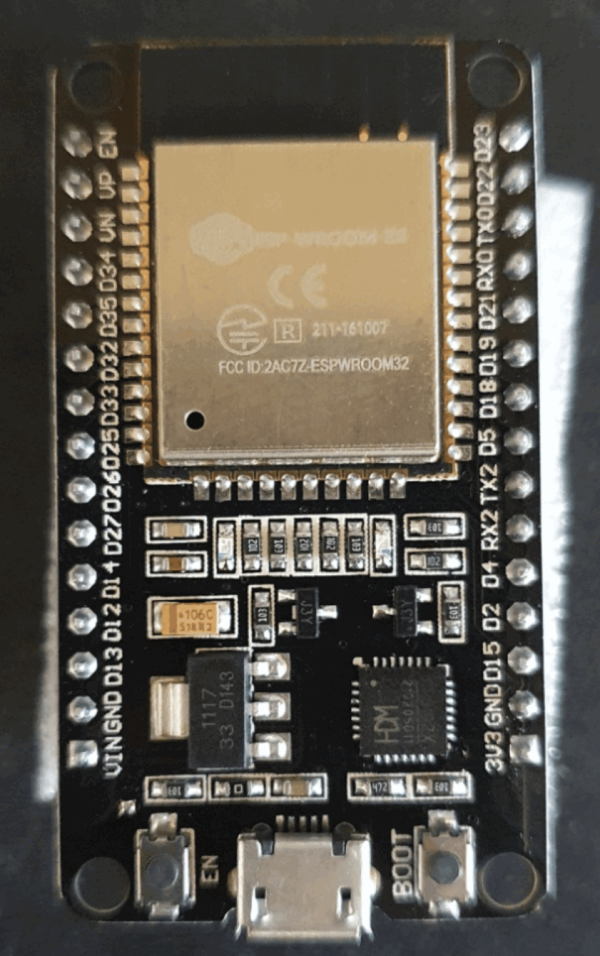
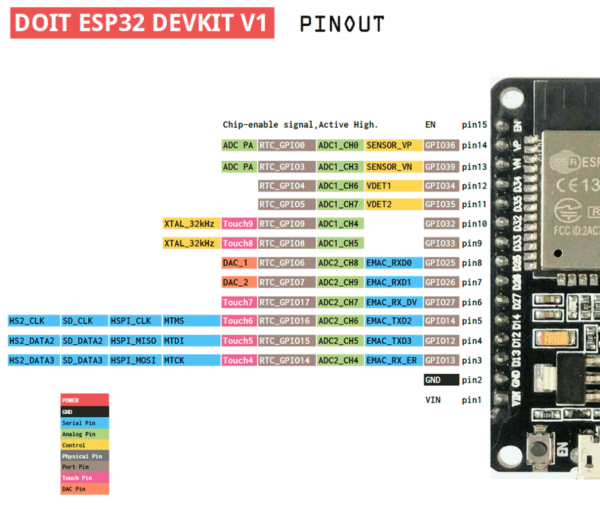
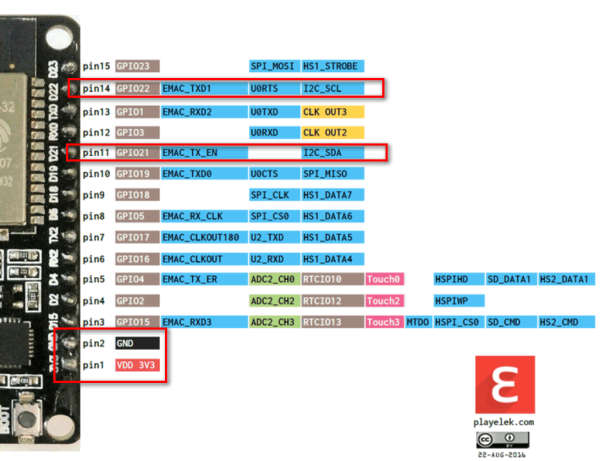
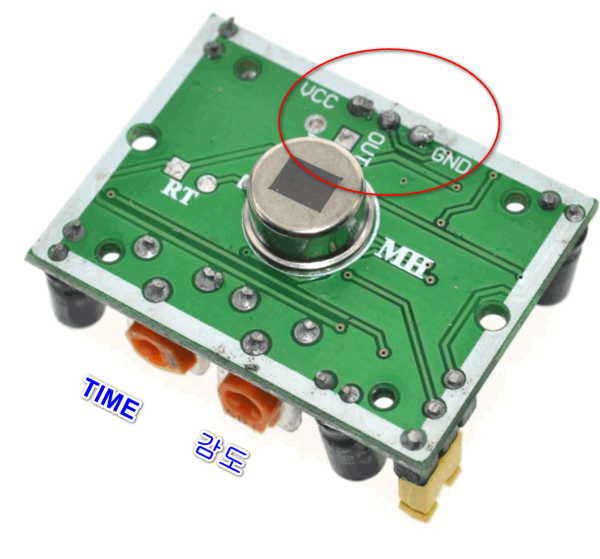
실제 사진을 찍어 시그널 이름을 확인 합니다
참조 정보
https://community.home-assistant.io/t/lcd-16x2-via-i2c-pcf8574-white-boxes-only/407967/2
https://community.home-assistant.io/t/lcd-16x2-via-i2c-pcf8574-white-boxes-only/407967/10
https://www.youtube.com/watch?v=CjpPdwK_ttg&t=446s
https://t1.daumcdn.net/cfile/tistory/9914094C5B9D3EFA0D?original
LCD 뒷면
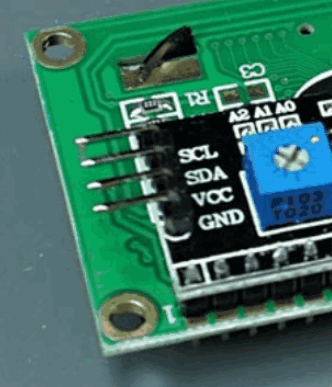
<연결정보>lcd_pcf8574 Component
pin정보와 연결정보
PIR_Sensor 구성및 감도 감지후 해체 시간 조정 하기
binary_sensor:
- platform: gpio
pin: GPIO2
name: "PIR_Sensor"
device_class: motion
id: pin_d2
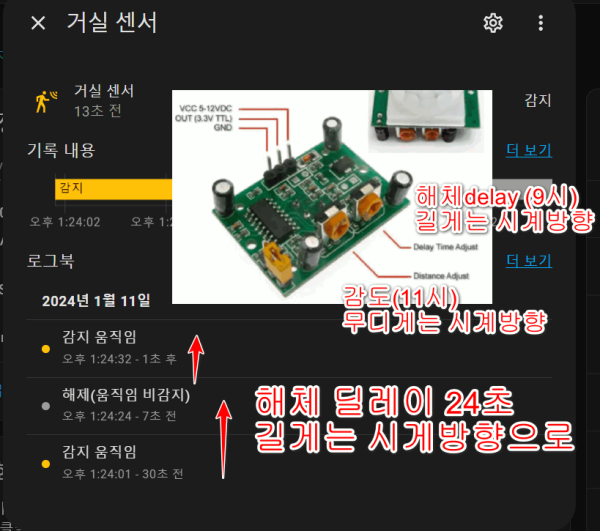
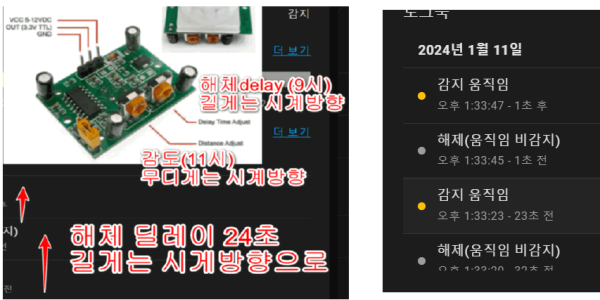
모션센서 감조 딜레이 조정 하기
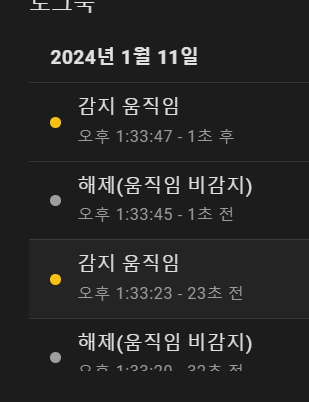
움직임 하여 관찰
https://community.home-assistant.io/t/error-compiling-code-for-lcd-display/423592
https://esphome.io/components/display/lcd_display.html
<소스 적용정보>
# temp1
esphome:
  name: "display-book-room" # ID
  friendly_name: "display_book_room_PIR_Sensor" # name
esp32:
  board: esp32dev
  framework:
    type: arduino
# 11q.kr/www/bbs/board.php?bo_table=co3&wr_id=1062
# Enable logging
logger:
  # baud_rate: 9600
  # baud_rate: 0
  level: DEBUG #기본값
  # level: VERBOSE #사용하지 않는 패킷만 출력
  # level: VERY_VERBOSE
  #전체 패킷 출력 <<=== 초기설치시 옵션사용
# Enable Home Assistant API
api:
  encryption:
    key: "wq8XuzMYpmw2ynd32uhEHm2KbQh4DO64+sX3P0zPimI="
ota:
  password: "62369d8ccd0bfd5f28950d4778cd9c40"
wifi:
  ssid: !secret wifi_ssid
  password: !secret wifi_password
  manual_ip:
    static_ip: 192.168.0.201
    gateway: 192.168.0.1
    subnet: 255.255.255.0
    dns1: 8.8.8.8
    dns2: 8.8.4.4
  ap:
    ssid: "Sensor Fallback Hotspot"
    password: "tqLb2DhNbREz"
captive_portal:
# ==============================
# 기기 추가부분
# pin 번호 > https://11q.kr/www/bbs/board.php?bo_table=co3&wr_id=1213    inverted: true
# # ==============================
time:
  - platform: homeassistant
    id: homeassistant_time
    timezone: Asia/Seoul

# 9999999999999999999999999999999999999999999
i2c:
  sda: GPIO21
  scl: GPIO22
  scan: True
  id: bus_a

# backlight   20240110_1154_28
# ========================
output:
  - platform: ledc
    pin: GPIO12
    id: backlight
    inverted: true
   # backlight_GPIO12
# ==========
# light:
light:
# 20240110_1205_13  88888888888888888888
  - platform: monochromatic
    output: backlight
    name: "LCD Display Backlight"
    id: light_backlight
    restore_mode: ALWAYS_ON

# 99999999999999999999999999999999999999
binary_sensor:
  - platform: gpio
    pin: GPIO2
    name: "PIR_Sensor"
    device_class: motion
    id: pin_d2

# 8888888888888888888888888888888
  - platform: homeassistant
    id: backlight_on
    entity_id: input_number.backlight_level
    internal: true
# 9999999999999999999999999999999999999999999
sensor:
# https://esphome.io/components/sensor/wifi_signal.html
  - platform: wifi_signal # Reports the WiFi signal strength/RSSI in dB
    name: "WiFi Signal dB"
    id: wifi_signal_db
    update_interval: 60s
    entity_category: "diagnostic"
  - platform: copy # Reports the WiFi signal strength in %
    source_id: wifi_signal_db
    name: "WiFi Signal Percent"
    filters:
      - lambda: return min(max(2 * (x + 100.0), 0.0), 100.0);
    unit_of_measurement: "Signal %"
    entity_category: "diagnostic"
    device_class: ""
# =======================================    #
  - platform: bme680
    temperature:
      name: "Temperature"
      filters:
      - calibrate_linear:
         method: least_squares
         datapoints:
          - 0.0 -> 1.0
          - 25.0 -> 22.0
    pressure:
      name: "Pressure"
    humidity:
      name: "Humidity"
      filters:
        - calibrate_linear:
          - 0 -> 0
          - 0.500 -> 0.550
    gas_resistance:
      name: "Gas Resistance"
    address: 0x77
    update_interval: 60s
# ========================================
  - platform: homeassistant
    id: temperature
    entity_id: sensor.esphome1_temperature
    internal: true
  - platform: homeassistant
    id: humidity
    entity_id: sensor.esphome1_humidity
    internal: true
  - platform: homeassistant
    id: raw
    entity_id: sensor.energymeterip67_raw
    internal: true
  - platform: homeassistant
    id: current
    entity_id: sensor.energy1_electricity_usage_current67_a
    internal: true

  - platform: homeassistant
    id: power
    entity_id: sensor.energy1_electricity_usage_power67_w
    internal: true

  - platform: homeassistant
    id: daily_energy
    entity_id: sensor.energy1_electricity_usage_power67_total_daily
    internal: true


text_sensor:
  - platform: version
    name: "Mortara - ESPHome Version"
  - platform: homeassistant
    id: display_line_2
    entity_id: input_text.mortara_line_2
    internal: true
  - platform: homeassistant
    id: display_line_3
    entity_id: input_text.mortara_line_3
    internal: true
  - platform: homeassistant
    id: display_line_4
    entity_id: input_text.mortara_line_4
    internal: true

  - platform: homeassistant
    id: display_backlight
    entity_id: input_number.backlight_level
    internal: true
    on_value:
      then:
        - output.turn_on: backlight
        - output.set_level:
            id: backlight
            level: !lambda |-
              return atoi(id(display_backlight).state.c_str()) / 100.0;
# ---------------
# text_sensor:
  - platform: template
    name: Uptime
    update_interval: 1s
    lambda: |-
      auto s = millis() / 1000;
      return str_snprintf("%02d:%02d:%02d:%02d", 11, s / 86400, s / 3600 % 24, s / 60 % 60, s % 60);
# -------------------
# 20240110_1554_39
# ========================
display:
  - platform: lcd_pcf8574
    dimensions: 20x4
    address: 0x27
    id: lcd
    update_interval: 0.200s

    user_characters:
      - position: 1
        data:
          - 0b00000
          - 0b00010
          - 0b00101
          - 0b00010
          - 0b00000
          - 0b00000
          - 0b00000
          - 0b00000
      - position: 2
        data:
          - 0b01000
          - 0b10101
          - 0b01011
          - 0b00110
          - 0b01100
          - 0b11010
          - 0b10101
          - 0b00110

    lambda: |-
      if(id(light_backlight).current_values.is_on()) {
        id(lcd).backlight();
        it.printf(0, 0, "%.0fdB", id(wifi_signal_db).state);
        it.strftime(5, 0, "> %H:%M-%S %a", id(homeassistant_time).now());
        it.strftime(0, 1, "Date > %Y-%b-%d", id(homeassistant_time).now());
        it.printf(0, 2, "Power> %.0f W,", id(power).state);
        it.printf(14, 2, "A>%.1f", id(current).state);
        it.printf(5, 3, "> %.1f C", id(temperature).state);
        it.printf(11, 3, "x01");
        it.printf(14, 3, "%.1f ", id(humidity).state);
        it.printf(18, 3, "x02");
          // 모션 감지 상태 확인 및 출력
        if (id(pin_d2).state == 1.0) {
          it.printf(0, 3, "PIR:1");
        } else {
          it.printf(0, 3, "PIR:0");
        }
      } else {
        id(lcd).no_backlight();
      }


# https://esphome.io/components/display/lcd_display.html
# https://esphome.io/components/sensor/bme680.html?highlight=bme680
# https://docs.openenergymonitor.org/electricity-monitoring/ct-sensors/interface-with-arduino.html
# https://www.speaktothegeek.co.uk/2022/08/esphome-ct-clamp-power-and-energy-monitor/
# https://community.home-assistant.io/t/energy-tracking-with-esp32-ct-clamp-sensor-from-an-efergy-elite-1-0r/344002
# https://community.home-assistant.io/t/ct-clamp-sensor-interference-on-esp32-adc/450366/2
# 20230810_1322_51
# https://community.home-assistant.io/t/dimmable-pcf8574-lcd-display-with-esphome/272308/9
# https://community.home-assistant.io/t/dimmable-pcf8574-lcd-display-with-esphome/272308/7

# ================ sample ===============
<화면이 나오지 않을시 >
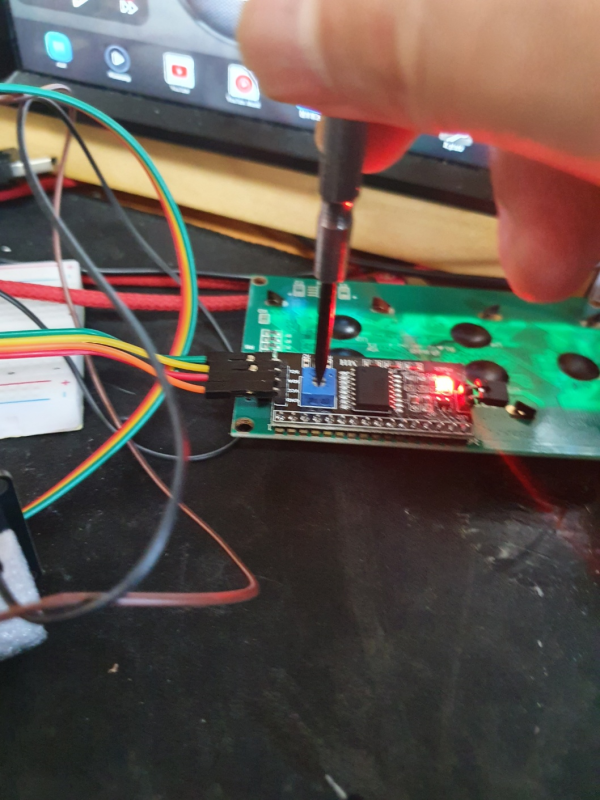
LCD의 입력 전압 ( 5v,3.3V) 전압에 조건에 따라 뒷면 backlight 밝기 조정 + 드라이버로 조정 글자확인
동작조건은 라이브러리 설치 관련 없이
home assistant 에 esp32 연결 정상 동작후 lcd_pcf8574 Component 사용파일을
상기 조건의 연결만 잘하고 install 후에 lcd 화면 발기 조정하여 글자만 나오면
성공후 모든 설정이 간단히 자동으로 업데이트 되고 자동 연결 됩니다
간단 초기 적용 테스트 소스정보
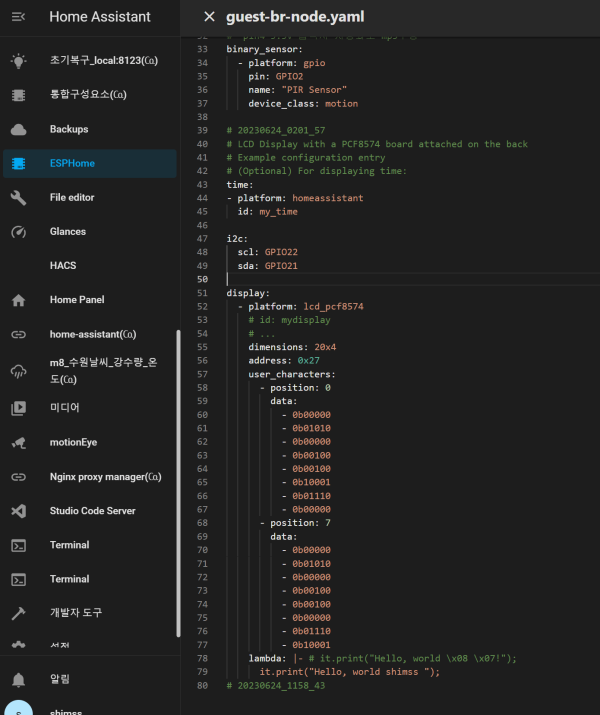
# 20230624_0201_57
#  ESP32 단독 테스트
#  pin4(GPIO02) 3.3v 입력시 RIP 동작감지 자동화로 mp3구동  확인
binary_sensor:
  - platform: gpio
    pin: GPIO2
    name: "PIR Sensor"
    device_class: motion
# 20230624_0201_57
# LCD Display with a PCF8574 board attached on the back
# Example configuration entry
# (Optional) For displaying time:
time:
- platform: homeassistant
  id: my_time
i2c:
  scl: GPIO22
  sda: GPIO21
display:
  - platform: lcd_pcf8574
    # id: mydisplay
    # ...
    dimensions: 20x4
    address: 0x27

    lambda: |-
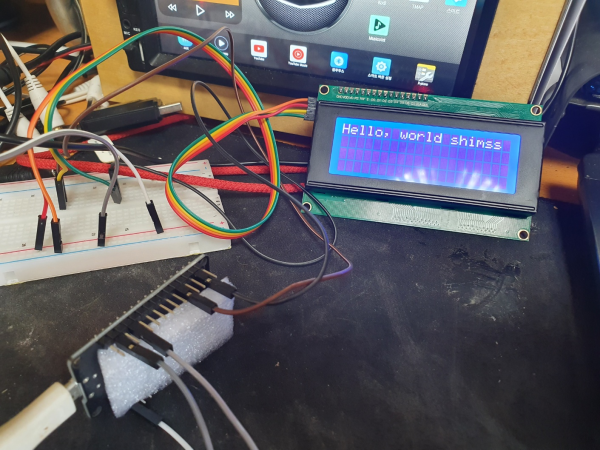
      it.print("Hello, world 11qkr");
# 20230624_1158_43
# 20230624_0201_57
# ESP32 단독 테스트
# pin4(GPIO02) 3.3v 입력시 RIP 동작감지 자동화로 mp3구동 확인
binary_sensor:
- platform: gpio
pin: GPIO2
name: "PIR Sensor"
device_class: motion
# 20230624_0201_57
# LCD Display with a PCF8574 board attached on the back
# Example configuration entry
# (Optional) For displaying time:
time:
- platform: homeassistant
id: my_time
i2c:
scl: GPIO22
sda: GPIO21
display:
- platform: lcd_pcf8574
# id: mydisplay
# ...
dimensions: 20x4
address: 0x27
lambda: |-
it.print("Hello, world 11qkr");
# 20230624_1158_43
lcd_pcf8574 Component 다음 정보 활용>>
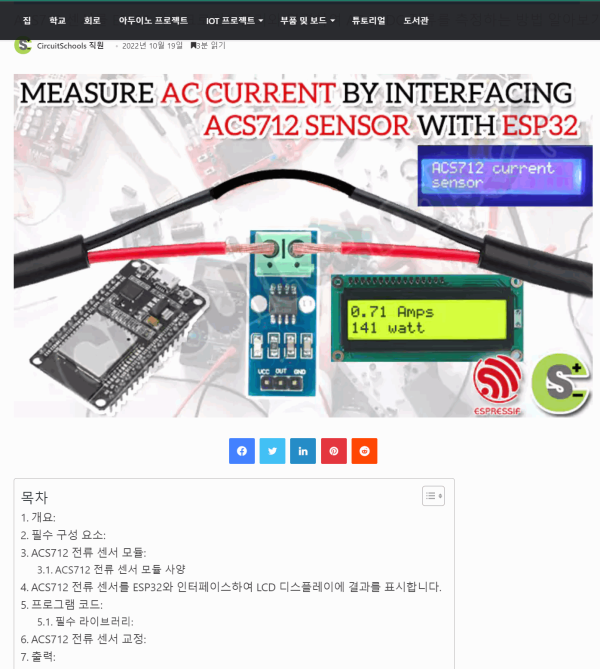
정보_ ACS712 센서와 ESP32를 연동하여 AC 전류 측정
https://www.circuitschools.com/measure-ac-current-by-interfacing-acs712-sensor-with-esp32/
https://www.circuitschools.com/measure-ac-current-by-interfacing-acs712-sensor-with-esp32/
☞ https://11q.kr 에 등록된 자료 입니다. ♠ 정보찾아 공유 드리며 출처는 링크 참조 바랍니다♠
뷰PDF 1,2
office view
관련자료
-
링크
-
첨부
-
이전
-
다음
댓글목록

11qkr님의 댓글
20230624_0211_00 작업중

11qkr님의 댓글

11qkr님의 댓글
lambda: |-
// Print 0 at the top left
it.print("0");
// Print 1 at the second row and second column.
it.print(1, 1, "1");
// Let's write a sensor value (let's assume it's 42.1)
it.printf("%.1f", id(my_sensor).state);
// Result: "42.1" (the dot will appear on the segment showing "2")
// Print a right-padded sensor value with 0 digits after the decimal
it.printf("Sensor value: %8.0f", id(my_sensor).state);
// Result: "Sensor value: 42"
// Print the current time
it.strftime("It is %H:%M on %d.%m.%Y", id(my_time).now());
// Result for 10:06 on august 21st 2018 -> "It is 10:06 on 21.08.2018"

11qkr님의 댓글
ESP32 응용> 코드 버튼 ON OFF 작동 방식 예제 설명
https://randomnerdtutorials.com/esp32-digital-inputs-outputs-arduino/

11qkr님의 댓글

11qkr님의 댓글
기본설치후 추가 내용
============
# ===============================================================
binary_sensor:
- platform: gpio
pin: GPIO2
name: "PIR_Sensor"
device_class: motion
id: pin_d2
i2c:
scl: GPIO22
sda: GPIO21
time:
- platform: homeassistant
id: homeassistant_time
timezone: Asia/Seoul
sensor:
- platform: bme680
temperature:
name: "BME680 Temperature"
oversampling: 16x
pressure:
name: "BME680 Pressure"
humidity:
name: "BME680 Humidity"
gas_resistance:
name: "BME680 Gas Resistance"
address: 0x77
update_interval: 60s
- platform: homeassistant
id: temperature
# entity_id: sensor.onseubdogye_temperature
entity_id: sensor.guest_br_node_bme680_temperature
internal: true
- platform: homeassistant
id: humidity
# entity_id: sensor.onseubdogye_humidity
entity_id: sensor.guest_br_node_bme680_humidity
internal: true
# sensor.bme680_bme680_temperature
# sensor.bme680_bme680_humidity
# sensor.guest_br_node_bme680_temperature
# sensor.guest_br_node_bme680_humidity
display:
- platform: lcd_pcf8574
dimensions: 20x4
address: 0x27
id: mydisplay
user_characters:
- position: 1
data:
- 0b00000
- 0b00010
- 0b00101
- 0b00010
- 0b00000
- 0b00000
- 0b00000
- 0b00000
- position: 2
data:
- 0b01000
- 0b10101
- 0b01011
- 0b00110
- 0b01100
- 0b11010
- 0b10101
- 0b00110
lambda: |-
it.print(0, 0, "Home Assistant_8574");
it.strftime(0, 1, "Date > %Y-%b-%d", id(homeassistant_time).now());
it.strftime(0, 2, "Time > %H:%M %a", id(homeassistant_time).now());
it.printf(0, 3, "Temp > %.1f C", id(temperature).state);
it.printf(11, 3, "\x01");
it.printf(14, 3, "%.1f ", id(humidity).state);
it.printf(18, 3, "\x02");
# https://esphome.io/components/display/lcd_display.html
# https://esphome.io/components/sensor/bme680.html?highlight=bme680
# 20230722_1802_37

11qkr님의 댓글
esphome esp32 pin정보 배열사진

11qkr님의 댓글
●HA작업) lcd_pcf8574 Component LCD 모듈 HAOS에 연결 및 PIR_Sensor 구성및 감도 감지후 해체 시간 조정 하기
s:\esphome\dispay-ip201-temp1.yaml 최종파일 보관

11qkr님의 댓글
pcf8574 재구성 2024_0126_1355_19

11qkr님의 댓글
추가정보)
ESPHome을 갖춘 밝기 조절 가능 PCF8574 LCD 디스플레이
https://community.home-assistant.io/t/dimmable-pcf8574-lcd-display-with-esphome/272308

11qkr님의 댓글
# temp1
esphome:
name: "display-book-room" # ID
friendly_name: "display_book_room_PIR_Sensor" # name
esp32:
board: esp32dev
framework:
type: arduino
# 11q.kr/www/bbs/board.php?bo_table=co3&wr_id=1062
# Enable logging
logger:
# baud_rate: 9600
# baud_rate: 0
level: DEBUG #기본값
# level: VERBOSE #사용하지 않는 패킷만 출력
# level: VERY_VERBOSE
#전체 패킷 출력 <<=== 초기설치시 옵션사용
# Enable Home Assistant API
api:
encryption:
key: "wq8XuzMYpmw2ynd32uhEHm2KbQh4DO64+sX3P0zPimI="
ota:
password: "62369d8ccd0bfd5f28950d4778cd9c40"
wifi:
ssid: !secret wifi_ssid
password: !secret wifi_password
manual_ip:
static_ip: 192.168.0.201
gateway: 192.168.0.1
subnet: 255.255.255.0
dns1: 8.8.8.8
dns2: 8.8.4.4
ap:
ssid: "Sensor Fallback Hotspot"
password: "tqLb2DhNbREz"
captive_portal:
# ==============================
# 기기 추가부분
# pin 번호 > https://11q.kr/www/bbs/board.php?bo_table=co3&wr_id=1213 inverted: true
# # ==============================
time:
- platform: homeassistant
id: homeassistant_time
timezone: Asia/Seoul
# 9999999999999999999999999999999999999999999
i2c:
sda: GPIO21
scl: GPIO22
scan: True
id: bus_a
# backlight 20240110_1154_28
# ========================
output:
- platform: ledc
pin: GPIO12
id: backlight
inverted: true
# backlight_GPIO12
# ==========
# light:
light:
# 20240110_1205_13 88888888888888888888
- platform: monochromatic
output: backlight
name: "LCD Display Backlight"
id: light_backlight
restore_mode: ALWAYS_ON
# 99999999999999999999999999999999999999
binary_sensor:
- platform: gpio
pin: GPIO2
name: "PIR_Sensor"
device_class: motion
id: pin_d2
# 8888888888888888888888888888888
- platform: homeassistant
id: backlight_on
entity_id: input_number.backlight_level
internal: true
# 9999999999999999999999999999999999999999999
sensor:
# https://esphome.io/components/sensor/wifi_signal.html
- platform: wifi_signal # Reports the WiFi signal strength/RSSI in dB
name: "WiFi Signal dB"
id: wifi_signal_db
update_interval: 60s
entity_category: "diagnostic"
- platform: copy # Reports the WiFi signal strength in %
source_id: wifi_signal_db
name: "WiFi Signal Percent"
filters:
- lambda: return min(max(2 * (x + 100.0), 0.0), 100.0);
unit_of_measurement: "Signal %"
entity_category: "diagnostic"
device_class: ""
# ======================================= #
- platform: bme680
temperature:
name: "Temperature"
filters:
- calibrate_linear:
method: least_squares
datapoints:
- 0.0 -> 1.0
- 25.0 -> 22.0
pressure:
name: "Pressure"
humidity:
name: "Humidity"
filters:
- calibrate_linear:
- 0 -> 0
- 0.500 -> 0.550
gas_resistance:
name: "Gas Resistance"
address: 0x77
update_interval: 60s
# ========================================
- platform: homeassistant
id: temperature
entity_id: sensor.esphome1_temperature
internal: true
- platform: homeassistant
id: humidity
entity_id: sensor.esphome1_humidity
internal: true
- platform: homeassistant
id: raw
entity_id: sensor.energymeterip67_raw
internal: true
- platform: homeassistant
id: current
entity_id: sensor.energy1_electricity_usage_current67_a
internal: true
- platform: homeassistant
id: power
entity_id: sensor.energy1_electricity_usage_power67_w
internal: true
- platform: homeassistant
id: daily_energy
entity_id: sensor.energy1_electricity_usage_power67_total_daily
internal: true
text_sensor:
- platform: version
name: "Mortara - ESPHome Version"
- platform: homeassistant
id: display_line_2
entity_id: input_text.mortara_line_2
internal: true
- platform: homeassistant
id: display_line_3
entity_id: input_text.mortara_line_3
internal: true
- platform: homeassistant
id: display_line_4
entity_id: input_text.mortara_line_4
internal: true
- platform: homeassistant
id: display_backlight
entity_id: input_number.backlight_level
internal: true
on_value:
then:
- output.turn_on: backlight
- output.set_level:
id: backlight
level: !lambda |-
return atoi(id(display_backlight).state.c_str()) / 100.0;
# ---------------
# text_sensor:
- platform: template
name: Uptime
update_interval: 1s
lambda: |-
auto s = millis() / 1000;
return str_snprintf("%02d:%02d:%02d:%02d", 11, s / 86400, s / 3600 % 24, s / 60 % 60, s % 60);
# -------------------
# 20240110_1554_39
# ========================
display:
- platform: lcd_pcf8574
dimensions: 20x4
address: 0x27
id: lcd
update_interval: 0.200s
user_characters:
- position: 1
data:
- 0b00000
- 0b00010
- 0b00101
- 0b00010
- 0b00000
- 0b00000
- 0b00000
- 0b00000
- position: 2
data:
- 0b01000
- 0b10101
- 0b01011
- 0b00110
- 0b01100
- 0b11010
- 0b10101
- 0b00110
lambda: |-
if(id(light_backlight).current_values.is_on()) {
id(lcd).backlight();
it.printf(0, 0, "%.0fdB", id(wifi_signal_db).state);
it.strftime(5, 0, "> %H:%M-%S %a", id(homeassistant_time).now());
it.strftime(0, 1, "Date > %Y-%b-%d", id(homeassistant_time).now());
it.printf(0, 2, "Power> %.0f W,", id(power).state);
it.printf(14, 2, "A>%.1f", id(current).state);
it.printf(5, 3, "> %.1f C", id(temperature).state);
it.printf(11, 3, "\x01");
it.printf(14, 3, "%.1f ", id(humidity).state);
it.printf(18, 3, "\x02");
// 모션 감지 상태 확인 및 출력
if (id(pin_d2).state == 1.0) {
it.printf(0, 3, "PIR:1");
} else {
it.printf(0, 3, "PIR:0");
}
} else {
id(lcd).no_backlight();
}
# https://esphome.io/components/display/lcd_display.html
# https://esphome.io/components/sensor/bme680.html?highlight=bme680
# https://docs.openenergymonitor.org/electricity-monitoring/ct-sensors/interface-with-arduino.html
# https://www.speaktothegeek.co.uk/2022/08/esphome-ct-clamp-power-and-energy-monitor/
# https://community.home-assistant.io/t/energy-tracking-with-esp32-ct-clamp-sensor-from-an-efergy-elite-1-0r/344002
# https://community.home-assistant.io/t/ct-clamp-sensor-interference-on-esp32-adc/450366/2
# 20230810_1322_51
# https://community.home-assistant.io/t/dimmable-pcf8574-lcd-display-with-esphome/272308/9
# https://community.home-assistant.io/t/dimmable-pcf8574-lcd-display-with-esphome/272308/7
# ================ sample ===============
♥간단_메모글♥
-
등록일 04.15가입 인사드립니다.댓글 6
-
등록일 04.09가입인사.댓글 4
-
등록일 03.03안녕하세여댓글 1
-
등록일 02.13
최근글
-
등록일 11.23
새댓글
-
등록자 진수수 등록일 11.24
-
등록자 개치토 등록일 11.24
-
등록자 알린이알리바바 등록일 11.24
-
등록자 dusrhwl 등록일 11.23
오늘의 홈 현황
QR코드
☞ QR코드 스캔은 kakao앱 자체 QR코드

