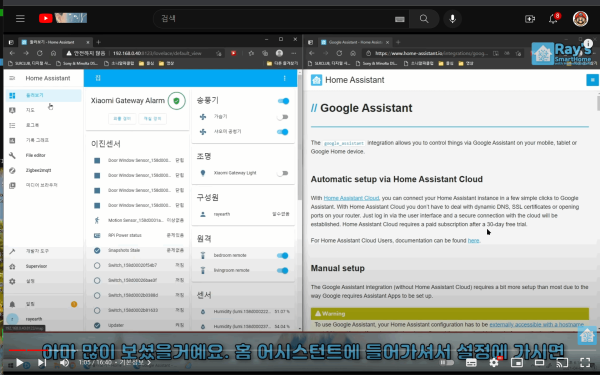
● HA작업) home assistant 와 구글홈 어시스턴트 상호 연결 영상 분석을 통한 연결 확인작업
♨ 카랜더 일정 :
2023년04월09일
본문
● HA작업) home assistant 와 구글홈 어시스턴트 상호 연결 하기
1차 작업 완료후 다시 영상 분석을 통한 연결 확인작업 재 점검 합니다,
ha 를 연결 할수 없습니다.,,,,> 재구성
영상정보로 설정 재 확인함
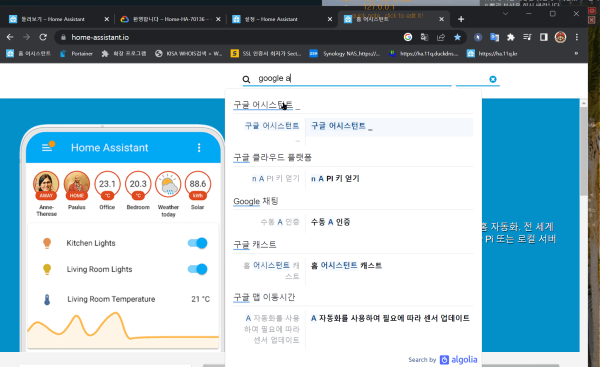
home assistant 진입 >
https://www.home-assistant.io/
이후 검색 > google a
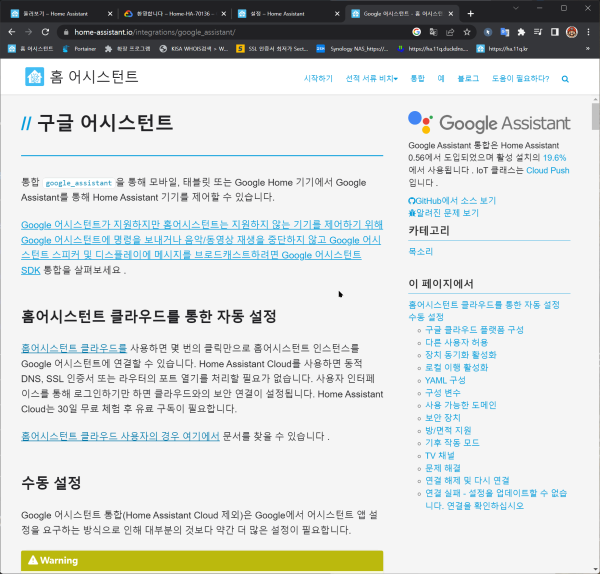
https://www.home-assistant.io/integrations/google_assistant/
(영상에 보면서 설명을 따라가며 설정 조건)
1.조건)무료로 사용을 위한 설정 조건 > https로 인증서 설치가 기본입니다
Google 어시스턴트를 사용하려면 호스트 이름과 SSL 인증서를 사용하여 홈어시스턴트 구성에 외부에서 액세스할 수 있어야 합니다 .
아직 구성하지 않은 경우 계속하기 전에 구성해야 합니다.
이를 위해 DNS를 변경하는 경우 DNS 변경 사항이 전파될 때까지 최대 48시간을 허용했는지 확인하세요.
그렇지 않으면 Google이 서버에 도달하지 못할 수 있습니다.
홈 네트워크 외부에서 홈어시스턴트에 연결할 수 있음을 확인한 후 Google 통합을 설정할 수 있습니다.
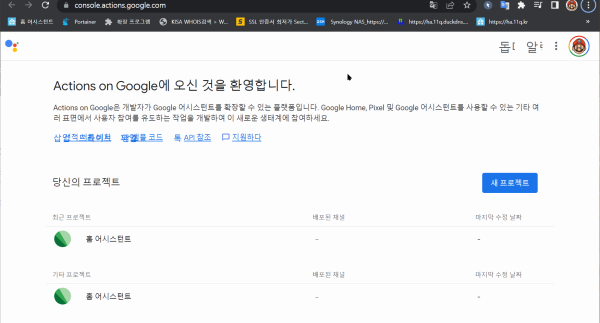
1) Actions on Google 콘솔 에서 새 프로젝트를 만듭니다 .
새창으로 열기 ( Shift + click )와 다른 새 탭으로 열기( crtl + click ) 을 이용 한다
https://console.actions.google.com/
로 접속 됩니다
1차 설정 값 수정이 목적이며
저의 설치 정보 확인
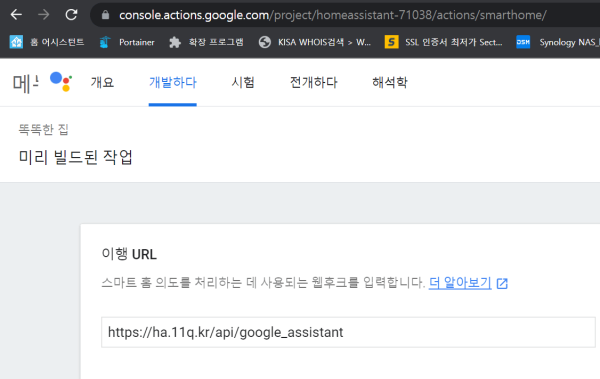
https://console.actions.google.com/project/homeassistant-71038/actions/smarthome/
https://ha.11q.kr/api/google_assistant
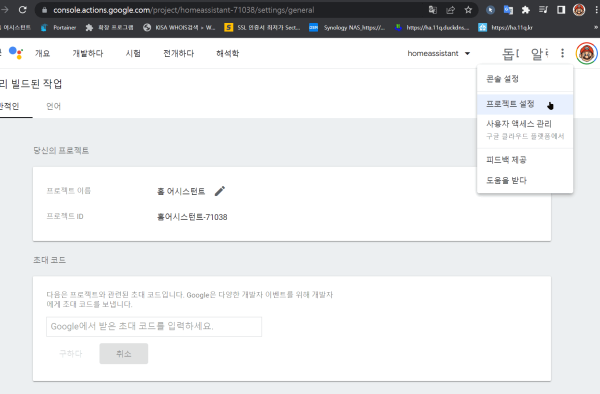
다음은 프로젝트설정에 들어가 이름과 아이디를 메모 합니다
Project name > homeassistant
Project ID > homeassistant-71038
다음은
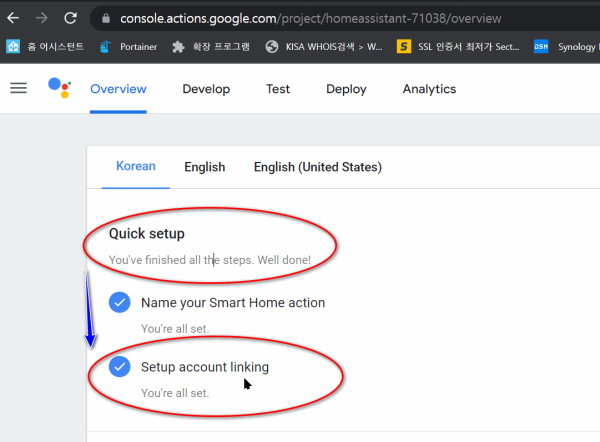
https://console.actions.google.com/project/homeassistant-71038/overview
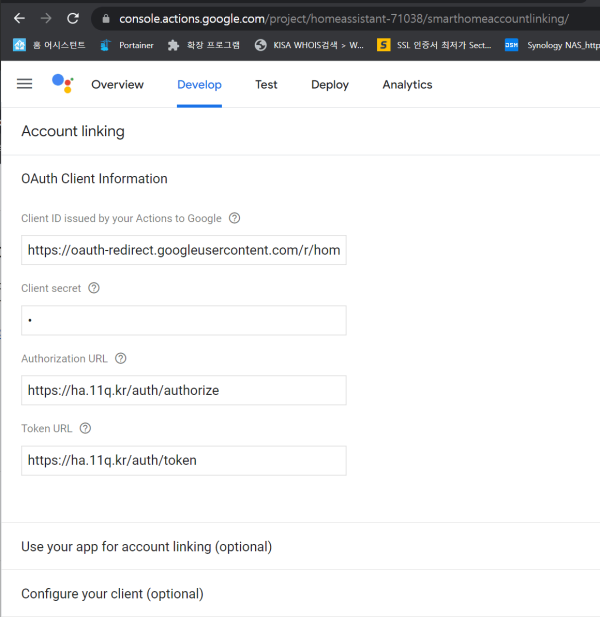
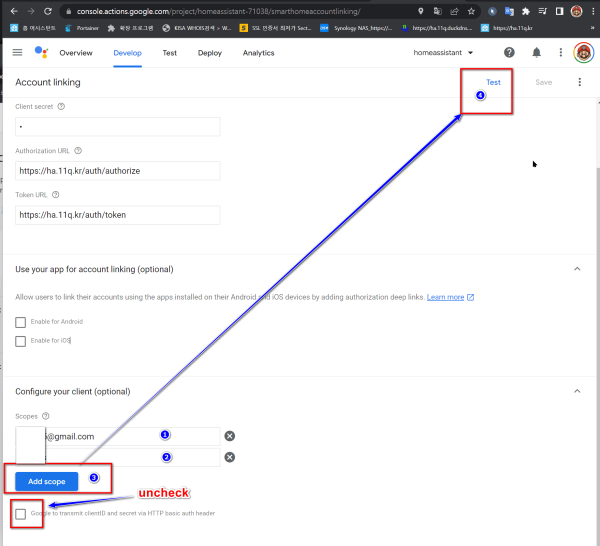
https://console.actions.google.com/project/homeassistant-71038/smarthomeaccountlinking/
https://oauth-redirect.googleusercontent.com/r/homeassistant-71038
https://ha.11q.kr/auth/authorize
아래로 이동하면
옵션
이메일
이름
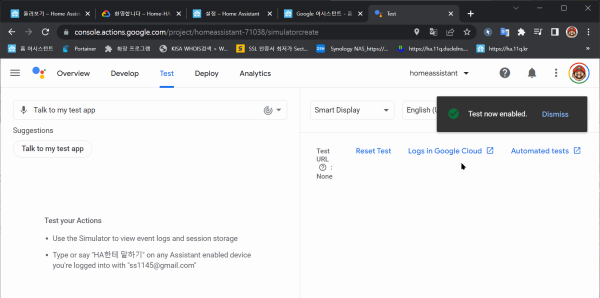
uncheck 저장 > add scope >> test 메뉴로 이동
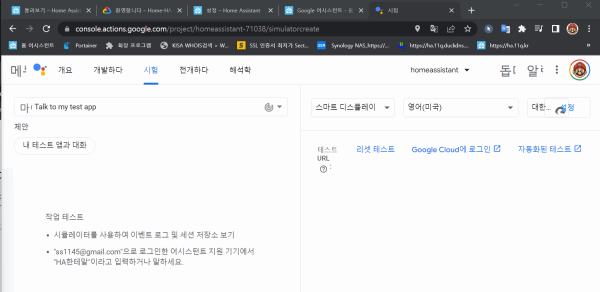
https://console.actions.google.com/project/homeassistant-71038/simulatorcreate
--------------
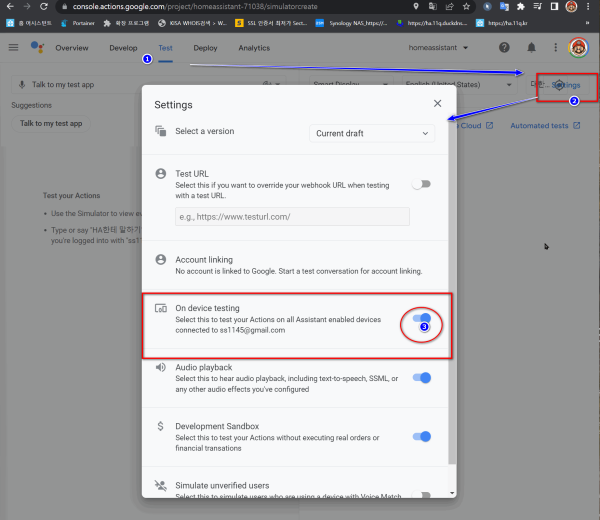
다음은 우측 상단에 setting 클릭
https://console.actions.google.com/project/homeassistant-71038/simulatorcreate
여기 까지 구글 콘솔에서 작업은 완료 되었습니다
다음은
https://www.home-assistant.io/integrations/google_assistant/
메뉴얼 참조 진행
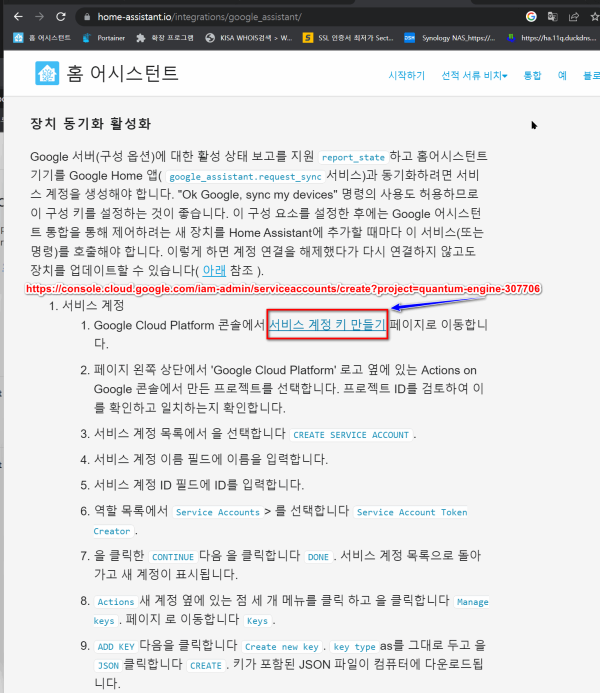
장치 동기화 활성화 >
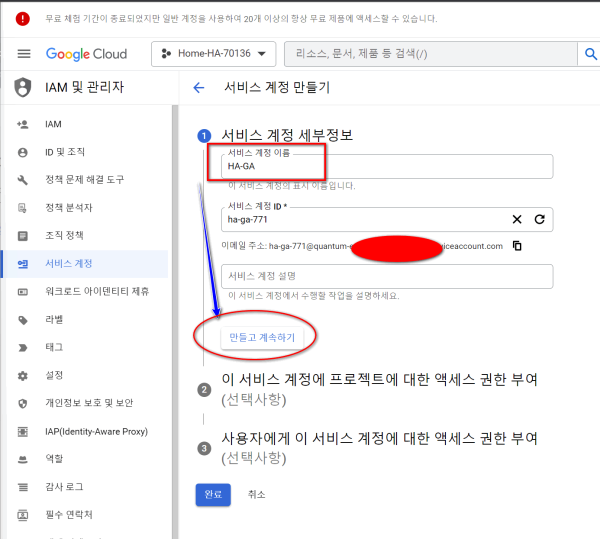
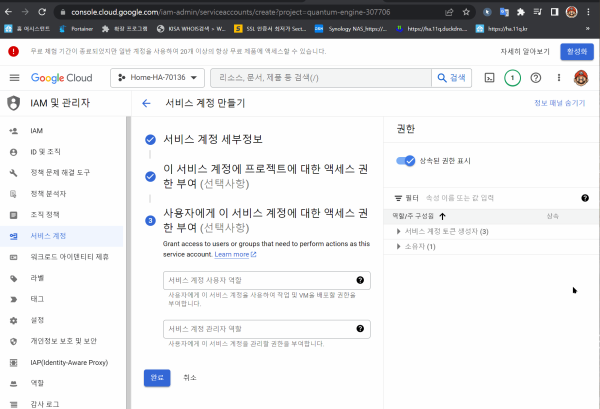
https://console.cloud.google.com/iam-admin/serviceaccounts/create?project=quantum-engine-307706
완료
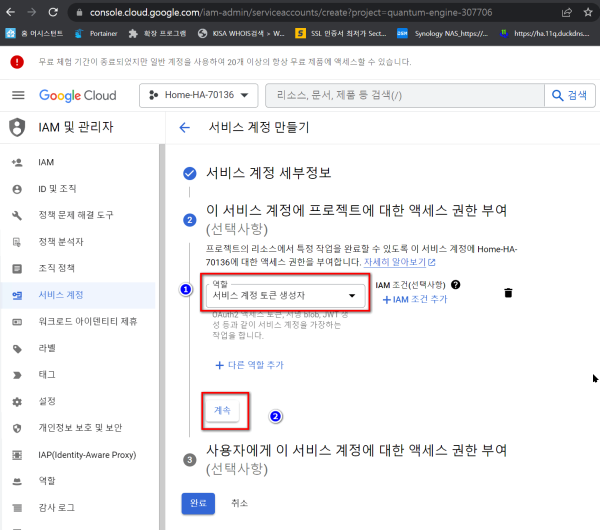
완료
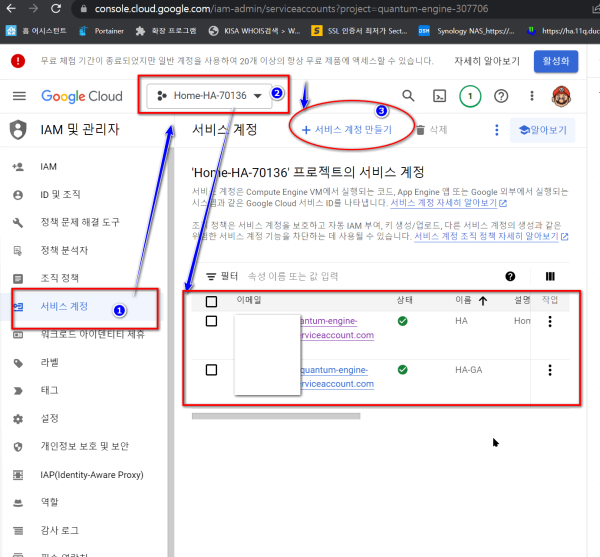
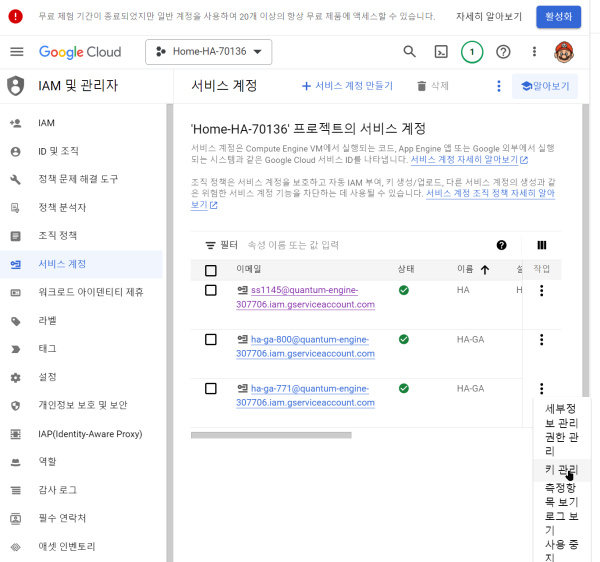
https://console.cloud.google.com/iam-admin/serviceaccounts?project=quantum-engine-307706
다음 화면이 나오면 진행한 번호를 확인 하여 키생성 파일 다운로드 합니다
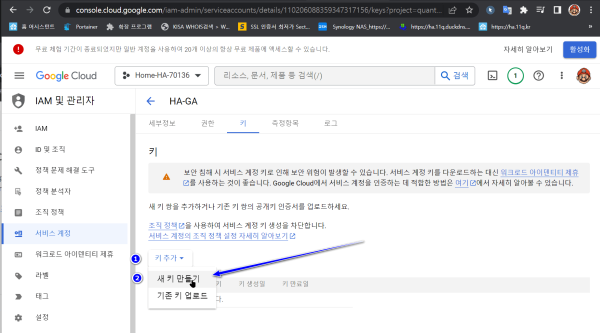
키관리 >>
키추가
https://console.cloud.google.com/iam-admin/serviceaccounts/details/110206088359347317156/keys?project=quantum-engine-307706
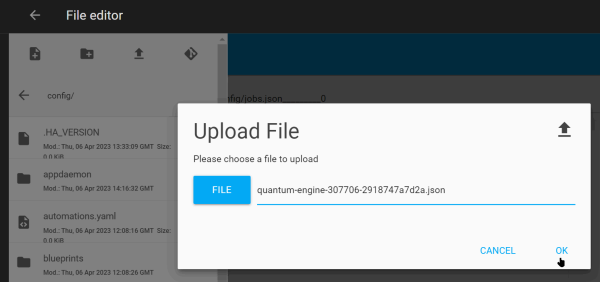
quantum-engine-307706-2918747a7d2a.json
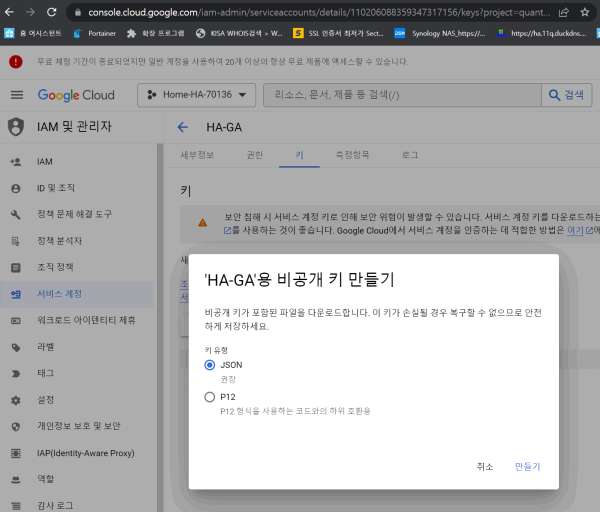
키 생성 저장 합니다 >> 이것은
파일에 파일명과 일치 하게 추가 합니다
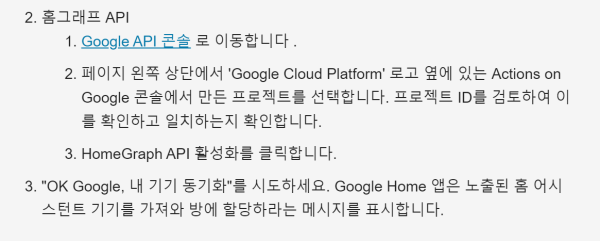
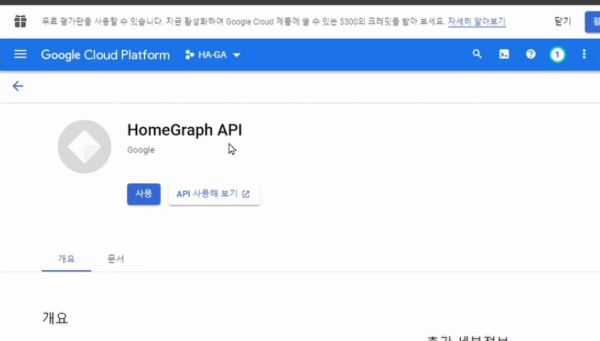
구글 콘솔로 이동
사용으로 하면 끝입니다
------------------- 참조 ---------------------
다음 뒤쪽에 파일 업로드및 수정
homeassistant-71038
를 변경하여 저장 예정입니다
===============================
키 생성 저장 합니다 >> 이것은
파일에 파일명과 일치 하게 추가 합니다
업로트 파일 이름 복사 후
quantum-engine-307706-2918747a7d2a.json
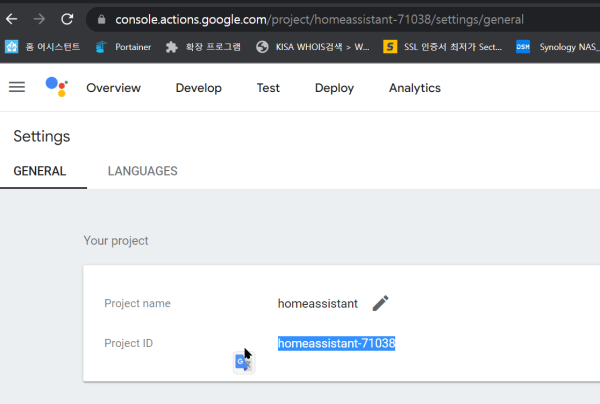
다음 링크 구글콘솔 /시험> 프로젝트설정 >>>에 들어가 프로젝터아이디 복사
https://console.actions.google.com/project/homeassistant-71038/simulatorcreate
프로젝트 아이디 복사 >> homeassistant-71038
https://console.actions.google.com/project/homeassistant-71038/settings/general
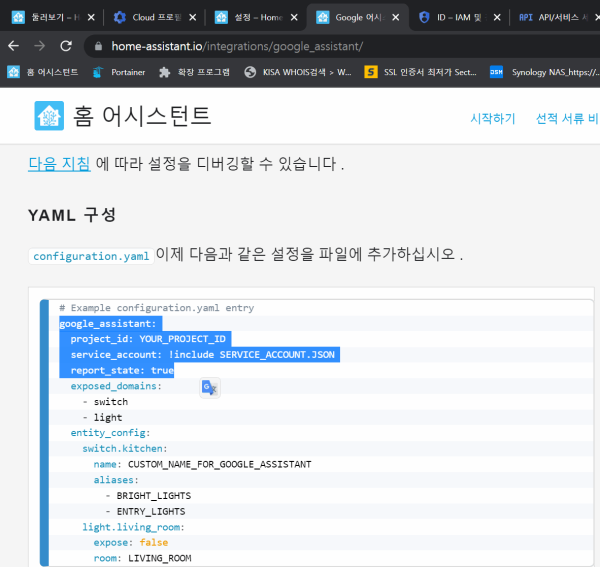
홈 어시스턴트 메뉴얼에서 참조 중간쯤
https://www.home-assistant.io/integrations/google_assistant/
의
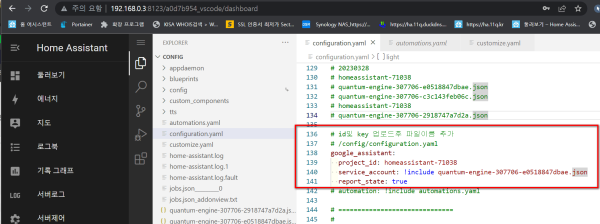
# Example configuration.yaml entry google_assistant: project_id: YOUR_PROJECT_ID service_account: !include SERVICE_ACCOUNT.JSON report_state: true
을 변경 추가 정보 확인 합니다.
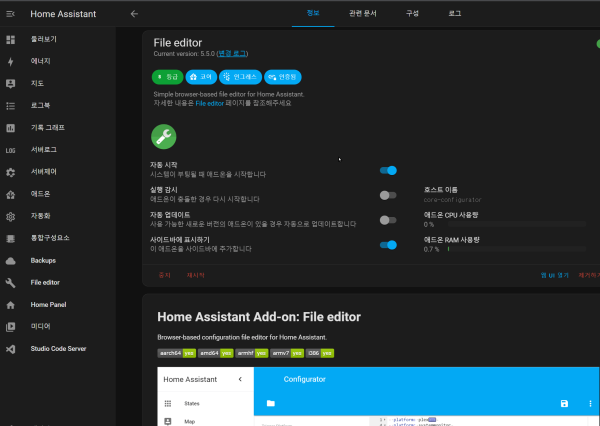
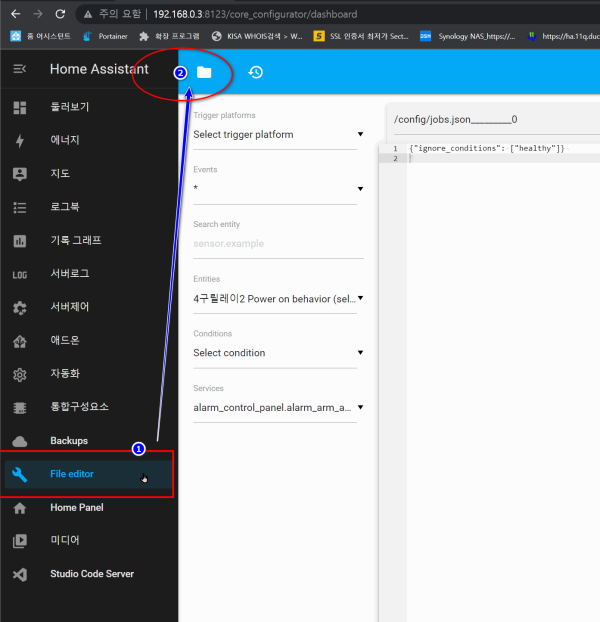
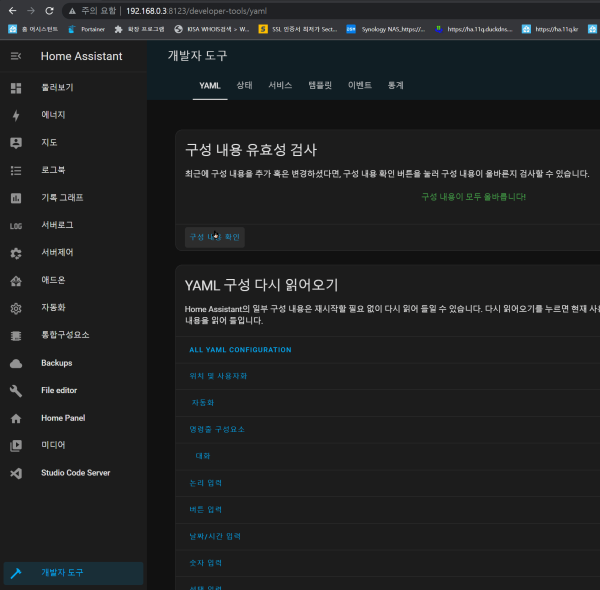
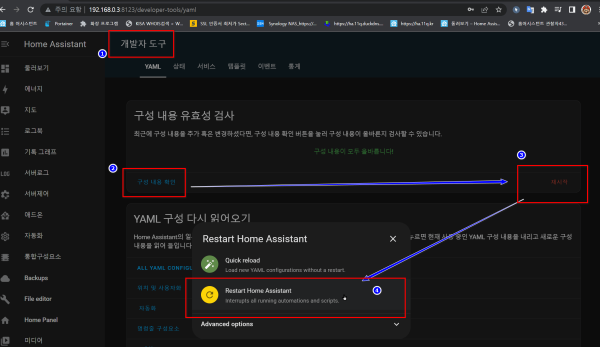
에디터로 추가 합니다
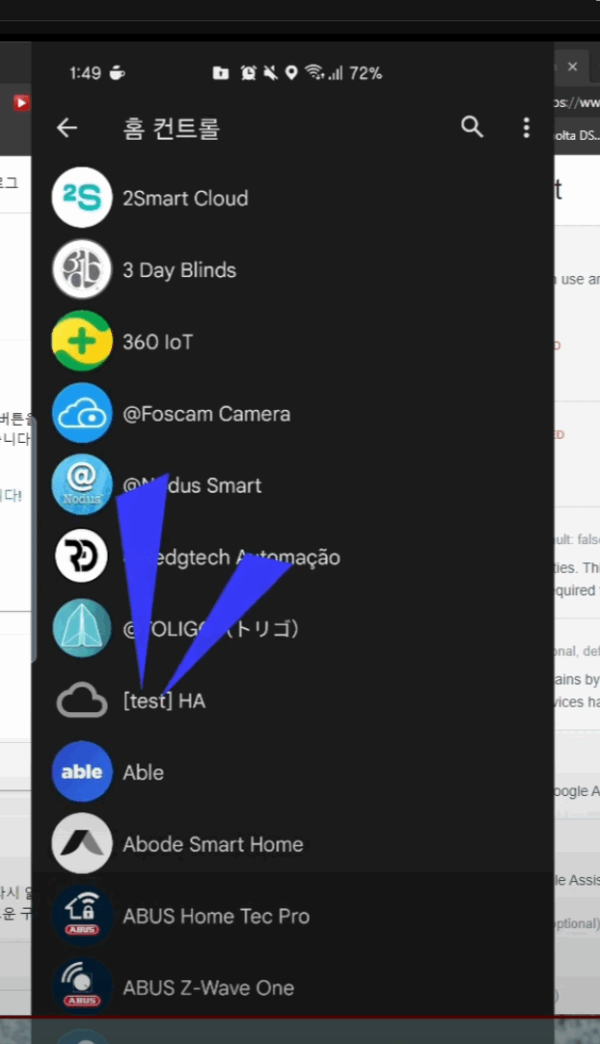
스마트폰 >>> 구글 home 앱으로 이동 기기추가는 영상 뒤부분에 참조 추가 합니다
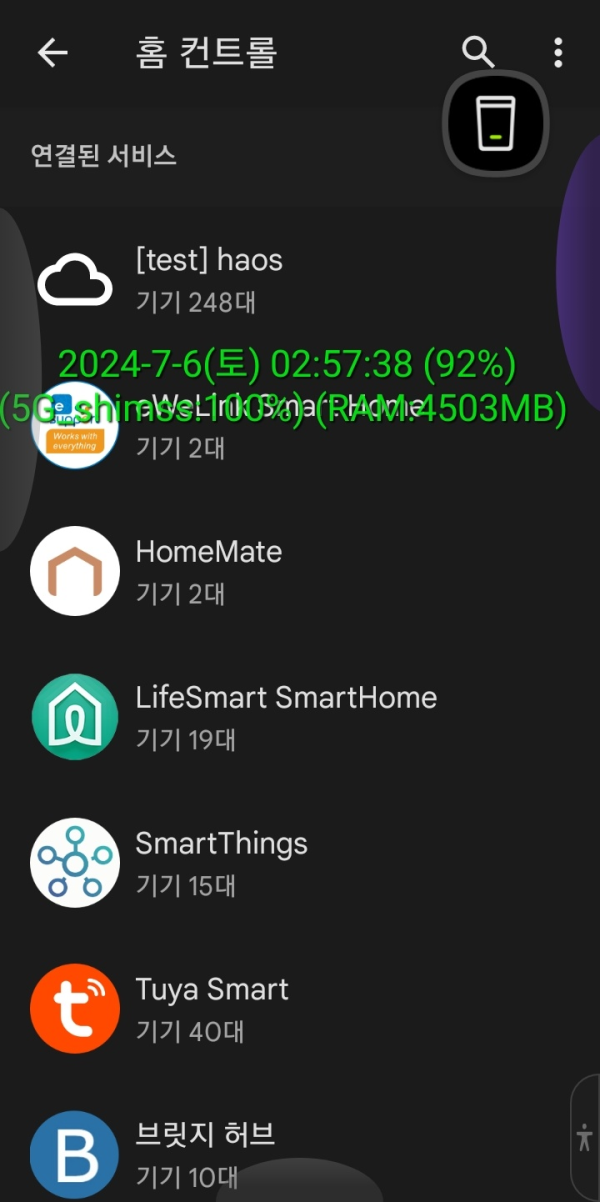
기기추가 > 기기설정 > test 검색 >>> [test ] ???? 추가 합니다
https:// 의 인증서가 제대로 된다면 기기추가 되고
기기목록이 나오고 음성으로 기기 on/off 가능 합니다.
ha를 연결 할수 없습니다.,,,등 문제 발생시
[test]HA ,,,등록 이 실패 하면 아래 내용 참조 작업 구성 합니다
>>> 재설치시 s:\www\privacy.html 지워진 파일를 생성 해야 한다
==================
https://11q.kr/www/bbs/board.php?bo_table=co3&wr_id=2314
https://cafe.naver.com/koreassistant/8589
의 내용 참조 작업
haos 재설치시
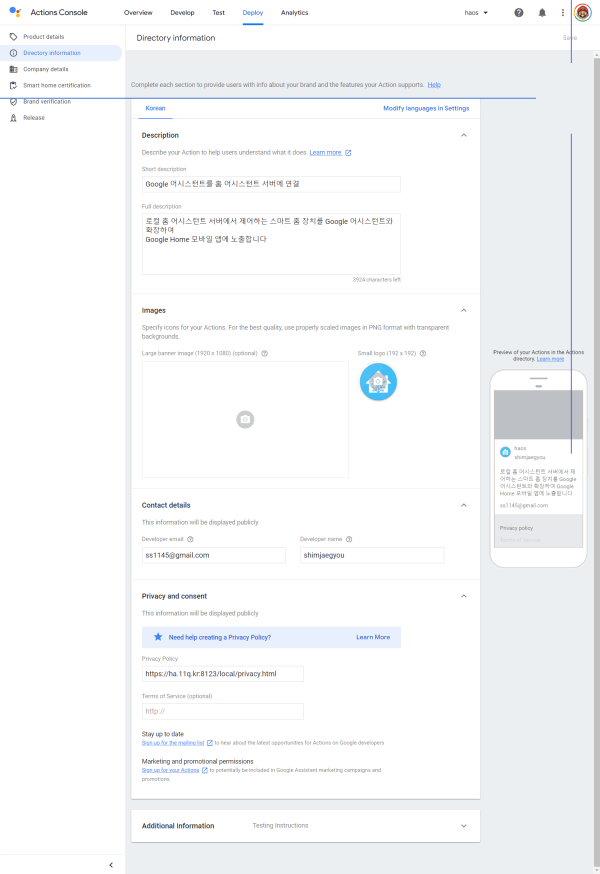
https://console.actions.google.com/project/haos-16120/directoryinformation/
에서 확인 하며
s:\www\privacy.html 지워진 파일를 생성 해야 한다
--------------------------- 생성 저장 합니다
s:\www\privacy.html
https://console.actions.google.com/project/haos-16120/directoryinformation/
상기 구성이 되어야 하며 구성시 우측 옆에 확인 이름 >>haos
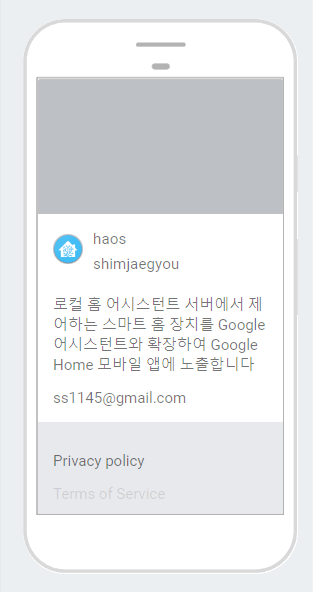
확인하여 스마트폰 에서 추가
https://11q.kr/www/bbs/board.php?bo_table=co3&wr_id=2404
내용확인
☞ https://11q.kr 에 등록된 자료 입니다. ♠ 정보찾아 공유 드리며 출처는 링크 참조 바랍니다♠
뷰PDF 1,2
office view
관련자료
-
링크
-
이전
-
다음작성일 2023.04.09 16:03
댓글목록

11qkr님의 댓글
HA를 구글홈에 연동시키기 AtoT / 스압주의
https://cafe.naver.com/koreassistant/5414

11qkr님의 댓글
https://console.actions.google.com/project/haos-16120/settings/general
화면 우측 상단에 3점을 클릭해서 - Project Settings 에 들어가시면
Project ID 항목이 보입니다.
이것도 복사해서, 위에 HA주소 적어둔 메모장에 붙여넣기 해주세요.
[출처] HomeAssistant를 구글홈에 연결하기|작성자 레이군
haos-16120
https://console.actions.google.com/project/haos-16120/smarthomeaccountlinking/
develop
https://oauth-redirect.googleusercontent.com/r/haos-16120
https://ha.11q.kr/auth/authorize
https://ha.11q.kr/auth/token
https://console.cloud.google.com/iam-admin/serviceaccounts?project=quantum-engine-307706&supportedpurview=project
'Home-HA-70136' 프로젝트의 서비스 계정
Home-HA-70136
>>>> HA >>>3점 키관리> 키추가> 새키 만들기 > json 만들 >> 파일 저장
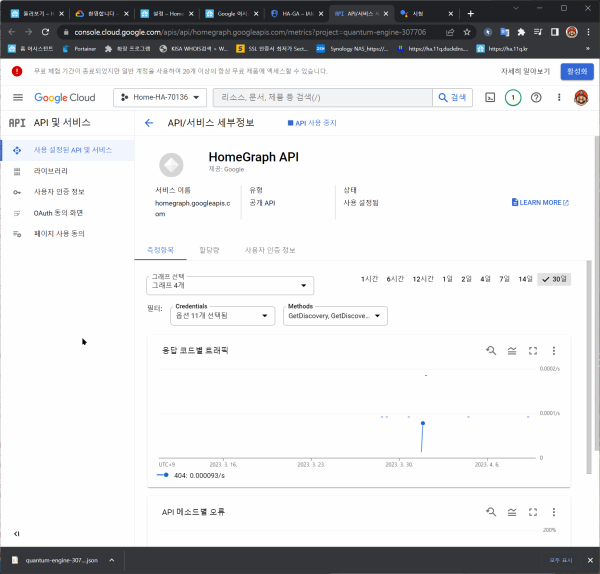
https://console.cloud.google.com/apis/api/homegraph.googleapis.com/metrics?project=quantum-engine-307706
사용설정만 확인
# /config/configuration.yaml 수정
google_assistant:
# https://blog.naver.com/ray0412/222405135843 2024_0520_1645_08
# project_id: haos-16120
# https://console.actions.google.com/project/haos-16120/overview
# https://console.actions.google.com/project/haos-16120/settings/general
# service_account: !include homeassistant-71038-aaf86d6560f9.json
# https://console.cloud.google.com/iam-admin/serviceaccounts/details/114843577091040733048/keys?project=homeassistant-71038&supportedpurview=project
# https://cafe.naver.com/koreassistant/8589
project_id: Home-HA-70136
service_account: !include quantum-engine-307706-93864e19bdeb.json
report_state: true
# expose_by_default: false
# 모든 디바이스 연동은 구글홈 앱에서 기기추가 Google호환 가능 추가 테스트 [test] HA 를 reconnect account 해야합니다
# false시 HA 등록 기기 모두 off 되고 아래 등록된 entity_config: 항목만 등록 됩니다
# true시 모든 디바이스 구글홈 등록은 앱에서 기기추가 Google호환 가능 추가 테스트 [test] HA
expose_by_default: true
# 수정후 테스트 연동은 구글홈 앱에서 기기추가 Google호환 가능 추가 테스트 [test] HA 를 reconnect account 해야합니다
# entity_config: 항목 설정하지 않고 모든 HA둥록기기 설정 합니다
# true시 모든 디바이스로 상기 false 조건 entity_config:d 입력 테스트후 전체 다시등록 전환 변경함
# 이름을 상이한 이름으로 등록후 구글홈 기기추가 아래 name: 짱구 보일러 node-red로 mqtt등록 사례 입니다.20230909_1129_27
#불러올 디 바 이스 지정
entity_config: !include ew11_google_assistant_entity_config.yaml

11qkr님의 댓글
ha-11qkr-69238
https://oauth-redirect.googleusercontent.com/r/ha-11qkr-69238
https://ha.11q.kr/auth/authorize
https://ha.11q.kr/auth/auth/token
이메일
shimss
https://console.cloud.google.com/projectselector2/iam-admin/serviceaccounts?supportedpurview=project
방금만든 프로젝트를 조회선택 해야 한다
서비스계정만들기
ha-11qkr
https://console.cloud.google.com/iam-admin/serviceaccounts?project=ha-11qkr-69238&supportedpurview=project
역할 선택 - 서비스 계정 - 서비스 계정 토큰 생성자
방금만든 ha-11qkr' 프로젝트의 서비스 계정 >>점3개>키관리
키추가
프로젝트 누르면 id를 볼수 있음
ha-11qkr-69238

11qkr님의 댓글

11qkr님의 댓글

♥간단_메모글♥
-
등록일 06.18
-
등록일 05.20
-
등록일 03.12가입인사 드립니다댓글 3
-
등록일 04.15가입 인사드립니다.댓글 8
-
등록일 04.09가입인사.댓글 4
최근글
-
등록일 07.01
-
등록일 07.01
새댓글
-
등록자 ㅇㅇㄹ 등록일 03:22
-
등록자 이모템 등록일 07.05
-
등록자 이모템 등록일 07.04
-
등록자 이모템 등록일 07.04
-
등록자 칸돌히 등록일 07.02
오늘의 홈 현황
QR코드
☞ QR코드 스캔은 kakao앱 자체 QR코드

