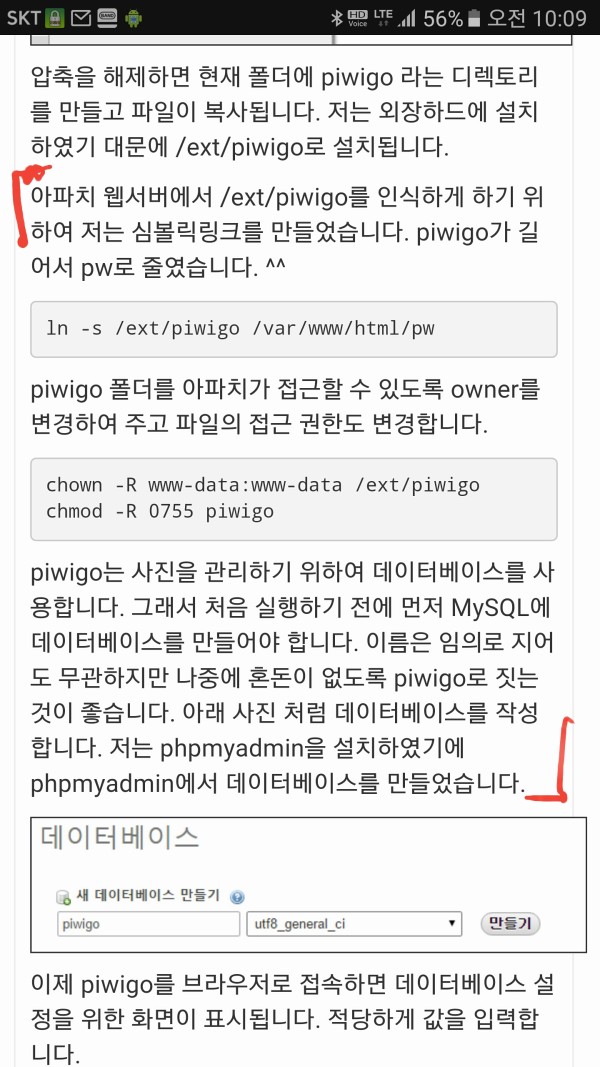
자료펌)별도 PHOTO 폴더 piwigo 설치 mount --bind A B 마운트 심 볼릭 링크 방법
♨ 카랜더 일정 :
본문
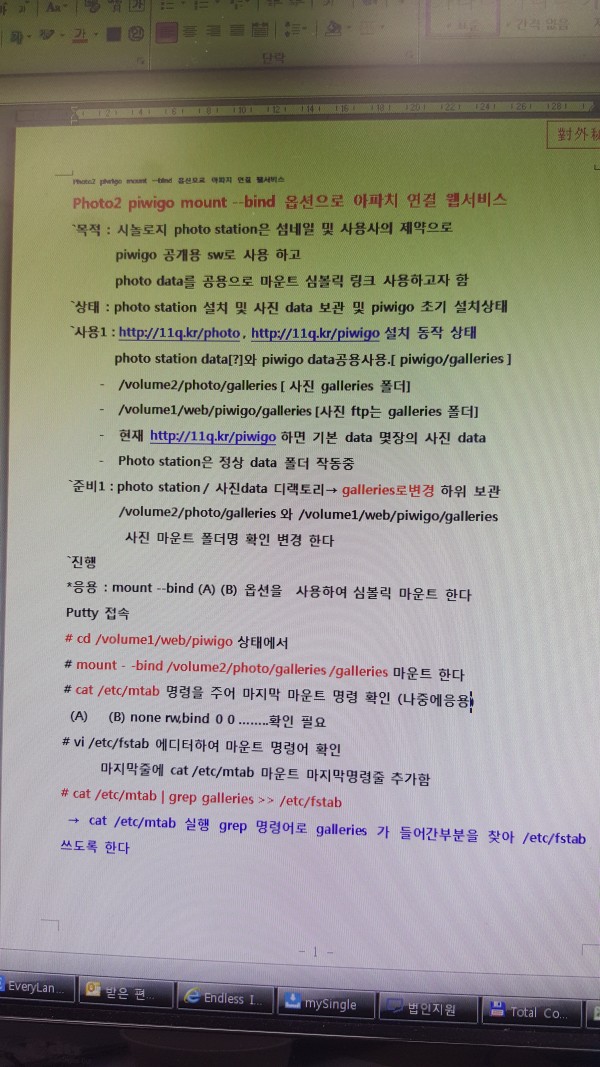
Photo2 piwigo mount --bind 옵션으로 아파치 연결 웹서비스
`목적 : 시놀로지 photo station은 섬네일 및 사용사의 제약으로
piwigo 공개용 sw로 사용 하고
photo data를 공용으로 마운트 심볼릭 링크 사용하고자 함
`상태 : photo station 설치 및 사진 data 보관 및 piwigo 초기 설치상태
`사용1 : https://11q.kr/photo , https://11q.kr/piwigo 설치 동작 상태
photo station data[?]와 piwigo data공용사용.[ piwigo/galleries ]
- /volume2/photo/galleries [ 사진 galleries 폴더]
- /volume1/web/piwigo/galleries [사진 ftp는 galleries 폴더]
- 현재 https://11q.kr/piwigo 하면 기본 data 몇장의 사진 data
- Photo station은 정상 data 폴더 작동중
`준비1 : photo station / 사진data 디랙토리→ galleries로변경 하위 보관
/volume2/photo/galleries 와 /volume1/web/piwigo/galleries
사진 마운트 폴더명 확인 변경 한다
`진행
*응용 : mount --bind (A) (B) 옵션을 사용하여 심볼릭 마운트 한다
Putty 접속
# cd /volume1/web/piwigo 상태에서
# mount - -bind /volume2/photo/galleries /galleries 마운트 한다
# cat /etc/mtab 명령을 주어 마지막 마운트 명령 확인 (나중에응용)
(A) (B) none rw,bind 0 0 ……..확인 필요
# vi /etc/fstab 에디터하여 마운트 명령어 확인
마지막줄에 cat /etc/mtab 마운트 마지막명령줄 추가함
# cat /etc/mtab | grep galleries >> /etc/fstab
→ cat /etc/mtab 실행 grep 명령어로 galleries가 들어간부분을 찾아 /etc/fstab 쓰도록 한다
♠ shimss home 는 컴퓨터자료 windows10, server 2012 2016 r2 xpenology WinPE 헤/시놀로지 NAS 그누보드 아미나,APMS 모바일 pc 홈페이지 일상생활 을 위하여 정보를 찾아 공유 합니다.♠ 출처는 링크 참조 바랍니다.♠ https://11q.kr.com https://11q.kr https://11q.kr http://33.iptime.org
뷰PDF 1,2
office view
관련자료
-
링크
댓글목록

shimss11q님의 댓글
mount --bind A B 명령어로 심볼릭마운트하기\r\nhttp://thirdnsov.tistory.com/m/8

shimss11q님의 댓글
PhotoStation 폴더 추가하기\r\nServer/Nas 6주 전\r\n\r\n \r\nXpenology에서 포토스테이션을 설치하면 생성되는 Photo 기본 폴더만이 포토스테이션에서 인식하는 폴더이다.\r\n따라서 다른 볼륨(다른 디스크나, USB외장하드등등..)에 있는 사진이나 , 혹은 현재 볼륨의 Photo 외의 다른 폴더를\r\n포토스테이션에서 볼 수 있도록 하기 위해서는 몇가지를 설정해주어야 한다.\r\n \r\n참고\r\nhttp://www.theghostbit.com/2016/01/sharing-my-adobe-lightroom-synology-nas.html\r\n\r\n1. photo 폴더에 추가할 폴더 생성(저는 PIC이라고 해보겠습니다. 만든 영상의 것과 다를 수있음.. 대소문자 가림)\r\n\r\n2. 추가할 폴더가 /volume2/mypic 이라면\r\nmount --bind /volume2/mypic /volume1/photo/PIC\r\n\r\n\r\n3. 추가할 폴더마운트를 서비스로 올리기\r\n1)sh파일 생성(윈도우의 배치파일 개념)\r\n재부팅하면 마운트포인트가 해제되므로 다음과같이 sh 파일을 만들어서 올립니다.\r\n 메모장으로 만들어서 WINSCP를 통해 SSH로 올리거나\r\n터미널로 접속해서 바로 vi 편집기로 만들거나 하면됩니다.\r\n마운트용 배치파일(sh)의 위치는 다음과 같습니다.\r\n/usr/syno/etc/rc.d\r\n파일명은 S00mountpic.sh로 만들어보고, 내용은 다음과 같습니다.\r\n\r\n#!/bin/sh\r\nmount --bind /volume2/mypic /volume1/photo/mypic\r\n\r\n2)실행권한 주기\r\n만든 S00moutpic.sh파일이\r\n나스에서 서비스로 실행되도록 권한을 줍니다.\r\n chmod +x /usr/syno/etc/rc.d/S00mountpic.sh\r\n\r\n4.웹에서 접근시 포토스테이션에서 추가한 폴더 및 하위 폴더(파일)포함해서 보이도록 -R 옵션으로 줍니다.\r\n권한 수정\r\nchmod 777 -R /volume1/photo/PIC\r\n\r\n5. 색인활성화\r\nsynoindex -A /volume1/photo/PIC\r\n혹은 제어판에서 미디어색인에서 한번 해주면 이후로는 추가되는 이미지들에 대해 자동으로 잘 색인되는듯 합니다.\r\n이게 버그 같은데 이런 문제때문에\r\n패키지센터에서 포토스테이션을설치하기 전에\r\n미리 photo폴더를 제어판-공유폴더에서 생성하는 이유가 있기도합니다. (만든 영상에서는 그렇게 하지 않았습니다)\r\n\r\n링크페이지에 있는\r\nsynoindex -R /volume1/photo/PIC/`date +"%Y"`/`date +"%Y-%m-%d"`\r\n은 그래서 사실 하지 않아도 될부분 같습니다.\r\n\r\n음성녹음까지 했는데 사운드체크를 안했던지,, 녹음이 안되었네요.\r\n \r\nhttp://3jini.tistory.com/70

shimss11q님의 댓글
길찾는 사람\r\n검색 http://m.egloos.zum.com/cooltrash/v/3176496\r\nPiwigo 설치 및 약간의 편의성 개선 Tip\r\n길잃은아이|2016.05.24 09:16\r\n-작게+크게\r\n현재 HP54L에 xpenology를 설치하여 개인용 Nas를 운영하고 있으며, 외부접속은 iptime의 DDNS를 활용하고 있다.\r\n\r\n나스에 저장된 사진으로 사진 갤러리를 운영하는 방안으로 가장 쉬운 방법은 시놀로지에서 제공하는 photo station을 사용하는 것이다. 웹서비스 설정하고 패키지 설치하고 사진파일 라이브러리 폴더만 지정해주면 끝. 디자인도 나쁘지 않고 모바일 앱 연동성도 좋다. \r\n\r\n다만 권한부분과 자유도가 떨어지는 점이 있어서 piwigo를 설치해봤다. \r\n\r\npiwigo의 장점은 1.설치가 쉽다 2.사진 올리기가 쉽다. (폴더구성해서 올리면 그대로 앨범 구조가 됨 3. 플러그인 적용이 쉽다. 즉 쉽다. \r\n\r\n설치는 다음 블로그를 참조했다. \r\n작성자 : 앤드류 > 제9장 Synology(Xpenology) phpMyAdmin & piwigo 웹갤러리 설치및 설정\r\n\r\n\r\n단점은 1.한글로 된 사진파일 및 폴더는 인식하지 못한다. 2.폴더구조 그대로 올리다 보니 시스템에서 자동 생성된 쓰레기 폴더가 앨범으로 생성된다. (시놀로지의 경우 @eaDir)\r\n\r\n하지만 opensource의 장점이라고 해야되나... 단점에 대해서는 해결책이 있다.\r\n1. piwigo에서 한글 폴더 및 한글 파일 사용하기\r\n\r\n2. piwigo에서 원치않는 폴더 @eaDir 업로드 방지\r\n파일 경로 : piwigo/admin/include/functions.php \r\n569라인에 exclude 폴더 명 추가\r\nfunction 명 : get_fs_directoried\r\n수정 내용 : sync_exclude_folders\r\n폴더명을 추가. \r\n\r\n카카오톡이나 페북에 글을 올릴때 미리보기 링크를 띄워주는 기능이 있다. html page의 header에 meta정보를 이용하도록 되어있고 OpenGraph 규약을 사용한다. 줄여서 ogtag \r\n\r\n인터넷에는 주로 index.html 파일의 header에 추가하면 된다고 하는데 .. piwigo는 구조상 index.html파일이 없어서.. 한참을 헤맸다\r\n\r\ntheme/자신이 선택한 테마 폴더/template/header.tpl 파일의 header부에 삽입하면 된다. \r\n참 쉽죠? \r\n\r\ndynamic하게 image를 불러오는 건 좀 더 확인해봐야한다. \r\n\r\n이 와중에 페북은.. 자동으로 썸네일중 하나를 가져오는걸 보고 소오름..; \r\n일해라 카톡

shimss11q님의 댓글
Change Apache owner on Synology\r\nDecember 1, 2012 by Opicron with no replies yet\r\nTags: apache owner telnet\r\nI am doing some web development on my Synology server and I found out that files created by Apache have the owner nobody from the group nobody. This causes the issue that files uploaded by apache ownership are locked from editing through guest or other accounts.\r\n\r\nTo solve this I could do the following when I need to edit files locally:\r\n\r\n\r\nchown -R guest:users * //editable through guest account\r\nchown -R nobody:nobody * //reset owner after edit (default apache owner)\r\n1\r\n2\r\nchown -R guest:users * //editable through guest account\r\nchown -R nobody:nobody * //reset owner after edit (default apache owner)\r\nHowever I hate doing this kind of thing because it seems counter productive. Instead I have changed the Apache configuration files making its default user guest:users. The configuration files reside in the following folder: usr/syno/apache/conf. You can reach it by logging in through telnet as root.\r\n\r\nAfterwards you are able to edit the configuration file httpd.conf-sys with the following command:\r\n\r\n\r\nvi http.conf-sys\r\n1\r\nvi http.conf-sys\r\napache-change-user-sysFind the text listed in the picture to the left (user and group already changed). Then type /a to get into the edit mode of the editor and adjust the user and group. To save the adjustments type :w and the changed will be saved.\r\n\r\nWhen done editing dont forget to chown -R guest:users * your web folder and reboot the Synology.\r\nhttp://opicron.eu/wp/snippet/change-apache-file-owner-on-synology/#respond

shimss11q님의 댓글
PIWIGO/GALLERIES 폴도의 @eaDIR 폴더 자료 숨기기 다음 추가( and $node != '@eaDir')\r\ndsm6 Piwigo 설치 : https://11q.kr/piwigo 실행\r\n동기화후 @eaDIR 폴더가 생성 되고 앨범에서 보이지 않게하기 (방법2) \r\n파일수정 : w:\piwigo\admin\site_reader_local.php \r\nelse if (is_dir($path.'/'.$node)\r\n and $node != 'pwg_high'\r\n and $node != 'pwg_representative'\r\n and $node != 'pwg_format'\r\n and $node != '@eaDir' \r\n and $node != 'thumbnail' )\r\n----------------------------

shimss11q님의 댓글

shimss11q님의 댓글
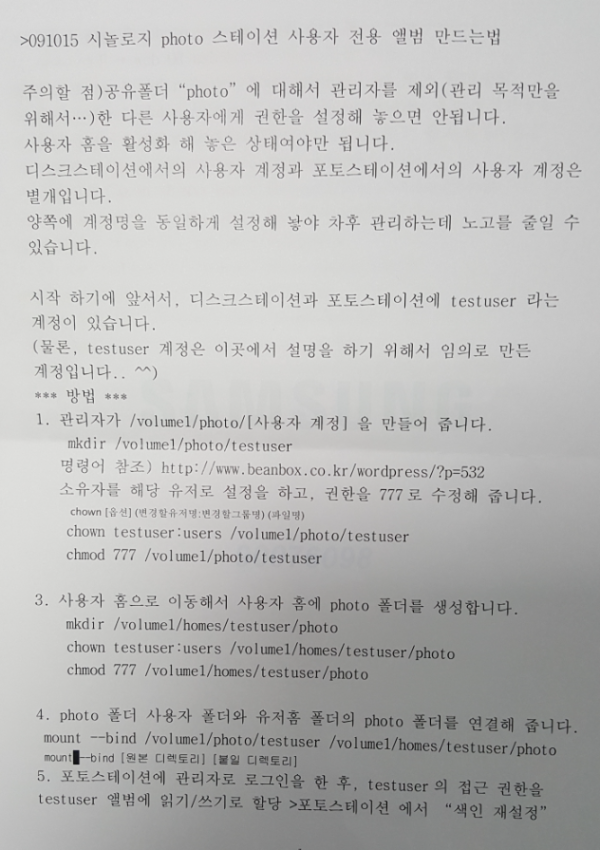
>091015 시놀로지 photo 스테이션 사용자 전용 앨범 만드는법\r\nhttps://fotobank.wordpress.com/2009/10/14/091015-시놀로지-photo-스테이션-사용자-전용-앨범-만드는법/\r\n\r\n포토 스테이션에서 사용자 전용 앨범을 만드는 방법입니다..\r\n우선 주의할 점은 공유폴더 “photo”에 대해서 관리자를 제외(관리 목적만을 위해서…)한 다른 사용자에게 권한을 설정해 놓으면 안됩니다.\r\n(사용자 전용 앨범의 의미가 없어 지니까요..)\r\n%% 이 문서는 디스크 스테이션에서 사용자 홈을 활성화 해 놓은 상태여야만 됩니다.\r\n[참고] 디스크스테이션에서의 사용자 계정과 포토스테이션에서의 사용자 계정은 별개입니다.\r\n따라서, 양쪽에 계정명을 동일하게 설정해 놯야 차후 관리하는데 노고를 줄일 수 있습니다.\r\n시작 하기에 앞서서, 디스크스테이션과 포토스테이션에 testuser 라는 계정이 있습니다.\r\n(물론, testuser 계정은 이곳에서 설명을 하기 위해서 임의로 만든 계정입니다.. ^^)\r\n\r\n*** 방법 ***\r\n1. 관리자가 /volume1/photo/[사용자 계정] 을 만들어 줍니다.\r\n mkdir /volume1/photo/testuser\r\n2. 위에서 만들어 준 폴더의 소유자를 해당 유저로 설정을 하고, 권한을 777로 수정해 줍니다.\r\n chown testuser:users /volume1/photo/testuser\r\n chmod 777 /volume1/photo/testuser\r\n3. 사용자 홈으로 이동해서 사용자 홈에 photo 폴더를 생성합니다.\r\n mkdir /volume1/homes/testuser/photo\r\n chown testuser.:users /volume1/homes/testuser/photo\r\n chmod 777 /volume1/homes/testuser/photo\r\n4. photo 폴더에서 만들어 놓은 사용자 폴더와 유저홈 폴더의 photo 폴더를 연결해 줍니다.\r\n mount -o bind /volume1/photo/testuser /volume1/homes/testuser/photo\r\n5. 포토스테이션에 관리자로 로그인을 한 후, testuser의 접근 권한을 testuser 앨범에 읽기/쓰기 로 할당합니다.\r\n (물론 testuser 앨범에 다른 사용자에게 읽기 권한을 주면 안되겠죠 ^^)\r\n\r\n그러면, 작업은 모두 마쳤습니다.\r\ntestuser 로 FTP 접속을 해서 /home/photo 폴더로 이동해서 사진을 올려 봅니다.\r\n(DS에서 미리보기 이미지 생성이 좀 늦으면, 관리 페이지->포토스테이션 에서 “색인 재설정”을 눌러 줍니다.)\r\nDS에서 미리보기 이미지를 만들어 준 다음에, 웹브라우저로 포토스테이션을 열어 봅니다.\r\n(포토스테이션 주소 : http://192.168.0.3/photo/)\r\n – 로그인을 하지 않았으니까.. testuser 라는 앨범은 보이지 않을 것입니다..\r\n포토스테이션에서 testuser로 로그인을 해 보면, 위에서 작업했던 testuser 라는 앨범이 보일 것입니다

shimss11q님의 댓글
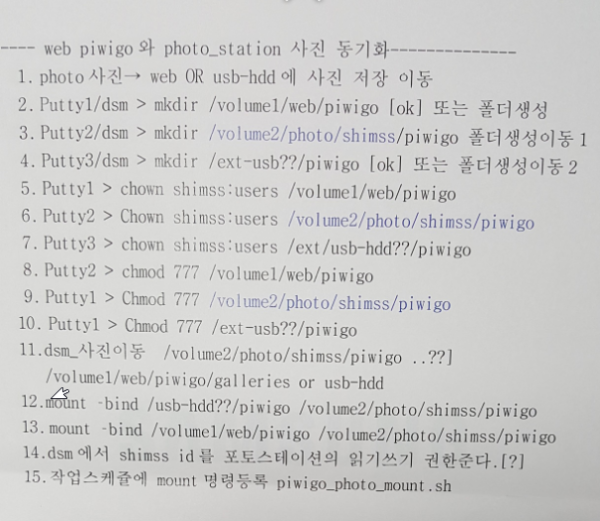
1) photo/galleries 디렉토리에 사진을 모은다 -> photo 사진첩에서 사진볼수 있는 상태\r\n2) photo/galleries 와 web/piwigo/galleries 마운트 하면 piwigo에서 사진을 같이 볼수 있다\r\n##PUTTY에서 다음 명령어 실행 쓰기및 소유권을 준다\r\nchown -R shimss:users /volume2/photo/galleries\r\nchown -R shimss:users /volume1/web/piwigo/galleries\r\nchmod -R 777 /volume2/photo/galleries\r\nchmod -R 777 /volume1/web/piwigo/galleries\r\n## 폴더를 마운트 한다\r\nmount --bind /volume2/photo/galleries /volume1/web/piwigo/galleries\r\n\r\n3) 정상적으로 되면BOOTING시 마운트 되게 한다

shimss11q님의 댓글
시놀로지 @eaDir Directories on Synology NAS 제거하기 정보\r\nHow to Find and Remove @eaDir Directories on Synology NAS\r\nhttps://www.flynsarmy.com/2013/09/how-to-find-and-remove-eadir-directories-on-synology-nas/\r\nPosted September 26th, 2013 in Linux\r\nIf you’ve installed the MediaServer or PhotoStation packages on your Synology NAS you’ve probably noticed @eaDir directories popping up everywhere. These are “hidden” folders equivalent to thumbs.db on Windows where the package stores thumbnail files associated with iTunes support. If you’re not using iTunes you don’t need these directories. You can remove them in two steps:\r\nDisable the Service Creating Them\r\n\r\nSSH in as root and run the following:\r\n1\r\n2\r\ncd /usr/syno/etc.defaults/rc.d/\r\nchmod 000 S66fileindexd.sh S66synoindexd.sh S77synomkthumbd.sh S88synomkflvd.sh S99iTunes.sh\r\nRemove the existing directories\r\n\r\nAgain in SSH use the following to locate them (cd to your volume root first):\r\n1\r\nfind . -type d -name "@eaDir"\r\nand if you’re feeling adventurous you can automatically delete them like so:\r\n1\r\nfind . -type d -name "@eaDir" -print0 | xargs -0 rm -rf

shimss11q님의 댓글
[시놀리지] 부팅시 자동 실행 스크립트 경로\r\n후크선장\r\n11월 02일 (13:53:42) | 조회 : 1335 댓글 : 0 추천 : 0\r\n \r\n리눅스에서 흔히들 /etc/rc.local 을 만들어서 사용하시죠?\r\n\r\n시놀리지에서 위의 경로로 사용해 보니 동작하지 않아서 검색해 보았더니\r\n\r\n/usr/syno/etc/rc.d 에 원하는 스크립트를 S99파일.sh 를 넣고\r\nchmod 700 S99파일명.sh 을 해주면 리부팅시마다 처리된다고 합니다.\r\n\r\n이거 설정을 몇달째 안해놔서 가끔 부팅할때마다 /root 에 넣어둔 스크립트를 실행하고 있었네요\r\n\r\n아래 출처의 내용도 옮겨두었는데 저 같은 경우는 다른 폴더는 안되고 /usr/syno/etc/rc.d/S99파일명.sh 이것만 되더라구요\r\n\r\n----------------------------------------------\r\nhttp://forum.synology.com/enu/viewtopic.php?f=77&t=51025\r\n\r\nOn startup post-edit, scripts run in this order:\r\n1. /usr/local/etc/rc.d/S[00->99]scriptname.sh start\r\nThese are all of the Synology Scripts.\r\n\r\n2. /etc/rc.optware start (executed by rc.local)\r\nThis script mounts your /opt with your /volume1/@optware\r\n\r\n3. /usr/local/etc/rc.d/optware.sh start (executed by unknown syno script)\r\nThis now rechecks your mounts on startup, and executes /opt/etc/rc.optware start.\r\n\r\n4. /opt/etc/rc.optware start (executed by /usr/local/etc/rc.d/optware.sh)\r\nThis executes a /opt/etc/init.d/S[00->99]scriptname.sh start\r\n\r\n5. /opt/etc/init.d/S[00->99]scriptname.sh start (executed by /opt/etc/rc.optware)\r\nThis is where optware packages will install their startup scripts. This is the correct place.\r\n\r\nOn shutdown, scripts run in this order:\r\n1. /usr/local/etc/rc.d/optware.sh stop (executed by unknown syno script)\r\nThis script does some logging on umount, then executes /opt/etc/rc.optware stop.\r\n\r\n2. /opt/etc/rc.optware stop (executed by /usr/local/etc/rc.d/optware.sh)\r\nThis executes a /opt/etc/init.d/K[00->99]scriptname.sh stop\r\n\r\n3. /opt/etc/init.d/K[00->99]scriptname.sh stop (executed by /opt/etc/rc.optware)\r\nThis is where optware packages will install their shutdown scripts.\r\n\r\n4. /usr/syno/etc/rc.d/S[00->99]scriptname.sh stop \r\nThese are all of the Synology Scripts.

shimss11q님의 댓글
piwigo usb_hdd 마운트 home user 설정\r\nmount --bind /volumeUSB1/usbshare1-1/DSM6_ORG/piwigo_photo_all /volume1/homes/shimss/www/pwg/galleries/ftp/FTP_LOCK_photo/piwigo_photo_all

shimss11q님의 댓글
작업설정 마운트 스케줄 dsm만들기 \r\n부트업으로 마운트 명령어 입력 (dsm 6.02 up5) 실행 됩니다.\r\nmount --bind /volumeUSB1/usbshare1-1/DSM6_ORG/piwigo_photo_all /volume1/homes/shimss/www/pwg/galleries/ftp/FTP_LOCK_photo/piwigo_photo_all

shimss11q님의 댓글
백업본 photo와 piwigo data 마운트 하기\r\nmount --bind /volumeUSB1/usbshare/shimss_nas_backup/photo/shimss_photo_lock/ /volume1/web/piwigo/galleries/ftp_up/shimss_photo_lock/

shimss11q님의 댓글
PhotoStation 폴더 추가하기\r\nhttp://3jini.tistory.com/70\r\nXpenology에서 포토스테이션을 설치하면 생성되는 Photo 기본 폴더만이 포토스테이션에서 인식하는 폴더이다.\r\n\r\n따라서 다른 볼륨(다른 디스크나, USB외장하드등등..)에 있는 사진이나 , 혹은 현재 볼륨의 Photo 외의 다른 폴더를\r\n\r\n포토스테이션에서 볼 수 있도록 하기 위해서는 몇가지를 설정해주어야 한다.\r\n\r\n \r\n\r\n참고\r\nhttp://www.theghostbit.com/2016/01/sharing-my-adobe-lightroom-synology-nas.html\r\n\r\n\r\n\r\n1. photo 폴더에 추가할 폴더 생성(저는 PIC이라고 해보겠습니다. 만든 영상의 것과 다를 수있음.. 대소문자 가림)\r\n\r\n\r\n\r\n2. 추가할 폴더가 /volume2/mypic 이라면\r\nmount --bind /volume2/mypic /volume1/photo/PIC\r\n\r\n\r\n\r\n3. 추가할 폴더마운트를 서비스로 올리기\r\n1)sh파일 생성(윈도우의 배치파일 개념)\r\n재부팅하면 마운트포인트가 해제되므로 다음과같이 sh 파일을 만들어서 올립니다.\r\n 메모장으로 만들어서 WINSCP를 통해 SSH로 올리거나\r\n\r\n터미널로 접속해서 바로 vi 편집기로 만들거나 하면됩니다.\r\n마운트용 배치파일(sh)의 위치는 다음과 같습니다.\r\n/usr/syno/etc/rc.d\r\n\r\n파일명은 S00mountpic.sh로 만들어보고, 내용은 다음과 같습니다.\r\n\r\n\r\n\r\n#!/bin/sh\r\nmount --bind /volume2/mypic /volume1/photo/mypic\r\n\r\n\r\n\r\n2)실행권한 주기\r\n만든 S00moutpic.sh파일이\r\n나스에서 서비스로 실행되도록 권한을 줍니다.\r\n chmod +x /usr/syno/etc/rc.d/S00mountpic.sh\r\n\r\n\r\n\r\n4.웹에서 접근시 포토스테이션에서 추가한 폴더 및 하위 폴더(파일)포함해서 보이도록 -R 옵션으로 줍니다.\r\n권한 수정\r\nchmod 777 -R /volume1/photo/PIC\r\n\r\n\r\n\r\n5. 색인활성화\r\nsynoindex -A /volume1/photo/PIC\r\n혹은 제어판에서 미디어색인에서 한번 해주면 이후로는 추가되는 이미지들에 대해 자동으로 잘 색인되는듯 합니다.\r\n이게 버그 같은데 이런 문제때문에\r\n패키지센터에서 포토스테이션을설치하기 전에\r\n미리 photo폴더를 제어판-공유폴더에서 생성하는 이유가 있기도합니다. (만든 영상에서는 그렇게 하지 않았습니다)\r\n\r\n\r\n\r\n링크페이지에 있는\r\nsynoindex -R /volume1/photo/PIC/`date +"%Y"`/`date +"%Y-%m-%d"`\r\n은 그래서 사실 하지 않아도 될부분 같습니다.\r\n\r\n출처: http://3jini.tistory.com/70 [3Jini's Enjoy]

11qkr님의 댓글

11qkr님의 댓글

11qkr님의 댓글
mount --bind /volume2/homes/shimss/shimss/Drive/Moments/Mobile /volume1/web/piw/galleries/ftp_lock/link
umount /volume1/web/piw/galleries/ftp_lock/link
♥간단_메모글♥
-
등록일 07.28
-
등록일 06.18
-
등록일 05.20
-
등록일 03.12가입인사 드립니다댓글 3
-
등록일 04.15가입 인사드립니다.댓글 8
최근글
-
등록일 08.20
-
등록일 08.17
새댓글
-
등록자 오수야 등록일 08.20
-
등록자 삽질황제 등록일 08.20
-
등록자 songjk 등록일 08.20
-
등록자 11qkr 등록일 08.20
-
등록자 11qkr 등록일 08.20
오늘의 홈 현황
QR코드
☞ QR코드 스캔은 kakao앱 자체 QR코드


 ● 기초작업) 시놀로지 인증서 설치 방법 <Let's Encrypt > _조회수_댓글수(
6234
 ● 시놀로지 기본작업) 도메인 구매 정보, 가격비교 총정리! _조회수_댓글수(
6052
 ● 시놀로지 서버 공유서버 간단히 접속방법 _조회수_댓글수(
5480